31
EntrEtIEn
2928
CARBURETOR ADJUSTMENT
The carburetor is a vital part of the engine. Adjusting should be left to a
dealer with the professional knowledge, specialized date, and equipment to
do so properly.
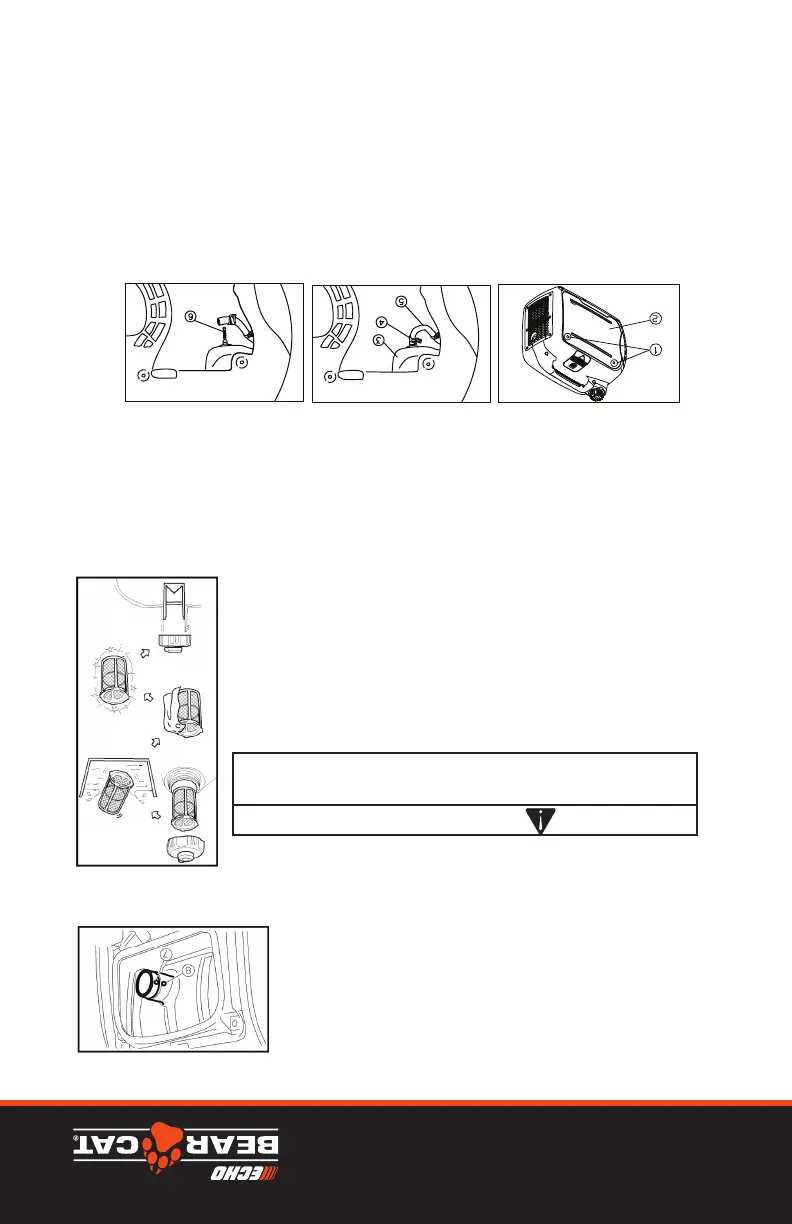
ENGINE OIL REPLACEMENT
1. Place the generator on a level
surface and warm up the engine
for several minutes. Stop the
engine and turn the 3 in 1 switch
knob and fuel tank cap air vent
knob to “OFF”.
2. Remove the screw and then
remove the cover .
3. Remove the oil filler cap
4. Place an oil pan under the engine.
Tilt the generator to drain the oil
completely.
5. Replace the generator to a level
surface.
①
②
③
.
Inverter Generator Owner's Manual
Inverter Generator Owner's Manual
SPARK PLUG INSPECTION
Standard spark plug:
E6TC/E6RTC
BP6HS / BPR6HS (NGK)
L87YC /R L87YC (CHAMPION)
W16FP / W16FPR (DENSO)
W6BC / WR6BC (BOSCH)
If needing EMC Certification,
engine must use E6RTC
spark plug
Gap: 0.6-0.7mm (0.024-0.028in)
5. Install the spark plug.
TIP:
If a torque wrench is not
available when installing a
spark plug, a good estimate of
the correct torque is 1/4-1/2
turn past finger tight. However,
the spark plug should be
tightened to the specified
torque as soon as possible.
6. Install the spark plug cap and
spark plug cover.
Maintenance Maintenance
The spark plug is important engine
components, which should be
checked periodically.
1. Remove the cap and spark
plug cap Insert the tool
through the hole from the outside
of the cover.
2. Insert the handlebar in to the
tool and turn it
counterclockwise to remove the
spark plug.
3. Check for discoloration and
remove any carbon deposits.
The porcelain insulator around
the center electrode of spark
plug should be a medium to
light tan color.
4. Check the spark plug type and gap.
①
②, ④
③
④
Torque: 20.0 N.m
!
WARNING
.
Avoid draining the
engine oil immediately
after stopping the
engine. The oil is hot
and should be handled
with care to avoid
burns
NOTICE
Do not tilt the generator
when adding engine oil.
This could result in
overfilling and damage
to the engine.
3332
Inverter Generator Owner's Manual
Maintenance
1. Remove the screws and then
pull outward on the areas of the
cover shown.
2. Loosen the bolt and then
remove the muffler cap , the
muffler screen and spark
arrester .
3. Clean the carbon on the muffler
screen by wire brush.
①
②
③
④
⑤
⑥
,
!
WARNING
4. Check the muffler screen and
spark arrester, replace if it
damage.
5. Install spark arrester.
NOTICE
When cleaning, use the
wire brush lightly to
avoid damaging or
scratching the muffler
screen and spark
arrester.
If using in areas prone
to fires such as forest
or woods, never use
an engine without an
appropriate spark
arrester.
Align the spark arrester
projection with the hole in
the muffler pipe.
TIP:
⑦⑧
6. Install the muffler screen and the
muffler cap.
7. Install the cover and tighten the
screws.
Inverter Generator Owner's Manual
Maintenance
1. Remove the fuel tank cap
and filter.
2. Clean the filter with gasoline.
3. Wipe the filter and install it.
4. Install the fuel tank cap.
!
WARNING
Never use gasoline
while smoking or in the
vicinity of an open
flame.
FUEL TANK FILTER
Be sure the fuel tank cap is
tightened securely.
1. Remove the screws , and then
remove the cover drain the
fuel .
2. Hold and move up the clamp ,
then take off the hose from
the tank.
3. Take out the fuel filter .
4. Clean the filter with gasoline.
5. Dry the filter and replace.
6. Install the hose and clamp, then
open the fuel valve to check for
leaks.
7. Install the cover and tighten the
screws.
①
②
③
④
⑤
⑥
,
FUEL FILTER
CONSEIL: Alignez la partie saillante du pare-
Etincelles (7) avec le trou (8) dans le tuyau
d’échappement.
6. Installez l’écran du silencieux et le bouchon du
silencieux.
7. Installez le couvercle et serrez les vis.
FILTRE DU RÉSERVOIR DE CARBURANT
ATTENTION
• Ne manipulez jamais de l’essence en fumant ou à
proximité d’une flamme nue.
1. Retirez le bouchon du réservoir de carburant et le
filtre.
2. Nettoyez le filtre avec à essence.
3. Essuyez le filtre et remettez-le en place.
4. Remettez le bouchon du réservoir de carburant en
place.
Assurez-vous que le bouchon du réservoir de
carburant est bien serré.
FILTRE À CARBURANT
1. Retirez les vis (1), puis enlevez le capot (2) et vidangez le carburant
(3).
2. Saisissez et déplacez le collier de serrage vers le haut (4), puis retirez
le flexible (5) du réservoir.
3. Retirez le filtre à carburant (6).
4. Nettoyez le filtre avec de l’essence.
5. Séchez le filtre et remettez-le en place dans le réservoir.
6. Installez le tube et le collier de serrage, puis ouvrez la vanne de
carburant pour vérifier l’absence de fuite.
7. Installez le couvercle et serrez les vis.