29
3130
MUFFLER SCREEN
!
WARNING
The engine and muffler will be very hot after the engine
has been run. Avoid touching the engine and muffler
while they are still hot with any part of your body or
clothing during inspection or repair.
Inverter Generator Owner's ManualInverter Generator Owner's Manual
Maintenance Maintenance
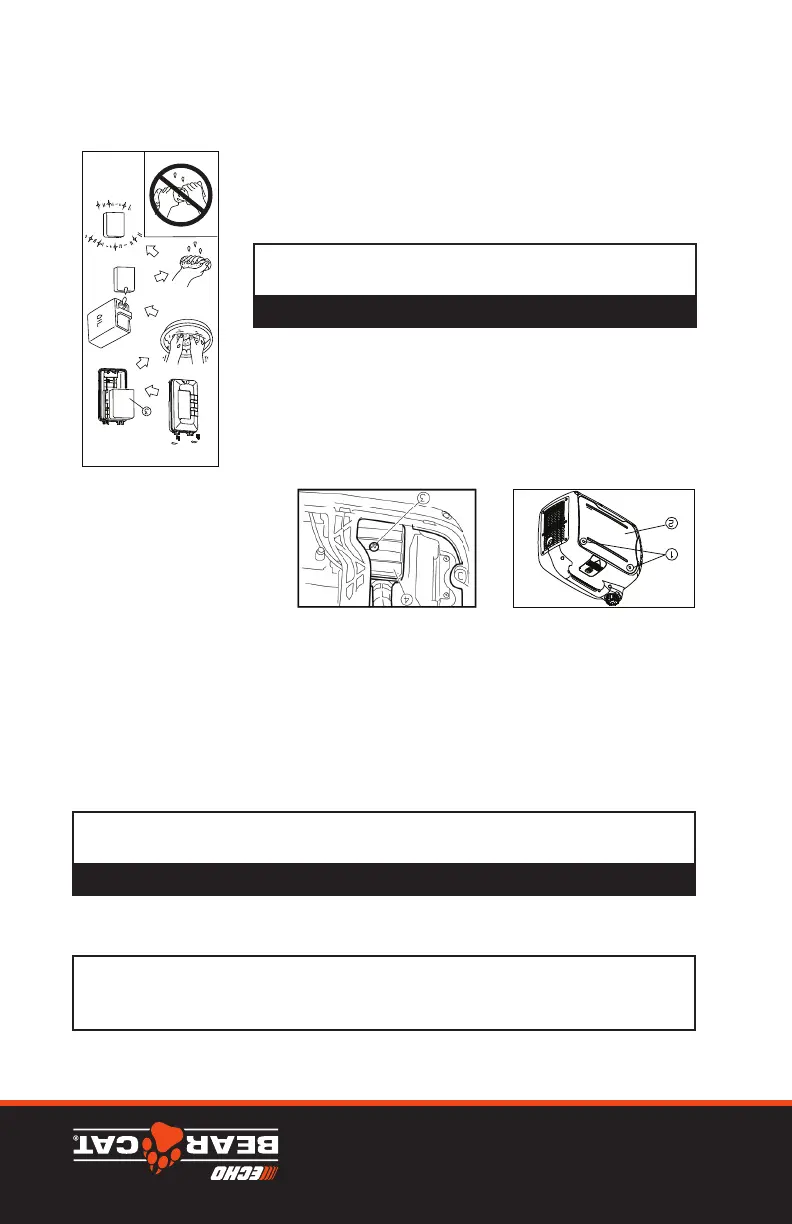
AIR FILTER
Be sure the foam element seals
properly against the air filter
holder to avoid air leakage.
The engine should never run
without the foam element;
excessive piston and cylinder
wear may result.
TIP:
6. Insert the foam element into the
air filter case.
7. Install the air filter case cover in
its original position and tighten
the screw.
8. Install the cover and tighten the
screws
6. Add engine oil to the upper level.
Recommended engine oil:
SAE 10W -30
Recommended engine oil grade:
API Service SE type or higher
Engine oil quantity:
0.35 L (0.42 US qt, 0.35 lmp qt)
7. Wipe the cover clean, and wipe up
any spilled oil.
8. Install the oil filler cap.
9. Install the cover and tighten the
screws.
NOTICE
Be sure no foreign
material enters the
crankcase.
1. Remove the screw and then
remove the cover .
2. Remove the screw and then
remove the air filter case
cover .
①
②
③
④
3. Remove the foam element .
4. Wash the foam element in solvent
and dry it.
5. Oil the foam element and squeeze
out excess oil. The foam element
should be wet but not dripping.
NOTICE
Do not wring out the
foam element when
squeezing it. This could
cause it to tear.
EntrEtIEn
2928
CARBURETOR ADJUSTMENT
The carburetor is a vital part of the engine. Adjusting should be left to a
dealer with the professional knowledge, specialized date, and equipment to
do so properly.
ENGINE OIL REPLACEMENT
1. Place the generator on a level
surface and warm up the engine
for several minutes. Stop the
engine and turn the 3 in 1 switch
knob and fuel tank cap air vent
knob to “OFF”.
2. Remove the screw and then
remove the cover .
3. Remove the oil filler cap
4. Place an oil pan under the engine.
Tilt the generator to drain the oil
completely.
5. Replace the generator to a level
surface.
①
②
③
.
Inverter Generator Owner's Manual
Inverter Generator Owner's Manual
SPARK PLUG INSPECTION
Standard spark plug:
E6TC/E6RTC
BP6HS / BPR6HS (NGK)
L87YC /R L87YC (CHAMPION)
W16FP / W16FPR (DENSO)
W6BC / WR6BC (BOSCH)
If needing EMC Certification,
engine must use E6RTC
spark plug
Gap: 0.6-0.7mm (0.024-0.028in)
5. Install the spark plug.
TIP:
If a torque wrench is not
available when installing a
spark plug, a good estimate of
the correct torque is 1/4-1/2
turn past finger tight. However,
the spark plug should be
tightened to the specified
torque as soon as possible.
6. Install the spark plug cap and
spark plug cover.
Maintenance Maintenance
The spark plug is important engine
components, which should be
checked periodically.
1. Remove the cap and spark
plug cap Insert the tool
through the hole from the outside
of the cover.
2. Insert the handlebar in to the
tool and turn it
counterclockwise to remove the
spark plug.
3. Check for discoloration and
remove any carbon deposits.
The porcelain insulator around
the center electrode of spark
plug should be a medium to
light tan color.
4. Check the spark plug type and gap.
①
②, ④
③
④
Torque: 20.0 N.m
!
WARNING
.
Avoid draining the
engine oil immediately
after stopping the
engine. The oil is hot
and should be handled
with care to avoid
burns
NOTICE
Do not tilt the generator
when adding engine oil.
This could result in
overfilling and damage
to the engine.
6. Ajoutez de l’huile moteur jusqu’au repère supérieur.
Huile moteur recommandée: SAE SJ 15W-40
Qualité d’huile moteur recommandée: qualité API SE ou meilleure
Quantité d’huile moteur: 0.35L
7. Nettoyez et essuyez le couvercle puis essuyez toute huile renversée.
AVIS
• Veillez à ce qu’aucun matériau étranger ne pénètre dans le carter du
moteur.
8. Installez le bouchon de remplissage d’huile.
9. Installez le couvercle et serrez les vis.
FILTRE À AIR
1. Retirez les vis (1), puis enlevez le couvercle (2).
2. Retirez la vis (3), puis enlevez le couvercle du boîtier du filtre à air (4).
3. Retirez la cartouche en mousse (5).
4. Lavez la cartouche en mousse dans du solvant, puis faites-la sécher.
5. Huilez la cartouche en mousse, puis pressez l’excédent d’huile. La
cartouche en mousse doit être humide, mais ne doit pas former de
gouttes.
AVIS
• Pressez la cartouche en mousse, mais ne
l’essorez pas. Cela pourrait la déchirer.
6. Insérez la cartouche en mousse dans le boîtier
du filtre à air.
CONSEIL: Veillez à ce que la surface de
scellement de la cartouche en mousse se colle bien
contre le filtre à air de sorte qu’il n’y ait aucune fuite
d’air.