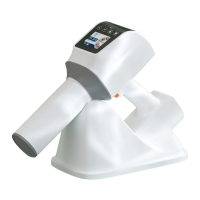
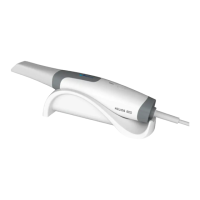
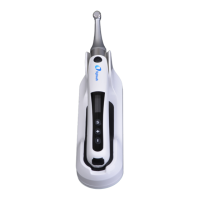
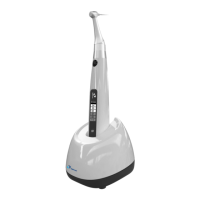
The HyperLight-G is a hand-held dental X-ray system designed for intra-oral radiography in clinical settings. It is intended for use by trained and qualified dentists or dental technicians for both adult and pediatric subjects as an extraoral diagnostic dental X-ray source to produce X-ray images using intraoral image receptors. This device can be used in hospital environments, clinics, or dental offices where appropriate safeguards are implemented, and not used in the oxygen-rich environment.
Function Description:
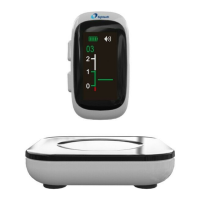
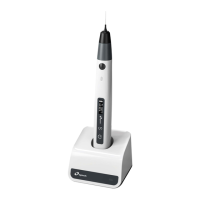
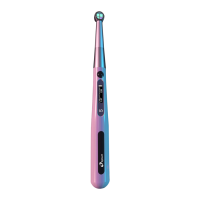
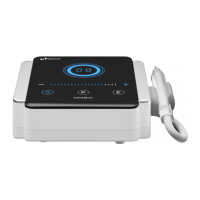
The HyperLight-G is a portable X-ray system that generates X-rays for dental imaging. It operates with a lithium-ion battery and features a user-friendly control panel for selecting exposure parameters. The system is designed to be used with either a digital sensor or phosphor plate, or traditional film, to capture X-ray images. It includes a backscatter shield (optional) for radiation protection and can be operated with a remote control switch (optional). The device provides visual feedback on its status through a screen display, indicating battery level, machine lock status, exposure parameters, and various alerts such as "Drop Detected" or "Abnormal exposure time."
Important Technical Specifications:
- Model: HyperLight-G
- Manufacturer: Changzhou Sifary Medical Technology Co., Ltd.
- Software version: HLG-1
- Total Weight: 3.5kg ± 20%
- Charger power supply: ~100-240V, 50/60Hz
- Power supply: Lithium ion battery: 14.8V, 2000mAh ± 10%
- Input AC Current: 500mA max
- Charger power output: 20V --- 0.9A
- Ray type: X-Ray
- X-ray tube model: KL21-0.7-70
- Tube voltage: 65kV (±10%)
- Tube Current: 2mA (±20%)
- Fuse: 15A 65V
- Exposure time adjustment range: 0.02-2S (±5% or ±20ms)
- Nominal power: 130W nominal at 65kV, 2mA
- Inherent Filtration: 0.8mm Al
- Added filter: 1mm Al (1mm Al)
- Total Filtration: ≥1.8mm Al (0.8mm glass, 1mm Al)
- Duty Cycle: 1:30
- Minimum source to skin distance: >20cm (from focal spot to cone tip)
- X-ray exit field size and configuration: 57mm diameter circle
- Applied part: B
- Electrical safety class: Class IIb
- IPX specification: IPX0; do not operate under wet conditions
- Apparent resistance of supply main: ≤2Ω
- Mode of operation: Intermittent operation (2S ON/60S OFF)
- Filament voltage: 3.2-3.9V
- Maximum filament current: 2.8A
- Nominal tube voltage: 70kV
- X-ray source maximum heat content: 7000J
- Maximum anode cooling rate: 130W
- Nominal anode input power: 1000W
- Target material: Tungsten
- Minimum target angle: 16°
- Nominal focal spot (IEC 60336:1993): 0.7mm
- Ambient conditions (Use): 10°C ~ 40°C, Relative humidity: 30%-75%, Atmospheric pressure: 700hPa ~ 1060hPa
- Transport and storage conditions: -20°C ~ +55°C, Relative humidity: 20% - 80%, non-condensing at > 40°C, Atmospheric pressure: 70 kPa - 106 kPa
- Leakage Dose: 65 kV, 2 mA, 0.5 s (Max. Exposure Condition) at Focal Spot to Distance 1 m 1 : 30 Duty Cycle: < 0.25 mGy/h
- Scatter (zone of occupancy): 65kV 2mA 0.5s: < 0.2 mGy/h
- EMC Compliance: Complies with IEC 60601-2-65 (2017) for dental intra-oral radiography.
Usage Features:
- Charging: The device is charged by plugging one end of the charger into the machine and the other end into the socket. The charging icon is displayed on the screen during charging.
- Backscatter Radiation Shielding: An optional backscatter radiation shielding can be installed on the machine for added safety.
- Operation Panel: The control panel features buttons for:
- Choosing adult mode or child mode (person icon).
- Choosing tooth type (tooth icon).
- Increasing exposure time (up arrow).
- Reducing exposure time (down arrow).
- Locking/unlocking the machine (press two buttons at the same time).
- Changing receiver type (press two buttons at the same time).
- Power Button (on/off).
- Power On/Off: Long press the power button to turn on or shut down the device. The screen enters the boot interface upon power on.
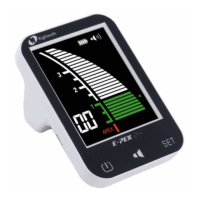
- Screen Instructions: The screen displays various icons and information including:
- Digital Sensor or Phosphor Plate / Film selection.
- Abnormal exposure time warning.
- Machine temperature too high warning.
- Battery level and charging indicator.
- Machine lock status.
- Tube Voltage/Current Indicator (e.g., 65kV 2mA).
- "Drop Detected" warning.
- Exposure status.
- Tooth type selection (Bitewing, Lower Molar, Upper Molar, Canine, Incisor).
- Patient type (Child Selection, Adult Selection).
- "FINISH" (exposure completed), "READY" (machine ready for exposure).
- Exposure Function: After selecting exposure time, short press the exposure button to enter the ready state. The screen displays the inclination angle of the machine to the ground plane. If exposure is not performed within 60 seconds, the ready state exits. To expose, press and hold the exposure button. The exposure stops immediately if the button is released.
- Positioning Instructions:
- Paralleling technique: The sensor is placed in a holder to align it parallel to the long axis of the teeth.
- Bisected angle technique: The patient holds the sensor in place with their finger. The X-ray beam is directed perpendicularly towards an imaginary line, which bisects the angle between the sensor plane and the long axis of the tooth.
- Recommended Exposure Settings: The manual provides a table of recommended angle of inclination and exposure times for different tooth types (Bitewing, Lower Molar, Upper Molar, Canine, Incisor) and patient types (Adult, Child) when using Digital Sensor/Phosphor Plate or Film.
- Ensuring Image Quality: The HyperLight-G features DC voltage X-ray generation for efficient energy delivery, a smaller focal spot (0.7mm) for better resolution, and a pistol-grip style for stable handling to achieve quality images and avoid motion blur.
- Dose Area Product (DAP): The device allows adjustment of loading time and exposure function, and observation of measurement values of different loading times on the computer. A table provides Air Kerma (mGy) and Dose Area Product (mGy*cm²) values for various exposure times.
Maintenance Features:
- Cleaning and Disinfection:
- Preparation: Power off the device.
- Cleaning: Wipe all exterior surfaces of the main body, backscatter shield, and base holder thoroughly with a cloth lightly moistened with Ethanol (70 to 80 vol%) at least 3 min, repeat for 5 times.
- Disinfection: Wipe all exterior surfaces of the main body, backscatter shield, and base holder thoroughly with a cloth lightly moistened with Ethanol (70 to 80 vol%) at least 3 min, repeat for 5 times.
- Drying: Use a lint-free cloth to wipe the surfaces.
- Inspection and maintenance: Visual inspection for cleanliness of the device and its accessories. Functional testing according to the user manual.
- Storage: Store the processed device in a dry, clean, and dust-free environment at modest temperatures, referring to label and instructions for use.
- Important Note: Do not use cleaners other than ethanol (70 to 80 vol%), as certain chemical combinations may deteriorate the HyperLight-G plastic. Never apply sprays or liquids directly on the surfaces. The main body, base holder, backscatter shield, and power adapter are not designed to be subjected to any kind of sterilization procedure.
- Annual Maintenance: Observe the following steps annually:
- Verify that the Power button is working properly.
- Verify that the Panel key is working properly.
- Check whether all interfaces on the screen are normal.
- Check whether the receiver can be switched.
- Use the exposure function to test whether the machine can be exposed properly.
- Check whether the protective panel is damaged.
- Check whether the battery is abnormal. If not, charge the machine every 6 months.
- Troubleshooting: The manual provides a table for common malfunctions, their causes, and methods for resolution, such as:
- Low battery: Use the charger to charge the machine.
- Machine temperature too high: Let stand for more than half an hour.
- Abnormal exposure time: During the exposure process, if the finger released the exposure button, the exposure will be forcibly terminated.
- Drop detected: A fall of the machine is detected, which may cause damage to the machine.