23456789012345
23456789012345
23456789012345
23456789012345
23456789012345
23456789012345
23456789012345
23456789012345
23456789012345
23456789012345
23456789012345
23456789012345
23456789012345
23456789012345
23456789012345
23456789012345
23456789012345
23456789012345
23456789012345
23456789012345
23456789012345
23456789012345
23456789012345
23456789012345
23456789012345
23456789012345
23456789012345
23456789012345
23456789012345
23456789012345
23456789012345
23456789012345
23456789012345
23456789012345
23456789012345
23456789012345
23456789012345
23456789012345
23456789012345
23456789012345
23456789012345
23456789012345
23456789012345
23456789012345
23456789012345
23456789012345
23456789012345
23456789012345
23456789012345
23456789012345
23456789012345
23456789012345
23456789012345
23456789012345
23456789012345
23456789012345
23456789012345
23456789012345
23456789012345
23456789012345
23456789012345
23456789012345
23456789012345
23456789012345
23456789012345
23456789012345
23456789012345
23456789012345
23456789012345
23456789012345
23456789012345
23456789012345
23456789012345
23456789012345
23456789012345
23456789012345
23456789012345
23456789012345
23456789012345
23456789012345
23456789012345
23456789012345
23456789012345
23456789012345
23456789012345
23456789012345
23456789012345
23456789012345
23456789012345
23456789012345
23456789012345
23456789012345
23456789012345
23456789012345
23456789012345
23456789012345
23456789012345
23456789012345
23456789012345
23456789012345
23456789012345
23456789012345
23456789012345
23456789012345
23456789012345
23456789012345
23456789012345
23456789012345
23456789012345
23456789012345
23456789012345
23456789012345
23456789012345
23456789012345
23456789012345
23456789012345
23456789012345
23456789012345
23456789012345
23456789012345
23456789012345
23456789012345
23456789012345
23456789012345
23456789012345
23456789012345
23456789012345
23456789012345
23456789012345
23456789012345
23456789012345
23456789012345
23456789012345
23456789012345
23456789012345
23456789012345
23456789012345
23456789012345
23456789012345
23456789012345
23456789012345
23456789012345
23456789012345
23456789012345
23456789012345
23456789012345
23456789012345
23456789012345
23456789012345
23456789012345
23456789012345
23456789012345
23456789012345
23456789012345
23456789012345
23456789012345
23456789012345
23456789012345
23456789012345
23456789012345
23456789012345
23456789012345
23456789012345
23456789012345
23456789012345
23456789012345
23456789012345
23456789012345
23456789012345
23456789012345
23456789012345
23456789012345
23456789012345
23456789012345
23456789012345
23456789012345
23456789012345
23456789012345
23456789012345
16
184633
ELECTRO FREEZE Models 876, 876B, 876C, 876RH, 876BRH, 876CRH
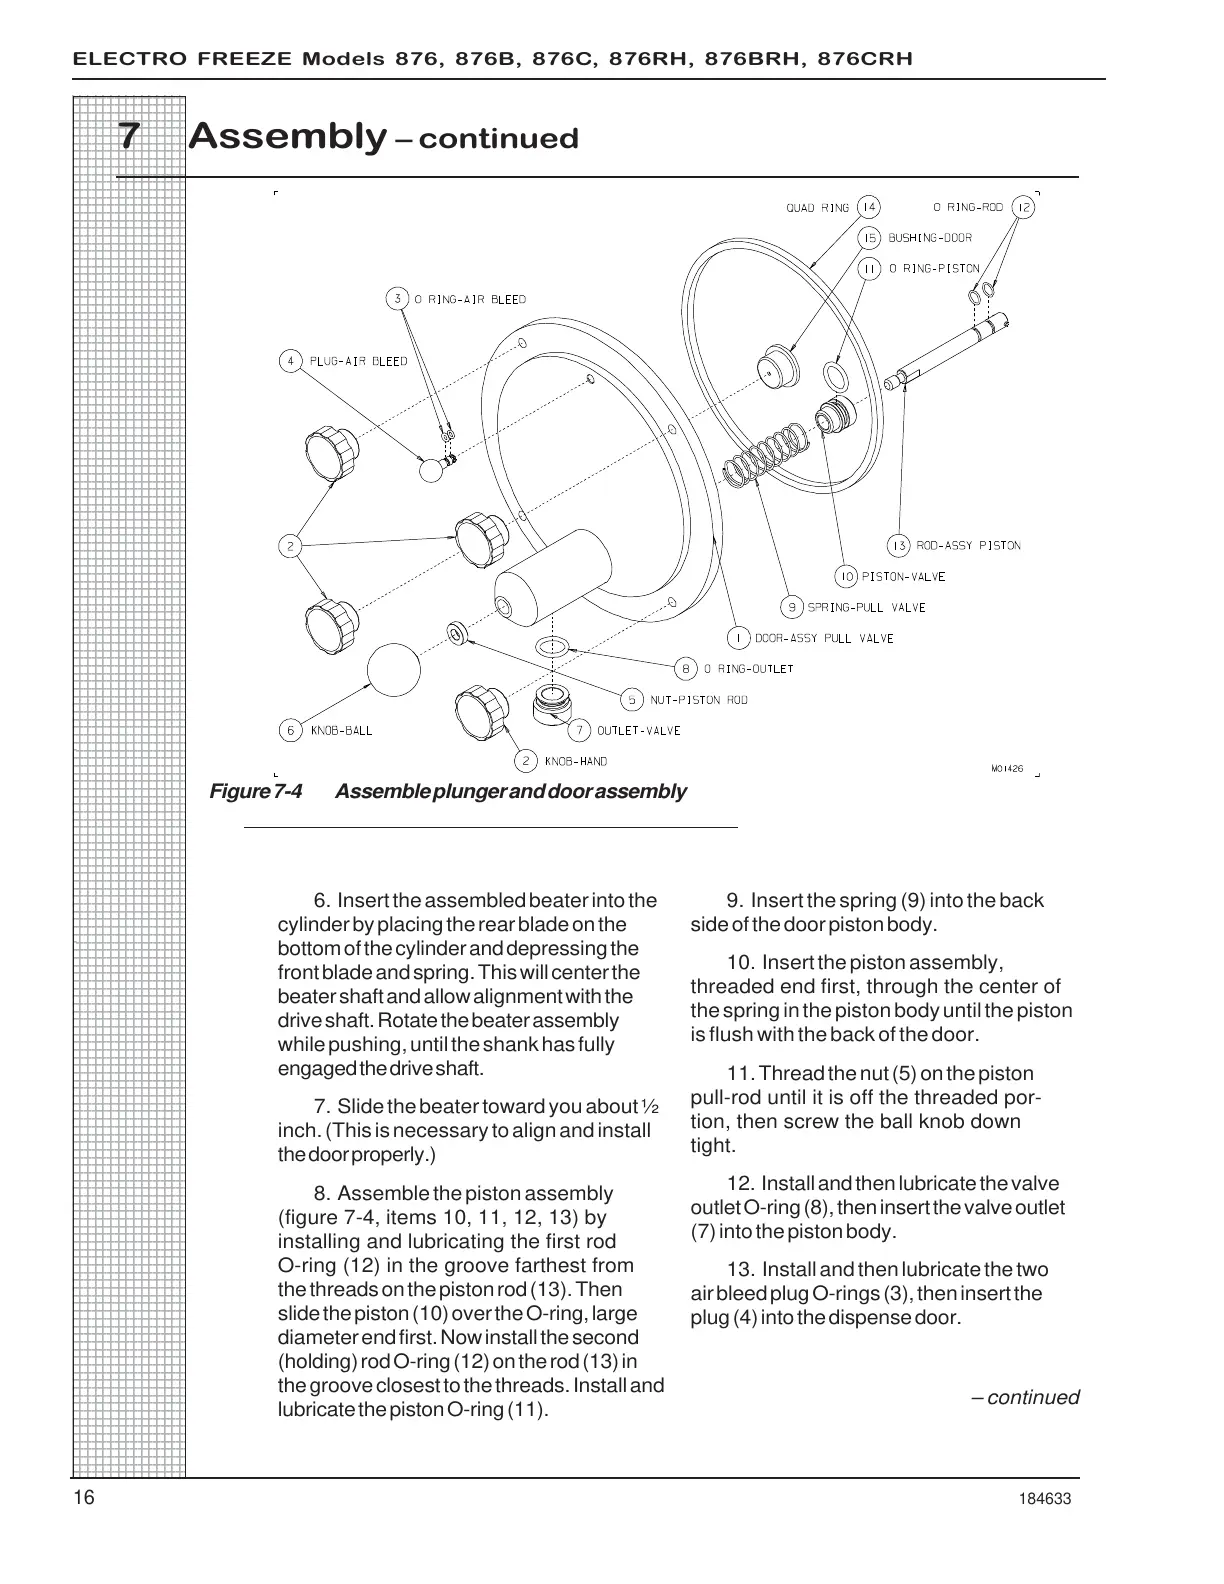
6. Insert the assembled beater into the
cylinder by placing the rear blade on the
bottom of the cylinder and depressing the
front blade and spring. This will center the
beater shaft and allow alignment with the
drive shaft. Rotate the beater assembly
while pushing, until the shank has fully
engaged the drive shaft.
7. Slide the beater toward you about ½
inch. (This is necessary to align and install
the door properly.)
8. Assemble the piston assembly
(figure 7-4, items 10, 11, 12, 13) by
installing and lubricating the first rod
O-ring (12) in the groove farthest from
the threads on the piston rod (13). Then
slide the piston (10) over the O-ring, large
diameter end first. Now install the second
(holding) rod O-ring (12) on the rod (13) in
the groove closest to the threads. Install and
lubricate the piston O-ring (11).
– continued
9. Insert the spring (9) into the back
side of the door piston body.
10. Insert the piston assembly,
threaded end first, through the center of
the spring in the piston body until the piston
is flush with the back of the door.
11. Thread the nut (5) on the piston
pull-rod until it is off the threaded por-
tion, then screw the ball knob down
tight.
12. Install and then lubricate the valve
outlet O-ring (8), then insert the valve outlet
(7) into the piston body.
13. Install and then lubricate the two
air bleed plug O-rings (3), then insert the
plug (4) into the dispense door.
7 Assembly – continued
Figure 7-4 Assemble plunger and door assembly