11
Water heater installation
Make sure that the electric water heater is
installed using original parts provided by the
manufacturer, which can support the weight
of the water heater filled with water. Do
not mount the water heater on the bracket
until do not make sure that the attachment
is securely fastened. Otherwise, the electric
water heater could fall.
The following table describes the labels in
this manual and the corresponding labels in
this manual.
When selecting locations for mounting
bolt holes, make sure that both sides of
the bathroom walls or other room up to
the water heater body there is a clearance
of at least 0.2 m and at least 0.5 m on the
pipe connection side to facilitate access for
maintenance when necessary.
If the water heater is supplied directly from
wells, wells or water towers, a coarse filter
for the cold water entering the water heater
must be used to operate the water heater.
The coarse filter can be purchased from
specialty stores. If the coarse filter is not
installed, the product warranty is not valid.
The electric water heater must be installed
on a solid vertical surface (wall). The
installation of SI EEC series water heaters
is greatly facilitated by the possibility to
install them both vertically and horizontally
anywhere in your home, in a heated (!) room.
It is advisable to install the heater as close
as possible to where the hot water is used,
because the shorter the length of the pipes,
the less heat is lost. As shown in Fig. 5. When
installing the heater close to a wall, leave the
recommended clearance for maintenance.
Do not install the heater on a horizontal
surface and up against the floor. After
selecting the mounting location, locate the
two fastening bolts with hooks (depending
on the specifications of the selected
product). Make two holes in the wall to the
required depth corresponding to the size of
the mounting bolts, insert the screws, rotate
the hook upwards, tighten the nuts firmly
and then install the electric water heater on
it (see Fig. 4). If the bathroom is too small to
accommodate the water heater, it can be
installed in any other room, protected from
direct sunlight and rain.
Fig. 4. Mounting anchor for mounting.
Connecting to the water supply
To connect the water heater to the water
mains use pipes with a diameter of G1/2.
Warning!
It is not recommended to use any
additional materials for the installation
of the flexible hose and the safety
valve that are not included in the water
heater. The coupling nut of the flexible
hose has a rubber gasket that ensures
a tight connection between the hose
and the safety valve. When tightening,
avoid sudden jerking forces and limit the
tightening torque to 25-30 N*m.
Install complete rubber gaskets on the ends
of the threaded connections to prevent leaks
when connecting the piping.
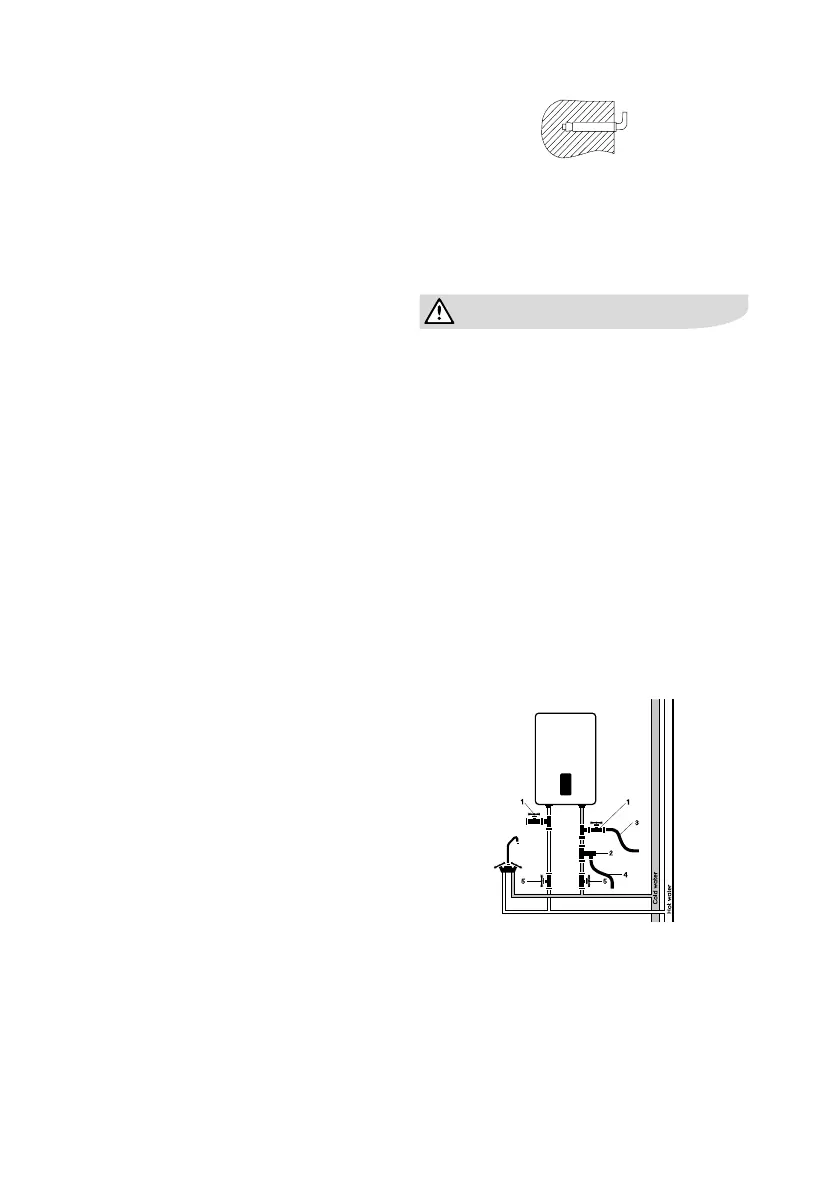
If you want to implement a water supply
system for several water points, use the
connection method (see Fig. 5).
Fig. 5
1. Tees
2. Relief valve
3. Drain tube
4. Drain hose
5. Valves
ENGLISH