SE Group Confidential (Related Staff Only)
Adjustment Details of Adjustments 66
SC-P600 Revision D
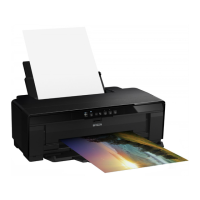
Figure 2-37. Starting the Color Measurement
x
Table 2-8. Limitations of the calibrator
i1Pro i1Pro2
Measurement start
point
Upper left on the color chart Upper left on the color chart
Measuring direction
In the direction of the arrow in Figure 2-35
only. An error occurs if scanned in the reverse
direction.
Outward (tungsten light): In the direction of
the arrow in
Figure 2-35
only.
Inward (UV light): In the reverse
direction from the outward scanning
Times of measurements
per row
Once Two times (one cycle)
When the
measurement fails
Perform the measurement of the failed row.
Cannot go on to the next row until the
measurement is successfully complete.
Perform the measurement of the failed row.
Cannot go on to the next row until the
measurement is successfully complete.
During color measurement, do not allow the calibrator to rub against unmeasured
patches on the chart.
Prevent the ruler and calibrator from coming off the chart sheet during color
measurement. Doing so will cause incorrect color measurement.
Do not press the calibrator to the chart too strongly, otherwise the patch may be
damaged.
If “X” appears repeatedly and the measurement fails continuously, the measured color
value may be far out of the standard range. In that case, end the measurement and go to
the troubleshooting below.
(1)
Color measurement
“complete” rows
Measured rows (starting from the left)
(2)
Color measurement
“not complete” rows
Rows to be measured (up to the right end)
(3)
Cursor Automatically moves right when color measurement of a row is complete.
(4)
Measurement result “O” appears if the color value is within the normal range. Otherwise or the number of patches is
not matched, “X” appears.
(5)
Stop button Discards the current measurement result and go back to the previous window before measurement.
Measurement start point
3
5
4
Orientation of the chart during measurement
1
2