Do you have a question about the ESDEC Clickfit Evo and is the answer not in the manual?
Provides overview of manual content, target audience, and availability of latest version.
Lists essential documents for installation, including project plans and component manuals.
Explains the meaning of Warning, Caution, and Note symbols for safety and instruction emphasis.
Manufacturer disclaims liability for damage or injury from non-compliance or negligence during installation.
Details the 20-year product warranty and directs users to the website for terms and conditions.
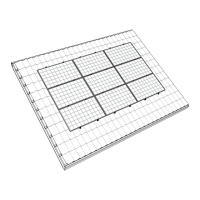
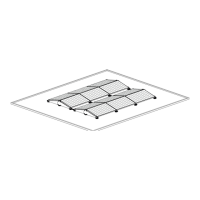
Describes the ClickFit EVO system's purpose for mounting solar panels on pitched roofs.
Specifies that the system is not suitable for roof types other than those explicitly mentioned.
Lists technical parameters such as panel orientation, frame height, maximum area, and edge zone requirements.
Outlines prerequisites for the installation site, including roof condition and structural integrity.
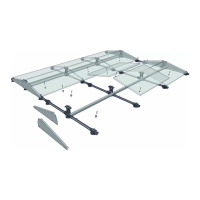
Lists all system components and accessories with their corresponding article numbers for easy identification.
Provides a matrix for selecting panel and rail orientation based on roof material and structure type.
Illustrates and lists essential PPE like helmets, glasses, gloves, and safety shoes for installers.
Lists critical safety precautions, including working with a partner, avoiding strong winds, and using fall protection.
Covers initial steps: inspecting the roof, verifying the project plan, checking components, and gathering tools.
Details the necessary tools for installation, including drills, wrenches, tape measures, and marking tools.
Provides drill bit sizes and socket sizes for different hanger bolt types and roof structures.
Instructions for cleaning and tidying the roof surface prior to panel installation.
Guidance on determining solar panel placement, respecting edge distances from ridge, gutter, and sides.
Instructions for drawing lines and marking end points for mounting rail placement on the roof.
Details on marking exact locations for hanger bolts, considering roof structures and thermal expansion.
Explains how to calculate and cut mounting rails to the required length, including overhangs.
Describes the optional use of couplers to connect mounting rails for extended lengths.
Guidance on extending mounting rails to the next structural support for proper end cap fitting.
Covers the process of installing hanger bolts, including pre-drilling for different substructures.
Specific instructions for pre-drilling holes in wooden purlins or trusses for hanger bolt installation.
Details on correctly tightening hanger bolts for various roof materials like bitumen, EPDM, and corrugated roofs.
Specific instructions for pre-drilling holes in concrete slabs or Arabic tiles for hanger bolt installation.
Guidance on using chemical anchors to fix hanger bolts, emphasizing adherence to supplier instructions.
Steps for inserting hanger bolts and allowing chemical anchors to cure properly.
Instructions for sealing screw holes using specific kits for bitumen, EPDM, and Arabic tile roofs.
Visual guide on correctly orienting click connections for horizontal and vertical rail mounting to ensure proper function.
Instructions for tightening nuts on hanger bolts, using crosshairs for alignment and to accommodate roof irregularities.
Describes using nuts and mounting rails to align click connections and adapters correctly.
Instructions for placing the mounting rail into the click connection mechanism.
Specific steps for securing mounting rails to click connections when using vertical orientation.
How to attach cable clips to the rail and guide cables through them for wire management.
Optional step for attaching optimizers to cable clips, with considerations for vertical rail orientation.
Optional steps for attaching auxiliary sets to panels and securing cables in clamps.
Instructions for attaching universal module clamps to the mounting rails for the first panel.
How to slide end caps onto the ends of the mounting rails.
Instructions for rotating the upper part of the module clamp over the end cap and securing cables.
Instructions for screwing module clamps onto the panel with a specified torque of 4.5 Nm.
Attaching universal module clamps to the rails for subsequent panels, ensuring correct orientation.
Guidance on sliding the solar panels into position against the previously installed clamps.
Screwing module clamps onto the panel with a specified torque of 4.5 Nm.
Optional step for sawing mounting rails to size, considering overhang requirements for end caps.
Attaching module clamps to the rails for the last panel.
Sliding end caps onto the rails for the last panel and securing the module clamp.
Screwing module clamps onto the last panel with a specified torque of 4.5 Nm.
Instructions for mounting additional rows of panels, ensuring correct spacing and alignment with previous rows.
General guidance on dismantling the mounting system and disposing of it in accordance with local laws and regulations.
The Esdec ClickFit EVO Hanger Bolt mounting system is designed for installing solar panels on pitched roofs, accommodating various roof types including Arabic tiles, bitumen or EPDM roof material, corrugated iron roofs, and sheet metal roofs. This system allows for solar panels to be mounted in both portrait and landscape orientations, offering flexibility in design and installation. The instructions provided are intended for qualified technical personnel, emphasizing the importance of professional installation to ensure safety and proper functionality.
A key function of the ClickFit EVO system is its adaptability to different roof structures, such as those with purlins, trusses, or solid engineered wood boards. The system's design ensures compatibility with a range of roof materials, making it a versatile solution for solar panel installations. The installation process involves several critical steps, starting with a thorough inspection of the roof to confirm its condition and load-bearing capacity. This initial assessment is crucial for identifying any potential issues related to the roof's integrity and its ability to support the additional weight and wind/snow loads associated with a solar panel array.
The system's components are meticulously designed for ease of installation and durability. These include various hanger bolt sizes (M10 x 200mm, M10 x 250mm, M12 x 250mm, M12 x 300mm, M12 x 350mm), mounting rails, universal module clamps, mounting rail end caps, and end clamp supports. Accessories such as mounting rail couplers, cable clips, self-drilling sheet metal screws, mounting sets, hanger bolt washers, and specialized kits for bitumen and EPDM roofing further enhance the system's functionality and adaptability. The use of a project plan, generated by an online calculator, is highly recommended to determine the correct rail orientation, component quantities, and optimal layout for each specific project, taking into account terrain category, snow loads, and wind zones.
Usage features of the ClickFit EVO system are centered around efficient and secure installation. The process begins with determining the precise position of the solar panels on the roof, considering factors like sunlight exposure, shading throughout the year, and maintaining specific distances from the ridge, gutter, and sides of the roof (at least 30cm). This ensures optimal performance and adherence to safety guidelines. Marking the lines and end points for the mounting rails, and subsequently the positions for the hanger bolts, is a critical step that relies on accurate measurements and adherence to the project plan. For corrugated roofs, it is advised to use existing screw holes where possible to prevent thermal expansion/contraction issues in the roof material.
Cutting the mounting rails to the required size is another important usage feature. The length of the rails is calculated based on the solar panel dimensions, allowing for additional space for universal module clamps, end clamps, and end caps. If the overhang is smaller than 250mm, a specific rail length overhang (20mm to 35mm) is maintained for mounting the end cap. For longer rail sections, couplers can be used to connect multiple mounting rails, ensuring structural continuity and stability.
The installation of hanger bolts varies depending on the roof structure. For wooden substructures (purlins/trusses), pre-drilling holes with specific diameters for M10 and M12 hanger bolts is required, ensuring the substructure is at least 50mm thick. For concrete roof structures, pre-drilling is also necessary, with specific depths (at least 100mm for Arabic tiles and 80mm for concrete slabs) and diameters. When installing on Arabic tiles, pre-drilling at the highest point of the tile ensures good drainage. For concrete, a chemical anchor is used to fix the hanger bolt, requiring adherence to the anchor supplier's instructions.
Once the hanger bolts are inserted, they must be aligned correctly and tightened to ensure the rubber seal deforms, effectively sealing the screw hole. Specialized sealing kits are used for bitumen and EPDM roofs, while Arabic tiles may require a separate waterproofing kit. The click connections on the hanger bolts must be rotated into the correct orientation: downwards for horizontal rail orientation (to accommodate the cable tray) and on the same side with connections pointing in the same direction for vertical rail orientation. The nuts on top of the hanger bolts are then tightened to a specified torque (25 Nm for M10, 40 Nm for M12), using the cross hairs on the adapter to compensate for roof irregularities and ensure a good basic position.
Attaching the mounting rails involves aligning the click connections and adapters. If the hanger bolts are not perfectly aligned, the mounting rail itself can be used to adjust them by loosening the nuts, clicking the rail into place, allowing the adapters and connections to self-adjust, and then retightening the nuts to the specified torque. For vertical mounting, the rails are secured to the click connections using self-drilling screws at specific intervals.
Optional features include attaching cable clips and optimizers. Cable clips are clicked onto the rail, with one clip per solar panel, and cables are guided through them. For vertical rail orientation, the cable clip can be further secured by bending the edge of the mounting rail with adjustable pliers. Optimizers can also be clicked onto the cable clips.
Mounting the solar panels involves several steps. First, auxiliary sets can optionally be clicked onto the panel, and the panel's cables can be firmly clicked into the cable clamp. Universal module clamps are then clicked onto the rails, ensuring their drainage channels point downwards. End caps are slid onto the rails, and the upper part of the module clamp is rotated over the end cap. The panel is then placed on the rails and slid against the clamps, which are subsequently screwed onto the panel with a torque of 4.5 Nm. This process is repeated for subsequent panels, with similar steps for mounting the last panel, which may involve sawing the mounting rails to size if the overhang is smaller than 250mm or extending them if the outer panel edge projects more than 250mm beyond the last hanger bolt.
For mounting multiple rows of panels, a minimum of 10mm space must be maintained between each row (for horizontally oriented rails) or each panel column (for vertically oriented rails) to allow for expansion. The project plan from the calculator should always be followed for multi-row installations.
Maintenance features are not explicitly detailed in the provided text, but the emphasis on durable components, proper sealing, and adherence to torque specifications during installation suggests a design intended for long-term reliability with minimal ongoing maintenance. The system's robust construction and secure fastening mechanisms contribute to its overall resilience against environmental factors.
Removal and recycling instructions emphasize adherence to local laws and regulations when dismantling the mounting system and disposing of its components, highlighting environmental responsibility. The 20-year product warranty offered by Esdec BV further underscores the manufacturer's confidence in the system's quality and longevity, subject to their warranty terms and general terms & conditions.
| Material | Aluminum |
|---|---|
| Category | Racks & Stands |
| Brand | ESDEC |
| Product Name | Clickfit Evo |
| Application | Solar panel mounting |
| Weight Capacity | Varies by configuration |
| Adjustability | Yes |