Getting started with your PROTEUS
Issue C
21
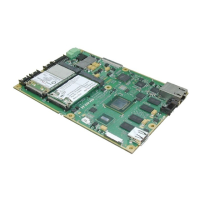
Identifying your PROTEUS
You can identify the version of your PROTEUS board in two ways:
• Visually. All PROTEUS PCBs are marked on the top side with the PROTEUS name,
board version and issue.
• Using the BIOS (see below).
To identify your PROTEUS from the BIOS follow the instructions below:
1 Boot the PROTEUS board.
2 Press F2 as the Eurotech splash screen appears until the BIOS main screen is
shown with the following details:.
BIOS version
BIOS version xx.xx.xx.xx
CPLD version
CPLD version x.xx
Embedded controller firmware version
uCtrl version x.xx
Unique silicon ID number
System serial number xxxx-xxxx-xxxx
Connecting a SATA hard disk
PROTEUS stand alone
PROTEUS (stand alone) supports one SATA drive via a SATA cable. A 7-wire SATA cable
is used to provide a direct connection between the PROTEUS board connector (J3
) and
the hard disk connector. Power for the hard drive is provided through J23
and a 4-wire
cable with a 4 pin Molex PicoBlade plug on one side and a standard SATA power
connector on the other. This power cable carries 5V only and can be used with 2.5” HDD.
Alternatively if the PROTEUS is powered from an ATX power supply then the standard
SATA power cable can be used.
The BIOS automatically detects the hard disk drive and configures the hardware
correctly.
PROTEUS COM Express
PROTEUS (COM Express) supports two SATA drives. For information on connecting a
SATA hard drive see the COM Express base board manual.
Connecting a CD-ROM
If a CD-ROM drive is required in the system, it may be connected directly via the SATA
interface or through a USB to IDE adapter. It is recommended to use the same power
source (for example one ATX power supply) for the PROTEUS board and CD-ROM hard
drive (especially when a USB to IDE adaptor is used).