ShareLink 200 N • Installation 3
Installation
This section covers the following:
• Rear Panel Features and Cabling
• Front Panel Features and Cabling
• Bottom Panel Features
• Setting up the Standby Screen
Rear Panel Features and Cabling
The following section covers rear panel features and cabling procedures. If mounting is
necessary before connecting cables, see Mounting on page 35.
ShareLink 200 N
AUDIO
OUT
LAN / PoE
VGA OUT HDMI OUT
USB 3
POWER
5V
2.3A MAX
Extron
12
USB
ShareLink 200 N
BB
AA
BB
CC
DD
EEFF
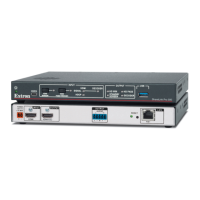
Figure 2. Rear Panel
A
Audio output — (Optional) Connect a 3.5 mm audio output cable between this female
audio jack and the audio input of a display or audio amplifier.
B
RJ-45 connector — Use an ethernet cable to connect a network switch, hub, router,
or PC to this female RJ-45 connector.
C
VGA output — (Optional) Connect a VGA display device into this female 15-pin HD
connector.
D
HDMI output — Connect an HDMI display device into this female HDMI connector.
E
USB port — (Optional) Connect a USB drive to this USB type A connector to present
documents, photos, videos, or audio files using the ShareLink USB player feature (see
figure 4,
5
on page 6).
F
Power input — Connect the included power supply to the power input (see the NOTE
and ATTENTION on the next page for important information).