EasyManua.ls Logo

Fanimation CCK8002 User Manual

Fanimation CCK8002
4 pages
To Next Page IconTo Next Page
Page #1 background imageLoading...
Page #1 background image
1
CCK8002
Close-To-Ceiling Kit
INSTRUCTION SHEET
USE THESE INSTRUCTION IN CONJUNCTION WITH YOUR FANIMATION
FAN OWNERS MANUAL AND IN PLACE OF THE STEPS FOR HOW TO
HANG YOUR CEILING FAN. IF YOU NO LONGER HAVE YOUR MANUAL,
ONE CAN BE DOWNLOADED AT WWW.FANIMATION.COM.
After removing your kit from the packaging, use slight 1.
pressure to push down and remove the screw trim
cover ring from the ceiling canopy assembly. (Figure 1)
Figure 1
SCREW TRIM
COVER RING
CEILING CANOPY
Figure 2
REMOVE
SCREW
LOOSEN SCREWS (2)
BUT DO NOT REMOVE
SLOTTED
REMOVE
SCREW
Separate the ceiling bracket from the ceiling canopy 2.
by loosening the two canopy-to-bracket screws where
the canopy is slotted and completely remove the other
two screws where it is not slotted and set aside for
later. (Figure 2)
Twist the ceiling bracket counter-clockwise and lift out 3.
of the ceiling canopy. There is another short canopy
option when it is needed to very close to ceiling.
(Figure 3)
Figure 3
CEILING CANOPY
Short Canopy
CEILING BRACKET
Safety Instructions
To avoid possible shock, be sure electricity is turned off at the fuse box before wiring, and do not operate fan without blades.1.
All wiring and installation procedures must satisfy National Electrical Codes (ANSI/ NFPA 70-1999) and Local Codes. The ceiling fan must 2.
be grounded as a precaution against possible electrical shock. Electrical installation should be made or approved by a licensed electrician.
The fan base must be securely mounted and capable of reliably supporting at least 50 lbs. Consult a qualified electrician if in doubt.3.
The fan must be mounted with the fan blades at least 7 feet from the floor to prevent accidental contact with the fan blades.4.
Follow the recommended instructions for the proper method of wiring your ceiling fan. If you do not have adequate electrical knowledge or 5.
experience, have your fan installed by licensed electrician.
6˝ downrod 4.5˝ downrod Tall close-to-ceiling kit Short close-to-ceiling kit
Question and Answer IconNeed help?

Do you have a question about the Fanimation CCK8002 and is the answer not in the manual?

Fanimation CCK8002 Specifications

General IconGeneral
ModelCCK8002
TypeCeiling Fan
Blade Span52 inches
Motor TypeAC Motor
Number of Blades5
Light KitNo
Control TypePull Chain
FinishBrushed Nickel
StyleTraditional
Blade Sweep52 inches
Blade Pitch12 degrees
Motor Size153 x 15 mm
Motor Speeds3
Light Kit IncludedNo
Downrod Length4 inches
Blade MaterialWood
Reversible MotorYes
WarrantyLimited Lifetime
Mounting TypeDownrod

Summary

Safety Instructions

Electrical and Installation Safety

Ensure electricity is off, follow codes, ground fan, and use licensed electrician for safety.

Fan Blade Clearance

Fan blades must be installed at least 7 feet from the floor to prevent accidental contact.

Canopy Preparation and Disassembly

Removing Screw Trim Cover Ring

Gently push down and remove the screw trim cover ring from the ceiling canopy assembly.

Separating Ceiling Bracket

Loosen and remove screws to separate the ceiling bracket from the ceiling canopy.

Accessing Short Canopy Option

Twist the ceiling bracket counter-clockwise to lift out, revealing a short canopy option.

Fan Motor and Canopy Mounting

Removing Downrod Support Screws

Remove and discard the two downrod support set screws and nuts from the fan's motor.

Attaching Canopy to Motor

Route wires through canopy, place it onto motor, and secure with motor coupling screws.

Ceiling Bracket Installation

Securing Bracket to Junction Box

Attach the ceiling bracket to the junction box using screws and washers, routing wires.

Installing Safety Cable

Loop safety cable through pin hole, attach clamp, and secure through hanger plate.

Final Canopy Attachment and Securing

Mounting Fan to Ceiling Bracket

Slide ceiling canopy over mounting bracket, aligning screws with slots, and tighten.

Securing Canopy and Cover Ring

Install remaining screws to secure the canopy, then push trim ring to conceal screws.
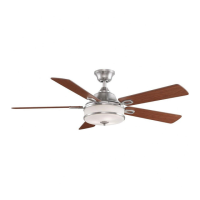
Related product manuals