10
Freehand routing
Freehand routing is the method normally used for
lettering or shapes, and for routing edges using
cutters with a guide pin or ring.
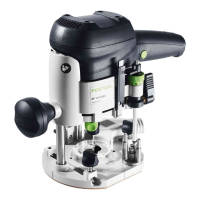
Routing with the parallel guide
The parallel guide (9.8) (accessory) can be used for
routing parallel to the edge of the workpiece.
- Clamp the two guide rods (9.6) to the parallel
guide with the rotary knobs (9.3).
- Push the guide rods into the grooves (9.2) of the
router table until the desired distance between
the router and workpiece edge is reached. Clamp
the guide rods tight with the rotary knobs (9.1).
This distance can be adjusted faster and more
precisely with the fi ne precision adjustment (9.7)
(accessory).
- Turn the adjusting screw (9.4) in the plastic part
of the guide.
- Clamp the guide rods with the rotating knobs (9.5)
in the precision adjustment.
- Loosen the rotating knobs (9.3) of the parallel
guide, set the desired distance with the adjusting
screw and retighten the rotating knobs.
Routing with the TV-
OF extension table
The extension table TV-OF (accessory) can be used
to enlarge the support area of the router and thus
improve guidance, e.g. when routing close to edges.
The extension table is fi tted in the same way as the
parallel guide.
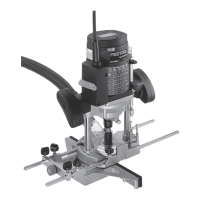
Routing with the FS guide system
The guide system (accessory) facilitates routing
straight grooves.
- Fasten the guide stop (10.1) to the platen with the
guide rails (10.3) of the parallel guide.
- Fasten the guide rail (10.5) with FSZ screw clamps
(10.4) to the workpiece. Make sure that the safety
distance X of 5 mm between the front edge of the
guide rail and cutter or groove is observed.
- Place the guide stop onto the guide rail as shown
in Fig. 10. To ensure a backlash-free guidance of
the router stop you can adjust two guide cheeks
with a screwdriver through the side openings
(10.2).
- Screw the height-adjustable support (10.7) of the
router table’s threaded bore in such a way that
10.6
10.7
10.4
10.5
10.3
10.1
10.2
x
9.8
9.7
9.2
9.4
9.1
9.3
9.3
9.5
9.5
9.6
 Loading...