Do you have a question about the FIBER FOX MINI3S and is the answer not in the manual?
Explains the use, performance, cautions, installation, and operation of the MINI3S fusion splicer.
Recommends all users read the manual before operating the MINI3S fusion splicer.
Details supported fiber types, count, and diameter specifications for the fusion splicer.
Provides typical splice loss values for different fiber types measured by insertion method.
Details available splice modes, recorded splices, and splice time for SM Quick Mode.
Lists applicable protection sleeve types and heating time options for the heat oven.
Covers AC and DC power supply, output voltage, and battery capacity.
Specifies the physical dimensions and weight of the fusion splicer, including battery.
Defines operating and storage conditions for temperature, humidity, and wind speed.
Describes cameras, LCD screen, magnification, tension test, and terminal ports.
General safety guidelines for using the fusion splicer and handling optical fibers.
Specific warnings for operating the splicer in hazardous environments and handling components.
Guidelines for cleaning V-grooves, electrodes, and the splicer exterior.
Instructions for safely transporting and storing the fusion splicer to prevent damage.
Instructions for unpacking and setting up the fusion splicer.
Identifies key components of the fusion splicer like heater, handle, and display.
Explains how to connect the AC adapter or use the removable battery for power.
Details the battery charging indicator and process for MINI3S.
Describes how to charge the battery while connected or separated from the splicer.
Explains how to check the battery level on the screen and via LED indicator.
Describes how to refresh the battery to prevent aging and maintain performance.
Visual guide showing the heat oven lid and cooling tray.
Explains the two ways of connecting power: AC adapter and removable battery.
Advises checking battery residual electric quality before operation.
Instructions on how to power on the splicer and navigate to the workbench page.
Guidance on adjusting the monitor angle for optimal viewing.
Steps to adjust the screen brightness for clarity.
Details fiber stripping, cleaning, and cleaving steps for optimal splicing.
Step-by-step guide on performing a splice, including fiber holder and V-groove usage.
Checks for fiber cleanliness and proper cleaving before proceeding with splicing.
Steps to select splice mode and initiate the splicing process.
Describes using a heat-shrink sleeve and heat oven to protect the splice.
Shows where the active splice program is displayed on the screen.
Guide on how to navigate to and select a different splice program.
Explains the pre-fusion and fusion stages of the automatic splicing process.
Details parameters like template, name, focus, arc adjust, and loss estimate.
Lists heat modes based on protection sleeve types like 60mm, 40mm, and 33mm.
Instructions on how to select a different heating mode from the menu.
Guide on how to edit or change tube-heating conditions in existing heat modes.
Steps to remove user-defined heat modes from the splicer.
Defines parameters like template, name, heater control, temperature, and time.
Procedure for replacing worn electrodes to maintain splice quality.
Expedites arc power stabilization after environmental changes or electrode replacement.
Evaluates critical parameters like LED, dust, motor calibration, and arc calibration.
Detects dust on optical paths that may affect fiber observation and splicing.
Automatically calibrates the speed of the splicer's four motors.
Calibrates arc power and fiber splicing position to compensate for wear and environment.
Configures warnings for electrode replacement based on discharge counts.
Performs simple adjustments for calibrating motors and positions.
Tests the normal operation of the splicer's four motors.
Steps to update the splicer software using a USB port.
Stores up to 10,000 splicing results, varying by splice mode.
How to view stored splicing results through the data storage menu.
Procedure for clearing specific or all stored splicing results.
Option to disable record storage via the 'Splice Data Save' menu.
Menu for changing detailed settings or limiting operator functions.
Enables the screen to auto-rotate when 'ON' is selected in system settings.
Adjusts monitor and splicer shut down times to conserve power.
Shows splicer serial number, software version, arc counts, and maintenance dates.
Provides solutions for common problems like power issues, battery life, and error messages.
The MINI3S Arc Fusion Splicer is a precision instrument designed for fusion splicing silica glass optical fibers. Its primary function is to join optical fibers with high accuracy and minimal loss, ensuring robust and reliable connections. The splicer utilizes a profile alignment technique and an extremely accurate alignment process to achieve precise splice loss estimation.
The MINI3S performs ultra-fast splicing and has an incredibly short shrinking time, resulting in an extremely fast total cycle time. It is designed to withstand harsh environmental conditions, making it suitable for various field applications. The device supports a wide range of fiber types, including SM (ITU-TG.652&G.657), MM (ITU-TG.651), DS (ITU-TG.653), NZDS (ITU-TG.655), ITU-TG.657A, and ITU-TG.657B, for single fiber counts. It accommodates applicable fiber/cable diameters from 0.25mm to 3.0mm and cladding diameters from 150µm to 3000µm.
The splicing process involves several steps: fiber preparation (stripping, cleaning, and cleaving), pre-fusion, and fusion. During pre-fusion, the splicer automatically aligns and focuses the fibers, applying a low pre-fusion current for cleaning and taking a pre-fusion image. It will alert the user to any problems detected in the pre-fusion image, such as poorly prepared fibers, before proceeding to fusion. The fusion process joins the fibers using five different currents, with the distance between fibers being a critical parameter.
After splicing, the joint is protected using a heat-shrink sleeve and the integrated heat oven. The "Shrink" process is activated by pressing the "HEAT" key, and the heating indicator turns off automatically upon completion, accompanied by a buzzer sound. The splicer offers 128 kinds of splice modes, including 11 preset modes, and can store up to 10,000 records and 2,000 splice images.
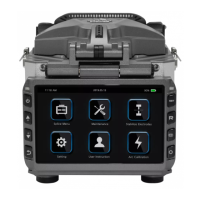
The MINI3S features a menu-driven user interface with dynamic function buttons and a fully automatic splice process, making it user-friendly. Its lightweight, robust, compact, and ergonomic design ensures easy portability.
To operate the splicer, users first connect the power supply, either via an AC adapter or a removable battery. A battery check is recommended to ensure sufficient charge (20% or more) for splicing and heating operations. The splicer is turned on by pressing the [Power] key, leading to the Workbench page. The monitor position can be adjusted for optimal viewing, and LCD backlight brightness can be customized via the Power Save option.
Fiber preparation is crucial and involves stripping at least 50mm of secondary coating and 30-40mm of primary coating, cleaning bare fibers with alcohol-soaked gauze, and cleaving them with a high-quality cleaver to ensure precise lengths. Users are reminded to slip a heat-shrinkable sleeve onto the fibers before preparation.
For splicing, users select an appropriate splice mode from the menu. If the splicer is set to "Auto mode," splicing begins automatically once the windproof cover is closed. Otherwise, splicing starts by pressing the SET button. The splicer automatically inspects fibers for cleanliness and proper cleave angles before proceeding. If defects like dust, lips, chips, or large cleave angles are detected, the user is prompted to re-prepare the fiber.
The splicer provides various splice options, including "Auto start" (splicing starts automatically when the wind protector is closed), "Pause 1" (pauses when fibers are forwarded to the gap-set position, displaying cleave angles), and "Pause 2" (pauses after fiber alignment is completed). It also offers options to ignore splice errors related to cleave angle, core angle, loss, fat, or thin errors. Fiber image display methods during splicing can also be customized.
The MINI3S includes a heat oven with max 32 heat modes, including 5 factory presets and 27 user-installable modes. Users can select the best-matching heating mode for their protection sleeve type, edit parameters for user-installable modes, and delete unwanted modes (excluding grayed-out system presets).
The device stores up to 10,000 splicing results, which can be displayed, deleted partially or entirely, or data storage can be canceled. System settings allow for changing language, buzzer volume, automatic heating, auto-rotate screen, power save options (monitor shut down, splicer shut down, LCD brightness), calendar settings, and password protection for certain menus.
The MINI3S has a dedicated maintenance menu to ensure optimal performance.
Electrode Replacement: Electrodes wear out over time, generating oxide and affecting splice quality. It is recommended to replace electrodes after 2500 arc discharges. The splicer will prompt a replacement message after this count. The procedure involves selecting "Replace electrodes" from the maintenance menu, turning off the splicer, loosening screws, removing old electrodes, cleaning new ones with alcohol, and installing them. Stabilizing electrodes and performing arc calibration are recommended after replacement.
Stabilize Electrodes: In environments with sudden changes in temperature, humidity, or pressure, arc power can become unstable, leading to higher splice loss. This function expedites the stabilization of arc power by performing five arc discharge measurements and 20 consecutive stabilizing electrode operations.
Diagnostic Test: A built-in diagnostic test evaluates critical variable parameters. This function checks LED brightness, optical path for dust or dirt (prompting cleaning if contamination is found), and automatically calibrates motor speeds and arc power factor.
Dust Check: This function detects dust and contaminants on the splicer, camera, and objective lenses that could interfere with fiber observation and splicing quality. If dust is detected, the splicer displays its location, guiding the user to clean the objective lenses.
Motor Calibration: Motors are factory-adjusted but may require recalibration due to various reasons. This function automatically calibrates the speed of the four motors. It is recommended if "Fat" or "Thin" errors occur or if fiber aligning/focusing takes too long.
Arc Calibration: Atmospheric conditions affect arc temperature, which can impact splice quality. While the splicer has sensors to maintain stable arc power, electrode wear and glass adhesion can shift the arc discharge center. Arc calibration adjusts arc power and fiber splicing position to eliminate these issues. It is performed in SM mode only, using standard SM, DS, or MM fibers, ensuring clean fibers for accurate calibration.
Electrode Setting: Users can set warnings for electrode replacement based on discharge counts. It is recommended to replace electrodes every 4500 discharges for best splice results.
Quick Optimize: This function provides a simple way to optimize the splicer by automatically adjusting motor positions and calibrating the speeds of the four motors.
Motor Drive: This function allows users to test if the four motors operate normally by selecting "Motor drive" and using on-screen icons to control motor movement.
Software Update: The splicer's software can be updated by connecting a USB driver with upgrade files to the USB port and pressing "OK." The splicer will restart automatically upon completion.
The manual also provides troubleshooting guidance for common issues such as power problems, error messages, high splice loss, monitor/splicer turning off unexpectedly, mismatch between estimated and actual splice loss, incomplete heat-shrink sleeve shrinking, and forgotten passwords. It emphasizes safety warnings and precautions, including avoiding flammable environments, not touching electrodes, and handling the main supply cable carefully. Regular maintenance and proper storage are also highlighted to ensure the longevity and performance of the MINI3S.
| Type | Fusion Splicer |
|---|---|
| Applicable Fibers | SM, MM, DS, NZDS |
| Splicing Loss | 0.02dB (SM), 0.01dB (MM) |
| Return Loss | 60dB or greater |
| Fiber Diameter | 125μm |
| Fiber Cleave Length | 8-16mm |
| Heating Time | 13~15 seconds |
| Monitor | 4.3 inch color LCD |
| Magnification | 300x |
| Power Supply | AC 100-240V |
| Battery | Li-ion |
| Operating Condition | -10 to 50°C, Humidity 95% or less |
| Storage Condition | -40 to 80°C, Humidity 95% or less |
| Dimension | 120W x 154D x 130H mm |