EasyManua.ls Logo

Fisher 4195 KB Series User Manual

Fisher 4195 KB Series
94 pages
To Next Page IconTo Next Page
Page #1 background imageLoading...
Page #1 background image
D200160X012
Fisher Controls International, Inc. 1983, 1997; All Rights Reserved
Fisher, Fisher-Rosemount, and Managing The Process Better are marks
owned by Fisher Controls International, Inc. or Fisher-Rosemount Systems, Inc.
All other marks are the property of their respective owners.
4195KA,
K
B
, a
n
d K
C S
eries Gaug
e P
ressure
Controllers
Contents
1. Introduction
Scope of Manual 1–3.
. . . . . . . . . . . . . . . . . . . . . . . . .
Description 1–3
. . . . . . . . . . . . . . . . . . . . . . . . . . . . . . .
Specifications 1–3
. . . . . . . . . . . . . . . . . . . . . . . . . . . .
2. Installation
Controller Mounting Orientation 2–1.
. . . . . . . . . . . .
Pipestand Mounting 2–1.
. . . . . . . . . . . . . . . . . . . . . .
Panel Mounting 2–1.
. . . . . . . . . . . . . . . . . . . . . . . . . .
Wall Mounting 2–1.
. . . . . . . . . . . . . . . . . . . . . . . . . . .
Actuator Mounting 2–1.
. . . . . . . . . . . . . . . . . . . . . . .
Pressure Connections 2–1.
. . . . . . . . . . . . . . . . . . . .
Process Pressure Connection 2–1.
. . . . . . . . . . . .
Supply Pressure Connection 2–3.
. . . . . . . . . . . . .
Remote Set Point (suffix letter M)
Pressure Connection 2–3.
. . . . . . . . . . . . . . . . . .
External Feedback Pressure Connection
(4195KB Series Controllers Only) 2–4.
. . . . . . .
Vent 2–4
. . . . . . . . . . . . . . . . . . . . . . . . . . . . . . . . . . . . .
3. 4195KA Series Proportional-Only Con-
trollers
Adjustments for 4195KA Series Controllers 3–1.
. .
Manual Set Point Adjustment 3–1.
. . . . . . . . . . . . .
Remote Set Point (suffix letter M)
Adjustment 3–1.
. . . . . . . . . . . . . . . . . . . . . . . . . .
Proportional Band Adjustment (PB ADJ) 3–1.
. . .
Changing Controller Action 3–2.
. . . . . . . . . . . . . . .
Switching The Auto/Manual Station
(suffix letter E) 3–2.
. . . . . . . . . . . . . . . . . . . . . . .
Prestartup Checks for 4195KA Series
Controllers 3–2.
. . . . . . . . . . . . . . . . . . . . . . . . . . . .
Startup for 4195KA Series Controllers 3–3.
. . . . . .
Calibration of 4195KA Series Controllers 3–3.
. . . .
General Calibration Instructions 3–3.
. . . . . . . . . . .
Process Indicator Zero and Span
Calibration 3–3.
. . . . . . . . . . . . . . . . . . . . . . . . . . .
Remote Set Point (suffix letter M)
Zero and Span Calibration 3–4.
. . . . . . . . . . . . .
Flapper Alignment 3–6.
. . . . . . . . . . . . . . . . . . . . . .
Principle of Operation for 4195KA Series
Controllers 3–6.
. . . . . . . . . . . . . . . . . . . . . . . . . . . .
Overall Operation 3–6.
. . . . . . . . . . . . . . . . . . . . . . .
Remote Set Point (suffix letter M)
Operation 3–7.
. . . . . . . . . . . . . . . . . . . . . . . . . . .
Auto/Manual Station (suffix letter E)
Operation 3–7.
. . . . . . . . . . . . . . . . . . . . . . . . . . .
4. 4195KB Series Proportional-Plus-Re-
set Controllers and 4195KC Series Pro-
portional-Plus-Reset-Plus-Rate Control-
lers
Adjustments for 4195KB and KC Series
Controllers 4–1.
. . . . . . . . . . . . . . . . . . . . . . . . . . . .
Manual Set Point Adjustment 4–1.
. . . . . . . . . . . . .
Remote Set Point (suffix letter M)
Adjustment 4–1.
. . . . . . . . . . . . . . . . . . . . . . . . . .
Proportional Band Adjustment (PB ADJ) 4–1.
. . .
Changing Controller Action 4–2.
. . . . . . . . . . . . . . .
Reset Adjustment 4–2.
. . . . . . . . . . . . . . . . . . . . . . .
Rate Adjustment 4–2.
. . . . . . . . . . . . . . . . . . . . . . . .
Anti-Reset Windup (suffix letter F)
Adjustment 4–2.
. . . . . . . . . . . . . . . . . . . . . . . . . .
Switching the Auto/Manual Station
(suffix letter E) 4–2.
. . . . . . . . . . . . . . . . . . . . . . .
Prestartup Checks for 4195KB and
KC Series
Controllers 4–3.
. . . . . . . . . . . . . . . . . .
Startup for 4195KB and KC Series
Controllers 4–3.
. . . . . . . . . . . . . . . . . . . . . . . . . . . .
Calibration of 4195KB and KC Series
Controllers 4–4.
. . . . . . . . . . . . . . . . . . . . . . . . . . . .
General Calibration Instructions 4–4.
. . . . . . . . . . .
Process Indicator Zero and Span
Calibration 4–4.
. . . . . . . . . . . . . . . . . . . . . . . . . . .
Remote Set Point (suffix letter M)
Zero and Span Calibration 4–6.
. . . . . . . . . . . . .
Flapper Alignment 4–6.
. . . . . . . . . . . . . . . . . . . . . .
Anti-Reset Windup (suffix letter F)
Differential Relief Valve Calibration 4–8.
. . . . .
Principle of Operation for 4195KB and
KC Series Controllers 4–9.
. . . . . . . . . . . . . . . . . .
Overall Operation 4–9.
. . . . . . . . . . . . . . . . . . . . . . .
Anti-Reset Windup (suffix letter F)
Operation 4–11.
. . . . . . . . . . . . . . . . . . . . . . . . . .
Instruction Manual
Form 5207
March 1997
4195KA, KB, and KC Series

Table of Contents

Question and Answer IconNeed help?

Do you have a question about the Fisher 4195 KB Series and is the answer not in the manual?

Fisher 4195 KB Series Specifications

General IconGeneral
TypePneumatic Controller
Input Signal3 to 15 psig
Output Signal3 to 15 psig
Supply Pressure20 psi
ActionDirect or Reverse
Accuracy±1% of span
Repeatability±0.5% of span
Enclosure RatingNEMA 4X

Summary

4195KA, KB, and KC Series Gauge Pressure Controllers

Introduction to 4195KA, KB, and KC Series Controllers

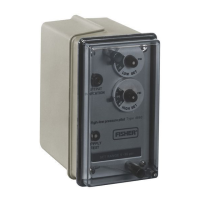
Overview of the manual's scope, description, and specifications for the controller series.

Installation of 4195KA, KB, and KC Series Controllers

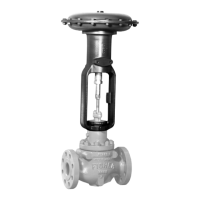
Detailed instructions for installing the gauge pressure controllers, covering mounting and connections.

4195KA Series Proportional-Only Controller Adjustments

Adjustments and procedures for the 4195KA proportional-only controllers.

4195KB and 4195KC Series Controller Adjustments

Adjustments and procedures for the 4195KB and 4195KC series controllers.

4195KA, KB, and KC Series Overview and Description

Introduction to the 4195K Series Controllers

Manual scope, controller types, and qualifications for personnel.

Description of 4195KA, KB, and KC Series Controllers

Details the functions and control modes of the 4195KA, 4195KB, and 4195KC series controllers.

Specifications for 4195KA, KB, and KC Series Controllers

Lists the technical specifications for the 4195KA, KB, and KC series controllers.

4195KA, KB, and KC Series Controller Specifications

Comprehensive Controller Specifications

Details configurations, input/output signals, connections, performance, and environmental limits.

4195KA, KB, and KC Series Available Configurations

Available Configurations Table for 4195KA, KB, and KC Series

Cross-reference table detailing controller modes and options based on type number.

Capsular Element Pressure Ratings - U.S. Units

Capsular Element Pressure Ratings Table (U.S. Units)

Details pressure ratings for capsular elements in U.S. units, including span and operating limits.

Capsular Element Pressure Ratings - Metric Units

Capsular Element Pressure Ratings Table (Metric Units)

Continues pressure ratings for capsular elements in metric units, including span and operating limits.

Bourdon Tube Pressure Ratings and Optional Connections

Bourdon Tube Pressure Ratings and Materials Table

Details pressure ratings and standard materials for Bourdon tube sensors.

Optional Process Connections Table

Lists optional process connection types, sizes, and materials.

Supply Pressure Data Table

Provides data on normal operating and maximum pressure limits for supply.

Section 2 Installation Overview

Controller Mounting Procedures

Covers orientation, pipestand, panel, wall, and actuator mounting for controllers.

Pressure Connections and Warnings

Details connection types, sizes, and associated safety warnings.

Process Pressure Connection Identification

Identifies specific process pressure connection points (A and B) for different controller types.

Controller Mounting Diagrams

Pipestand Mounting Diagram

Illustrates the components and assembly for pipestand mounting.

Panel Mounting Diagram

Diagram showing dimensions and assembly for panel mounting.

Wall Mounting Diagram

Diagram illustrating the setup for wall mounting the controller.

Process Piping and Supply Pressure Connections

Supply Pressure Connection Requirements and Safety

Details on supply pressure quality, regulators, and safety warnings.

Remote Set Point Pressure Connection Details

Instructions for connecting remote set point pressure, including range and bleed orifice.

External Feedback and Vent Connections

External Feedback Connection for 4195KB Series

Explains how to connect external feedback for override applications.

Vent Connection and Safety Precautions

Covers vent requirements, safety warnings for hazardous gases, and connection precautions.

Section 3: 4195KA Series Controller Operations

Adjustments for 4195KA Series Controllers

Descriptions of adjustments and procedures for prestartup, startup, and calibration.

Manual Set Point Adjustment Procedure

How to adjust the set point indicator manually or via optional adjustment knob.

Remote Set Point Adjustment Caution

Warning against manually moving the set point indicator with remote set point.

Proportional Band (PB ADJ) Adjustment

How to adjust the proportional band sensitivity using the PB ADJ knob.

4195KA Series Controller Action and Auto/Manual Station

Changing Controller Action (Direct/Reverse)

Procedure for changing controller action by adjusting the proportional band indicator cover.

Controller Action for Bourdon Tube/Capsular (Positive/Compound)

Defines direct and reverse control action for positive/compound pressure applications.

Controller Action for Capsular Element (Vacuum)

Defines direct and reverse control action for vacuum pressure applications.

Switching the Auto/Manual Station (Suffix E)

Instructions and cautions for switching between automatic and manual modes.

Prestartup Checks for 4195KA Series Controllers

Checks to perform before startup, ensuring open loop conditions exist.

Startup and Calibration Procedures for 4195KA Series

Startup for 4195KA Series Controllers

Steps to follow for starting up the 4195KA series controller after checks.

Calibration of 4195KA Series Controllers

General instructions and procedures for calibrating the controller.

Process Indicator Zero and Span Calibration

Detailed steps for calibrating the process indicator's zero and span.

Process Indicator and Remote Set Point Calibration for 4195KA Series

Process Indicator Zero and Span Calibration Steps

Continues the step-by-step procedure for calibrating the process indicator's zero and span.

Remote Set Point Zero and Span Calibration

Procedure for calibrating the zero and span of the remote set point.

4195KA Series Controller Calibration Adjustment Locations

4195KA Series Calibration Adjustment Locations Diagram

Diagram showing the locations of various adjustment points for calibration.

Flapper Alignment and Principle of Operation for 4195KA Series

Flapper Alignment Procedure

Detailed steps for aligning the flapper to ensure proper controller operation.

Principle of Operation for 4195KA Series Controllers

Explanation of how the 4195KA series controller functions, including overall operation.

Controller Schematics and Operation Details

4195KA Series Controller Schematic Diagram

Diagram illustrating the internal workings and signal flow of the 4195KA controller.

Remote Set Point (Suffix M) Operation

Describes the operational aspects of the remote set point feature.

Auto/Manual Station (Suffix E) Operation

Explains the operation of the auto/manual station and the switching process.

Auto/Manual Station Schematic for 4195KA Series

Auto/Manual Station Schematic Diagram

Diagram illustrating the auto/manual station's schematic for the 4195KA series.

Section 4: 4195KB/KC Series Controller Operations

Adjustments for 4195KB and KC Series Controllers

Descriptions of adjustments and procedures for prestartup, startup, and calibration.

Manual Set Point Adjustment for 4195KB/KC Series

How to adjust the set point indicator manually.

Remote Set Point Adjustment Caution

Warning about manually moving the set point indicator with remote set point.

Proportional Band (PB ADJ) Adjustment for 4195KB/KC Series

How to adjust the proportional band sensitivity using the PB ADJ knob.

Controller Action, Reset, Rate, and Auto/Manual Station Adjustments

Changing Controller Action for 4195KB/KC Series

Procedure for changing controller action by adjusting the proportional band indicator cover.

Reset Adjustment Procedure

How to adjust the reset time setting for controller response.

Rate Adjustment Procedure

How to adjust the rate setting for controller response.

Anti-Reset Windup (Suffix F) Adjustment

Instructions for adjusting the anti-reset windup differential relief valve.

Switching the Auto/Manual Station (Suffix E) Caution

Caution regarding switching modes without balancing.

Prestartup and Startup for 4195KB and KC Series Controllers

Prestartup Checks for 4195KB/KC Series Controllers

Checks to perform before startup, ensuring open loop conditions and correct connections.

Startup for 4195KB and KC Series Controllers

Steps to follow for starting up the 4195KB/KC series controller after checks.

Tuning and Calibration for 4195KB and KC Series Controllers

Calibration of 4195KB and KC Series Controllers

General instructions for calibration, emphasizing using external gauges.

Process Indicator Zero and Span Calibration for 4195KB/KC Series

Steps for calibrating the process indicator's zero and span.

4195KB and KC Series Controller Calibration Adjustment Locations

4195KB/KC Series Calibration Adjustment Locations Diagram

Diagram showing adjustment locations for 4195KB and KC series controllers.

Process Indicator and Remote Set Point Calibration for 4195KB/KC Series

Process Scale Span Calibration Procedure

Steps for calibrating the process scale span, including error correction.

Remote Set Point Zero and Span Calibration for 4195KB/KC Series

Procedure for calibrating the remote set point zero and span.

Flapper Alignment Procedure for 4195KB/KC Series

Steps for aligning the flapper, ensuring proper controller operation.

Anti-Reset Windup and Flapper Alignment Procedures

Anti-Reset Windup Relief Valve Tubing Replacement

Procedure for replacing the relief valve tubing for anti-reset windup.

Flapper Alignment Steps and Stability Checks

Detailed steps for flapper alignment and checks for output stability.

Anti-Reset Windup Differential Relief Valve Calibration

Anti-Reset Windup Differential Relief Valve Calibration

Calibration procedure for the differential relief valve for rising controller output pressure.

Differential Relief Valve Calibration (Falling Output)

Calibration procedure for the differential relief valve for falling controller output pressure.

Principle of Operation for 4195KB and KC Series Controllers

Principle of Operation for 4195KB and KC Series

Explanation of the overall operation of the 4195KB and KC series controllers.

4195KB Series Controller Schematic and Operation

4195KB Series Controller Schematic Diagram

Diagram illustrating the proportional-plus-reset control mechanism.

Proportional-Plus-Reset Control Operation

Explanation of how proportional-plus-reset control interacts with feedback.

4195KC Series Controller Schematic and Anti-Reset Windup Operation

4195KC Series Controller Schematic Diagram

Diagram illustrating the proportional-plus-reset-plus-rate control mechanism.

Anti-Reset Windup (Suffix F) Operation

Explains how anti-reset windup reduces overshoot and its availability.

Controller Schematics and Operation Modes

Reset-Rate Schematic Diagram

Diagram illustrating the reset and rate control functions.

Remote Set Point (Suffix M) Operation

Describes how the remote set point feature operates.

Auto/Manual Station (Suffix E) Operation

Explains the operation of the auto/manual station.

External Feedback Operation for 4195KB Series

Describes external feedback for override applications to minimize reset windup.

Section 5: Maintenance Procedures

Inspection and Maintenance Precautions

General guidelines and safety warnings for performing maintenance.

Troubleshooting Common Faults

A chart listing common faults, probable causes, and suggested corrections.

Replacing Common Controller Parts Procedures

General procedures for replacing common controller parts with safety warnings.

Replacing the Process Pressure Scale

Steps for replacing the process pressure scale, with cautions on handling.

Troubleshooting Chart and Process Scale Replacement

Troubleshooting Chart for 4195KA, KB, KC Series

Lists common faults, causes, checks, and corrections for controller issues.

Process Pressure Scale Replacement Steps

Continues the steps for replacing the process pressure scale.

Troubleshooting Chart - Controller Off-Set and No Reset Action

Troubleshooting Chart (Continued)

Continues the troubleshooting chart for various controller faults.

Troubleshooting Chart - Control Point Shift and Output Range Issues

Troubleshooting Chart (Continued)

Continues the troubleshooting chart covering control point shift and output range issues.

Troubleshooting Chart - Controller Output Issues and Scale Replacement

Troubleshooting Chart (Continued)

Continues the troubleshooting chart for controller output issues.

Changing the Scale Diagram

Diagram illustrating the process of changing the controller scale.

Replacing the Relay Procedure

Steps for removing and installing the controller relay with related diagrams.

Relay Replacement and Case/Cover Replacement

Relay Construction Diagram

Diagram showing the construction details of the controller relay.

Relay Replacement Steps

Continues the procedure for replacing the controller relay.

Replacing the Case and Cover Procedure

Instructions for replacing the controller case and cover assembly.

Gauge, Tubing Assembly, and Proportional Band Adjustment Replacement

Replacing Controller Gauges

Procedure for replacing the output or supply pressure gauges with cautions.

Replacing Supply Gauge and Tubing Assemblies

Steps for replacing tubing assemblies for supply, proportional, and reset functions.

Replacing Proportional Band Knob, Nozzle, and Set Point Beam

Detailed disassembly and assembly procedures for these components.

Proportional Band Adjustment and Set Point Beam Assembly Details

Proportional Band and Set Point Beam Details Diagram

Diagrams showing exploded and assembled views of the proportional band adjustment and set point beam.

Assembly of Proportional Band Adjustment Components

Steps to reassemble the proportional band adjustment knob, nozzle, and set point beam.

Proportional Band Adjustment Knob Setting and Nozzle-Flapper Positioning

Proportional Band Adjustment Knob Setting Diagram

Illustration of how to set the proportional band adjustment knob.

Nozzle-Flapper Positioning Diagram

Diagram showing the correct positioning of the nozzle relative to the flapper.

Assembly Steps for Nozzle and Set Point Beam

Continues assembly procedures for the nozzle and set point beam components.

Adjustable Set Point Pivot Assembly and Linkage Alignment

Adjustable Set Point Pivot Assembly Locking Nut Diagram

Diagram showing the location of the adjustable set point pivot assembly locking nut.

Final Assembly Steps for Proportional Band Components

Final assembly steps for the proportional band adjustment, nozzle, and set point beam.

Calibration Procedure for Proportional Band Assembly

Procedure to match process pointer motion to set point indicator motion.

Bellows Assembly and Flapper Assembly Replacement

Bellows Assembly and Proportional Band Adjustment Diagram

Diagram showing bellows assembly and proportional band adjustment components.

Replacing Flapper Assembly and Flexure Pivot Assembly

Detailed steps for removing and installing the flapper assembly and its pivot.

Flapper Alignment and Linkage Adjustment

Leveling Screw Alignment Diagram

Diagram illustrating leveling screw alignment for the flapper assembly.

Exploded View of Flexure Pivot Assembly

Diagram showing the exploded components of the flexure pivot assembly.

Link 2 and 4 Adjustment Locations Diagram

Diagram showing adjustment locations for links 2 and 4.

Link 2 Adjustment Note for Tension

Note on adjusting link 2 to ensure tension and eliminate lost motion.

Flapper Alignment and Linkage Adjustment Procedures

Link 2 Adjustment Diagram

Diagram illustrating the adjustment procedure for link 2.

Flapper Alignment Steps and Linkage Adjustments

Detailed steps for flapper alignment and adjustments for links and leveling screws.

Link 4 Adjustment Note for Compression

Note on adjusting link 4 for compression to eliminate lost motion.

Link 4 Adjustment and Bourdon Tube Travel Stop Installation

Link 4 Adjustment Steps

Steps for adjusting link 4 to ensure proper compression and eliminate lost motion.

Bourdon Tube Travel Stop Adjustment Diagram

Diagram showing the location and adjustment of Bourdon tube travel stops.

Bourdon Tube Travel Stop Installation and Adjustment

Procedures for installing and adjusting travel stops for Bourdon tubes.

Bourdon Tube Calibration and Bellows Replacement

Bourdon Tube Zero and Span Calibration

Procedure for calibrating the zero and span of the Bourdon tube controller.

Replacing Reset Restriction Valve (4195KB Series)

Steps for replacing the reset restriction valve specific to 4195KB series.

Replacing Rate/Reset Valve Assembly (4195KC Series)

Steps for replacing the rate/reset valve assembly specific to 4195KC series.

Rate/Reset Valve and Anti-Reset Windup Replacement

Rate/Reset Valve Assembly Replacement Steps

Continues steps for replacing the rate/reset valve assembly.

Replacing Anti-Reset Windup Differential Relief Valve

Procedure for replacing the differential relief valve for anti-reset windup.

Replacing Anti-Reset Windup Relief Valve Tubing

Steps for replacing the relief valve tubing assembly for anti-reset windup.

Bourdon Tube Controller Maintenance and Calibration

Replacing the Bourdon Tube Procedure

Detailed steps for removing and installing a Bourdon tube.

Bourdon Tube Controller Link Locations Diagram

Diagram showing the location and adjustment of Bourdon tube controller links.

Bourdon Tube Controller Link Replacement Procedures

Disconnecting Link 1 from Bourdon Tube Diagram

Diagram showing how to disconnect link 1 from the Bourdon tube.

Replacing Bourdon Tube Controller Links

Describes the replacement of four specific links in the Bourdon tube controller.

Replacing Bourdon Tube Controller Link 1

Steps for replacing link 1, including adjustments and calibration.

Bourdon Tube Controller Link 2 and Link 3 Replacement

Process Pointer Alignment Diagram

Diagram illustrating process pointer alignment procedures.

Replacing Bourdon Tube Controller Link 2

Steps for replacing link 2, including pointer alignment and adjustments.

Replacing Bourdon Tube Controller Link 3

Steps for replacing link 3, including adjustments and checks.

Flapper Alignment and Linkage Adjustment

Flapper Leveling Screw and Clinch Nut Diagram

Diagram showing flapper leveling screw and clinch nut.

Link 4 Adjustment Screws Position Diagram

Diagram showing the position of link 4 adjustment screws.

Replacing Bourdon Tube Controller Link 4

Steps for replacing link 4, including adjustments and calibration.

Link 4 Adjustment and Bourdon Tube Travel Stop Installation

Link 4 Adjustment Steps

Steps for adjusting link 4 to ensure proper compression and eliminate lost motion.

Bourdon Tube Travel Stop Adjustment Diagram

Diagram showing the location and adjustment of Bourdon tube travel stops.

Bourdon Tube Travel Stop Installation and Adjustment

Procedures for installing and adjusting travel stops for Bourdon tubes.

Bourdon Tube Controller Calibration: Zero and Span Adjustment

Bourdon Tube Zero and Span Calibration Procedure

Detailed maintenance procedure for Bourdon tube zero and span calibration.

Bourdon Tube Travel Stop Contact Note

Note on checking Bourdon tube contact with optional travel stops.

4195K Controller Calibration Adjustment Locations

4195K Controller Calibration Adjustment Locations Diagram

Diagram showing adjustment locations for 4195K series controllers.

Bourdon Tube Calibration and Capsular Element Assembly Replacement

Bourdon Tube Calibration: Zero and Span Adjustment Steps

Continues steps for Bourdon tube zero and span calibration.

Replacing Capsular Element Assembly Procedure

Steps for removing and installing the capsular element assembly.

Capsular Element Assembly and Pivot Assembly Replacement

Long Pivot Clevis Assembly Cutaway Diagram

Diagram showing a cutaway of the long pivot clevis assembly.

Replacing Capsular Element Parts Procedures

Procedures for replacing individual parts of the capsular element assembly.

Replacing the Long Pivot Assembly

Steps for replacing the long pivot assembly with associated parts.

Pivot Assembly and Drive Flexure Replacement

Capsular Element Controller Link Locations Diagram

Diagram showing link locations and adjustments for capsular element controllers.

Replacing the Short Pivot Assembly

Steps for replacing the short pivot assembly and associated components.

Replacing the Process Drive Flexure

Procedure for replacing the process drive flexure.

Process Drive Flexure, Linkage, and Capsular Element Link Replacement

Process Drive Flexure Replacement Steps

Continues the procedure for replacing the process drive flexure.

Replacing the Process Tubing

Steps for removing and installing the process tubing.

Replacing Capsular Element Controller Links

Procedures for replacing five specific links in the capsular element controller.

Replacing Capsular Element Controller Link 1

Steps for replacing link 1, including adjustments and calibration.

Capsular Element Controller Link 2, 3, and 4 Replacement

Replacing Capsular Element Controller Link 2

Steps for replacing link 2, including pointer alignment and adjustments.

Replacing Capsular Element Controller Link 3

Steps for replacing link 3, including adjustments and checks.

Replacing Capsular Element Controller Link 4

Steps for replacing link 4, including calibration and adjustments.

Link 4 Adjustment and Capsular Element Linkage Alignment

Link 4 Adjustment Steps

Steps for adjusting link 4 to ensure proper compression and eliminate lost motion.

Capsular Element Assembly and Adjustment Locations Diagram

Diagram showing capsular element assembly parts and adjustment locations.

Aligning the Drive Bracket Assembly

Procedure for aligning the drive bracket assembly for proper flexure orientation.

Aligning the Capsular Element Linkage

Steps for aligning the linkage components of the capsular element assembly.

Capsular Element Travel Stops and Linkage Alignment

Setting Capsular Element Travel Stops

Procedures for setting full span and zero travel stops for capsular elements.

Travel Stop Nut Caution

Caution regarding potential capsule damage from travel stop nut binding.

Capsular Element Linkage Alignment Steps

Continues linkage alignment steps for capsular element assembly.

Capsular Element Linkage Alignment and Calibration

Capsular Element Linkage Alignment Steps

Continues linkage alignment steps, including pivot assembly and flexure alignment.

Remote Set Point Maintenance Calibration

Procedures for maintenance calibration of the remote set point assembly.

Span Adjustment Screw Note

Note that span adjustment requires zero adjustment readjustment.

Capsular Element Zero and Span Adjustment Procedures

Capsular Element Zero and Span Adjustment Steps

Detailed steps for performing zero and span adjustment on capsular element controllers.

Capsular Element Linearity Adjustment Note

Note on improving linearity with the linearity adjustment screw.

Remote Set Point Maintenance and Pivot Assembly Replacement

Remote Set Point Maintenance Calibration

Procedures for maintenance calibration of the remote set point assembly.

Precalibration Procedure for Remote Set Point

Steps to perform before calibrating the remote set point assembly.

Aligning the Flexures for Remote Set Point

Procedures for aligning guide and drive flexures for the remote set point assembly.

Replacing Remote Set Point Assembly Parts

Lists parts and adjustment locations for remote set point assembly replacement.

Replacing Pivot Assembly A

Steps for replacing pivot assembly A in the remote set point assembly.

Pivot Assembly, Flexure Alignment, and Travel Stops

Replacing Pivot Assembly B

Steps for replacing pivot assembly B in the remote set point assembly.

Setting Capsular Element Travel Stops

Procedures for setting full span and zero travel stops for capsular elements.

Travel Stop Nut Caution

Caution regarding potential capsule damage from travel stop nut binding.

Capsular Element Linkage Alignment and Remote Set Point Calibration

Capsular Element Linkage Alignment Steps

Continues linkage alignment steps for capsular element assembly.

Remote Set Point Zero and Span Adjustment

Procedures for zero and span adjustment of the remote set point.

Remote Set Point Linearity Adjustment

Procedure for adjusting linearity of the remote set point.

Auto/Manual Station Maintenance and Switch Body Assembly Replacement

Auto/Manual Station Maintenance

Procedures for maintenance of the auto/manual station.

Replacing the Auto/Manual Station

Steps for removing and installing the auto/manual station assembly.

Auto/Manual Station O-Ring Note

Note on replacing O-rings for the auto/manual station.

Auto/Manual Station Screw Tightening Caution

Caution about even tightening of screws to prevent tubing damage.

Replacing Switch Body, Lever O-Ring, and Tubing Assembly

Procedure for replacing switch body parts and tubing assembly.

Switch Body Assembly and Loader Spring Replacement

Switch Body Assembly Steps

Continues assembly steps for the switch body assembly.

Switch Body Spring Preload Caution

Caution about spring preload when disassembling switch body assembly.

Replacing Loader Spring, Diaphragm, Ball Seat, Tubing, and Ball

Detailed steps for replacing loader spring and associated components.

Loader Assembly and Valve Plug Replacement

Loader Assembly and Tubing Assembly Steps

Continues assembly steps for the loader mechanism.

Loader Seat Alignment Caution

Caution about aligning loader supply and exhaust seats for proper performance.

Replacing Loader Valve Plug and Spring

Steps for replacing the loader valve plug and its spring.

Controller Assembly Drawings Overview

Controller Assembly Drawings Overview

Diagrams showing various controller assemblies and their key numbers.

Controller Assembly Drawings - 4195KB Series

Controller Assembly Drawings (4195KB Series)

Diagrams illustrating controller assemblies for the 4195KB series.

Controller Assembly Drawings - 4195KC Series

Controller Assembly Drawings (4195KC Series)

Diagrams illustrating controller assemblies for the 4195KC series.

Controller Assembly Drawings - Section Views

Controller Assembly Drawings (Sections and Auto/Manual)

Diagrams showing section views and auto/manual station assemblies.

Controller Assembly Drawings - Remote Set Point and External Feedback

Controller Assembly Drawings (Remote Set Point/External Feedback)

Diagrams showing controllers with remote set point and external feedback options.

Process and Set Point Indicator Assembly for Bourdon Tube Controllers

Process and Set Point Indicator Assembly (Bourdon Tube) Diagram

Diagram showing the indicator assembly for Bourdon tube controllers.

Process and Set Point Indicator Assembly for Capsular Element Controllers

Process and Set Point Indicator Assembly (Capsular Element) Diagram

Diagram showing the indicator assembly for capsular element controllers.

Indicator Assembly Diagram

Indicator Assembly Diagram

Diagram showing the components of the indicator assembly.

Capsular Element Assembly Diagrams

Capsular Element Assembly Diagrams

Diagrams illustrating the capsular element assembly for different pressure types.

Type 83U Relay and Remote Set Point Assembly Diagrams

Type 83U Relay Diagram

Diagram showing the components and assembly of the Type 83U Relay.

Remote Set Point Assembly Diagram

Diagram showing the components and assembly of the remote set point assembly.

Auto/Manual Station Assembly Diagram

Auto/Manual Station Assembly Diagram

Diagram showing the components and assembly of the auto/manual station.

Internal and External Set Point Assembly Diagrams

Internal and External Set Point Assembly Diagrams

Diagrams illustrating the internal and external set point assemblies.

Section 6: Parts Information

Parts Ordering Information

Guidelines for ordering replacement parts, including serial number and part number reference.

Available Parts Kits

List of available repair kits for auto/manual stations and other components.

Common Controller Parts List (Figure 5-24)

List of common parts used across all controller types, referenced by figure 5-24 key numbers.

Abbreviations Used in Parts List

Glossary of abbreviations used in the parts list.

Parts List - Nozzle, Proportional Tubing, and Relay Assemblies

Pressure Gauge Part Numbers

Part numbers for pressure gauges, including dual and triple scale types.

Process and Set Point Indicator Assembly (Bourdon Tube) Parts

Part numbers for the process and set point indicator assembly with Bourdon tube.

Process and Set Point Indicator Assembly (Capsular Element) Parts

Part numbers for the indicator assembly with capsular element.

Parts List - Capsular Element Assembly and Pressure Connections

Process Scale Part Numbers (Vacuum/Compound)

Part numbers for process scales used with vacuum and compound pressure.

Process Scale Part Numbers (Positive Pressure)

Part numbers for process scales used with positive pressure.

Pressure Control Block Part Numbers

Part numbers for the pressure control block with different connection types.

Parts List - Process Scale Ranges and Bourdon Tube Keys

Process Scale Part Numbers (Positive Pressure)

Part numbers for positive pressure process scales across various ranges.

Process Scale Part Numbers (All Controllers)

Part numbers for all controllers' process scales, including square root.

Bourdon Tube Travel Stop Parts Note

Note about usage and specifications for Bourdon tube travel stop parts.

Parts List - Capsular Element and Bourdon Tube Scales

Capsular Element Assembly Part Numbers

Part numbers for capsular element assemblies based on pressure range and material.

Bourdon Tube Part Numbers

Part numbers for Bourdon tubes based on pressure range and material.

Parts List - Capsular Element, Bourdon Tube, and Indicator Assembly Components

Capsular Element Assembly Parts (Continued)

Continues part numbers for capsular element assemblies.

Bourdon Tube Part Numbers (Continued)

Continues part numbers for Bourdon tubes.

Indicator Assembly Parts (Figure 5-27)

Part numbers for the indicator assembly components.

Parts List - Capsular Element, Auto/Manual Station, and Remote Set Point Components

Capsular Element Assembly Parts (Figure 5-28)

Part numbers for capsular element assembly components.

Type 83U Relay Parts (Figure 5-29)

Part numbers for the Type 83U Relay components.

Remote Set Point Assembly Parts (Figure 5-30)

Part numbers for remote set point assembly components.

Parts List - Auto/Manual Station and Internal/External Set Point Components

Auto/Manual Station Parts (Figure 5-31)

Part numbers for auto/manual station components.

Internal/External Set Point Assembly Parts (Figure 5-32)

Part numbers for internal and external set point assembly components.

Controller Mounting Parts and Regulator Mounting Parts

Controller Mounting Parts (Casing-Mounted)

Part numbers for mounting controllers to casing-mounted actuators.

Controller Mounting Parts (Yoke-Mounted)

Part numbers for mounting controllers to yoke-mounted actuators.

Regulator Mounting Parts (Casing-Mounted)

Part numbers for mounting regulators to casing-mounted regulators.

Regulator Mounting Parts (Yoke-Mounted, No Bracket)

Part numbers for mounting regulators to yoke-mounted regulators without a bracket.

Regulator Mounting Parts (Yoke-Mounted, With Bracket)

Part numbers for mounting regulators to yoke-mounted regulators with a bracket.

Fittings Parts List

Fittings Part Numbers for Tubing and Hose

Part numbers for various fittings used with tubing and hose connections.

Related product manuals