3-2
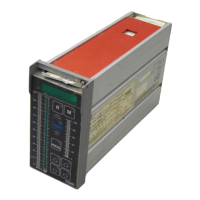
Controls and Indicators
9 - Output signal vertical bargraph display (O-1 00%).
10 - PROG Button - Switching button for selecting the configuration
mode. The red LED is lit during configuration. Selecting the
configuration mode also lights the SET and STORE lights.
11
- increase/Decrease Buttons -ON, Yellow, output signal can be
stepped up/down one point at a time. These buttons are lit and
active only when the controller is in the Manual mode.
12 - Increase/Decrease Buttons -ON, Green, setpoint and/or the
configuration value can be stepped up/down one point at a time.
These buttons are lit only when the controller is in the
configuration mode or the setpoint is being manipulated.
13 - SP Bargraph -Analog setpoint (SP) vertical bargraph display.
14 - PV Bargraph -Analog process value (PV) vertical bargraph
display. If alarm limits apply to the PV and are set in the
controller, such limits are indicated by brighter bars on the
display.
15 - SP - Setpoint light. Flashing or lit when setpoint is indicated on
digital display.
16 - C - Lit when communication has been configured
Press any of the four illuminated increase/decrease buttons, 11 or 12,
to change the displayed value one increment (0.1 percent of
measuring range). Holding the button down will continue to increase
or decrease the value until the button is released.
The SP or configuration value buttons (12) also make changes in
increments of 2.5% of measuring range. To increase/decrease this
way, first press and hold the desired direction button, and then press
the opposite button, The displayed value increases or decreases in
increments of 2.5% of the full measuring range.
3.2
Digital Display
The digital display can indicate several different functions:
n
Process value (normal display)
n
Setpoint
n
Alarms
n
Fault codes
n
Any analog input
n
Function codes and associated parameter setting (only during
configuration).
The following paragraphs address the displays available and give an
example of each.
May 1991