Maintenance of the Machine
212601 14/03/2023
61
9.2.2 Dismantling drill chuck with pin punch
The drill chuck must be dismantled with the help of a second person.
Attention
Damage to the spindle or drill chuck.
Make sure that when dismantling the chuck, it does not fall onto the drilling ta-
ble or vise. This can cause damage to components and render them unsuita-
ble for further use.
1. Switch off the machine (see section 7.1 Switching the machine off, page
52).
2. Swivel the drill guide to the left side.
Attention. Danger due to hot cutter.
The cutter may still be hot after use. Cool the cutter with coolant or remove it
with a protective glove.
3. First, remove the cutter from the chuck before disassembling the chuck.
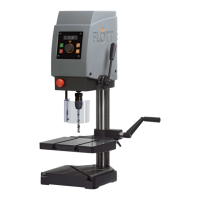
4. Turn (2nd person) the drill lever down until the lateral pin
openings are visible.
Hold the drill lever in this position.
5. Hold the drill chuck tight with one hand so that it does not
fall onto the drilling table or vise after dismantling and is
damaged.
6. Insert the pin punch through the side opening of the quill.
Make sure the rounded side is at the top.
Attention
Damage to the quill.
Pay attention to the correct insertion of the pin punch in the quill. Never move
the quill with the drill level turned up when the pin punch is inserted to loosen
the chuck. This will damage the quill, and may render the machine unsuitable
for further use.
7. Gently tap the end of the pin punch with a hammer, this will release the chuck
from the spindle.
8. Remove the chuck.
9. Check the spindle and the drill chuck for dirt, wear or damage.