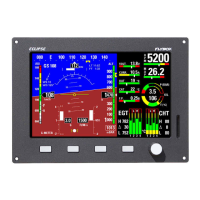
5.3 Using the menus
The buttons functionality, inside the configuration menus, is indicated by onscreen labels:
In this example P1 button is assigned to “exit” function (i.e. exit from the current menu) and knob button is assigned to “enter”
function (pressing the knob it enter in the function currently selected).
To show the available menu and functions press one of the 4 buttons (P1,P2,P3 or P4). The menu is always shown on the bottom
section of the display, with each button assigned to the corresponding function indicated by its onscreen label.
After a settable time the menu automatically disappear (see chap. 6, “CONFIGURATION MENU”).
To enter in a function assigned to a button simply press it, to enter in a function assigned to the knob rotate it until the function
become selected and then press the knob.
To clarify the operating mode of the menus we explain below an example of operation:
In this example P1 button is assigned to “EIS” function, P2 button to “ZERO PITCH” function, P3 button to “TRK” function. Rotating
the knob will select one of the available functions (“LOG MARK”, “CAMERAS”, “ALT BUG”, “HDG BUG/AP”, “DIMMER”, “RESET G”),
pressing the knob will enter the selected function.
For example choosing the “DIMMER” function will display the following menu:
Now it's possible to set the function value rotating the knob (in this example the value is 10). Press P4 button (DONE) to save the
changes and exit from the function.
The menus and functions available are dynamic and depends on the screen currently displayed, on the ECLIPSE model and on the
sensors/functions enabled; on each section of this manual it's explained all the menus and functions available.
24