CR194 Two-High Vacuum Limitamp@ Control
Step 12.
To remove the CPT, disconnect the control wires that
are attached to the transformer terminal board and
disconnect the two CPT high-voltage fuse leads that at-
tach to the lower terminals of the power fuse assembly.
Then remove the transformer and fuse block assembly
by removing the four (4) bolts that mount the trans-
former. See Figure 24 for view with CPT, CPT fuse
block and power fuses removed.
NOTE:
It is typically not necessary to gain access to the main
to uertical bus connections, but this option is auailable as de-
tailed in Steps 13-16.
If
access to these connections is not re-
quired, then disassembly is complete.
Step 13.
To access the main to vertical bus joints in the center
of the main bus, additional parts must be removed as
outlined below. First remove the three power fuses.
Step 14.
Remove the lower power fuse base assembly by
removing the eight (8) mounting screws on each side
of the lower fuse base assembly. Figure 25 shows the
compartment once the lower fuse base assembly has
been removed.
Step 15.
Remove the screws that mount the contactor lower
terminal assembly as shown in Figure 25. Also remove
the four (4) screws that mount the “U” shaped insula-
tion barrier at the rear of the compartment as shown
in Figure 25.
Step 16.
Move the contactor lower terminal assembly forward
and lift up and pull forward at the bottom of the “U”
shaped insulation barrier at the rear of the compart-
ment as shown in Figure 26. The barrier can then be
completely removed from the enclosure to fully ex-
pose the main to vertical bus joints as shown in Figure
27, which completes the disassembly.
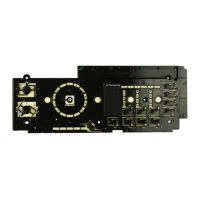
Figure
24.
CPT and stationary contactor removed to provide
better access to main bus bars on left side
Figure 25. View with lower fuse base assembly removed
(stationary contactor design)
15
 Loading...