11
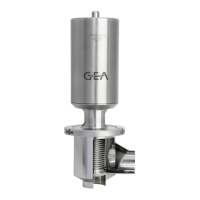
2013-10 · Anschlusskopf T.VIS P-1 / Control Module T.VIS
®
P-1
Optische Anzeige
Folgende Zustände werden in der Leuchtkuppel
optisch angezeigt:
– Ventil ZU grün
– Ventil AUF gelb
– Programmiermodus aktiv rot Dauerlicht
– Fehler / Störung rot schnell blinkend
– Ventil unprogrammiert rot blinkend
telegrammartig, d. h.
3x blinken – Pause – 3x blinken – Pause
– Position wird ausgeregelt blau blinkend
– Position ist ausgeregelt blau Dauerlicht
Keine Signalisierung über einen Zeitraum von
mehr als 5 s weist auf einen Stromausfall hin!
Visual indication
The following stati are visualised via the illuminated
cap:
– Valve CLOSED green
– Valve OPEN yellow
– Programming mode active red permanent light
– Fault / error red quick-flashing
– Valve non-programmed red flashing
in telegraphic style, i.e.
3x flashing – Pause – 3x flashing – Pause
– Position is being regulated blue flashing
– Position is regulated blue permanent light
No signalling within a period of more than 5 s indicates
a power failure.
Haube / Cap
Leuchtkuppel / Illuminated cap
Taste - / Key -
Taste - / Key -
Farbumschaltung
Mit Hilfe der Funktion „Farbumschaltung” können Sie
grun zu gelb und gelb zu gru n umschalten.
• Anschlusskopf spannungsfrei schalten.
• Beide Tasten gleichzeitig betätigen und gedru ckt hal-
ten.
• Versorgungsspannung wieder einschalten. Die Tasten
mussen nach dem Einschalten der Versorgungsspan-
nung noch 3 Sekunden betätigt bleiben.
HINWEIS
Bei Farbumschaltung werden auch die Ruckmeldesig-
nale getauscht!
Colour Changeover
The "colour changeover" function allows you to change
green to yellow and yellow to green.
• Disconnect the control module from the power supply.
• Press both buttons at the same time and keep them
pressed.
• Switch the power supply back on. After switching on
the power supply voltage, continue to press the but-
tons for another 3 seconds.
NOTE
When the colours are swapped, the feedback signals are
also swapped!

 Loading...