Accuracy Adjustment Zone20 H | 23
7.2 Adjusting the Level Accuracy
Description
Entering adjustment
mode step-by-step
The following sequence of LED behaviour occurs:
• The X-axis and the Y-axis LEDs flash alternately three times.
• The X-axis LED flashes three times, then flashes slowly until level. When the Zone20 H is level, the X-
axis LED is on, but does not flash.
• The Y-axis LED is off.
Adjusting the X-axis
step-by-step
The following sequence of LED behaviour occurs:
• The X-axis and the Y-axis LEDs flash alternately three times.
• The Y-axis LED flashes three times, then flashes slowly until level. When the Zone20 H is level, the Y-
axis LED is on, but does not flash.
• The X-axis LED is off.
Adjusting the Y-axis
step-by-step
Exiting adjustment
mode step-by-step
Press and hold the Automatic/Manual Mode button for 3 seconds to save and exit Adjustment Mode.
The X-axis LED and Y-axis LED flash alternately three times, then the Zone20 H shuts off.
Pressing the Power button at any time while in Adjustment Mode will exit the mode without saving
changes.
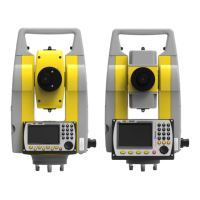
In Adjustment Mode the X-axis LED indicates changes to the X-axis.
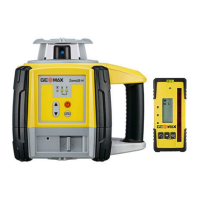
The Y-axis LED indicates changes to the Y-axis
011294_001
X
011295_001
Y
Step Description
1. Turn off the power.
2. Press and hold both the Up and Down Arrow buttons.
3. Press the Power button. The active axis is the X-axis.
Step Description
1. Press the Up and Down Arrow buttons to increment the laser beam up and down. Each incre-
ment is indicated by a flash of the X-axis LED and a beep from the audio indicator.
2. Continue to press the Up and Down Arrow buttons and monitor the spot until the Zone20 H is
within its specified range.
Five steps are equal to 10 arc seconds of change, or approximately 1.5 mm at 30 m
(1/16" at 100’).
3. Press the Automatic/Manual Mode button to switch to the Y-axis.
Step Description
1. Press the Up and Down Arrow buttons to increment the laser beam up and down. Each incre-
ment is indicated by a flash of the Y-axis LED and a beep from the audio indicator.
2. Continue to press the Up and Down Arrow buttons and monitor the spot until the Zone20 H is
within its specified range.
Five steps are equal to 10 arc seconds of change, or approximately 1.5 mm at 30 m
(1/16" at 100’).
3. Press the Automatic/Manual Mode button to switch back to the X-axis if desired.
 Loading...