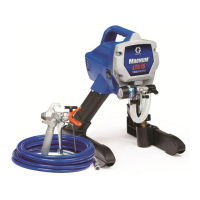
14
308-105
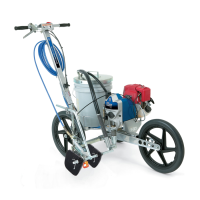
Startup
Before
Y
ou Start the Linestriper
1. See
Flushing,
page 13, to determine if
the Line Lazer
should
be flushed.
2.
Be sure the gas tank is full.
3.
Check the engine oil level.
NOTE: The engine stops automatically, or will not start,
if
it is low on oil. If you
try to start it again without adding
more oil, a red light (A) near the engine on/of f switch
glows
as you pull the starter rope.
4. Be
sure
the spark plug cable (J) is firmly pushed onto
the
spark plug.
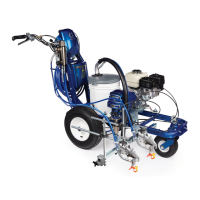
Startup See
Fig. 8.
1. When starting a sprayer that IS NOT PRIMED, re-
move
the spray tip.
2. Place
the
suction tube (S) into the paint, water or sol
-
vent
container
, depending on whether
you are flush
-
ing
or are ready to spray
.
3. Open
the black fuel
shutof
f lever (E)
by pushing it in
the
direction of the arrow
.
CAUTION
Never start the engine unless fluid pressure is re-
lieved
and the pressure control switch is turned OFF
.
Attempting
to start the engine when it is pressurized
could
damage the recoil system.
4. T
urn OFF the pressure control switch (K).
5. T
o start the engine:
a. Turn
the pressure adjusting
knob
(L) all the way
counterclockwise
to the lowest pressure setting.
b. Slide the metal throttle lever (C) away from the
fuel
tank to the maximum position (fully left).
c. If
the engine is cold,
close the
choke by moving
the
gray lever (D).
d. If
the engine is warm
,
close the
choke by moving
the
gray lever (D) only half way or not at all.
e. T
urn ON the engine switch (B).
WARNING
A rope that recoils too
quickly may hit someone and
cause serious bodily injury
. The rope could also jam
in the recoil assembly
.
f. Hold
the frame of the sprayer with one hand
and
pull the starter rope (G) rapidly and firmly. Con-
tinue
holding the rope as you let it return. Pull and
return
the rope until the engine starts.
g. Open the choke as soon as the engine starts,
except in cold weather . In cold weather , leave
the choke closed for 10 to 30 seconds before
opening
it to keep the engine running.
6. Release
the trigger cable and engage the gun trigger
safety
latch.
See page 22.
7. Remove
the gun from the
holder
by unscrewing the
gun
holder knob and lifting out the gun.
8. To start the pump:
NOTE:
Lower the throttle setting for easier priming.
a.
Open the pressure drain valve (R).
b. T
urn ON the pressure control switch (K).
c. Turn
the pressure control
knob (L) about 1/4 turn
from
minimum pressure. Run the pump until
fluid
is flowing smoothly from the pressure drain
valve,
indicating the pump is fully primed.
d.
Close the pressure drain valve (R).
e. Disengage the gun safety latch. Hold a metal
part of the gun firmly against a grounded metal
pail,
squeeze the trigger until fluid
flows from the
gun.
f. Release
the trigger
. Engage the safety latch.
NOTE: If you are using two guns, follow Step e and f,
above,
for the second gun.
9. If you have not primed the sprayer with paint yet,
move
the suction tube (S) to the paint container
. Re
-
lease
the trigger safety latch.
T
rigger the gun into the
water/solvent pail just until paint appears. Release
the trigger and engage the trigger safety latch. Re-
peat
for the second gun, if two guns are used.
10.
Place the pail cover (F) on the pail.
WARNING
To
reduce the risk of serious bodily injury from fluid in
-
jection, NEVER operate the spray gun with the tip
guard
removed.
11. Install
the tip guard and spray tip (M). See page 16.
12.
Mount the gun in the gun holder
. See page 21.
13.
Engage the trigger cable.
See page 22.
CAUTION
Always use the lowest fluid pressure and the lowest
throttle
setting needed. Higher settings cause exces
-
sive clutch cycling, premature tip wear and prema-
ture
pump wear
.
14. Adjust
the engine speed and pump pressure.
Trigger
the
gun onto a test paper to check the spray pattern
and atomization. Turn the pressure adjusting knob
(L)
until
you get a good pattern. Then slowly lower the
throttle
setting (C) as far
as you can without changing
the
spray pattern.
 Loading...