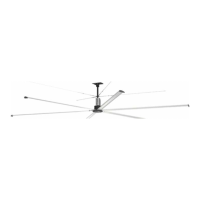
High Volume, Low Speed Ceiling Fans 15
®
Gripple
®
Hardware (Optional)
IMPORTANT: Guy wires must be installed 45º to 60º
from vertical to ensure proper functioning.
Components required from Bag # 915067:
• Guy Wire Clamp Assembly (4)
• Guy Wire Clamp Bolt (4)
• Quick Link (8)
• 20 ft. Guy Wire (4)
• No. 4 Gripple
®
Connector (4)
• Turnbuckle (4)
Hardware/Tools Needed (Not Included):
• Adjustable Wrench
• Level
• 1/16 in. Allen Wrench (optional)
1. Secure guy wire clamps to the building structure
using the guy wire clamp bolts. Attach guy wires
to the eyelets on the guy wire clamp assemblies
using (4) supplied quick links.
GUY WIRE
GUY WIRE CLAMP ASSEMBLY
GUY WIRE CLAMP BOLT
QUICK LINK
2. Insert the loose end of each guy wire into a No. 4
Gripple connector until a length of wire is pushed
through the connector. Insert the loose end of the
guy wire through the end of the turnbuckle and
push back through the No. 4 Gripple connector to
close the loop.
3. Attach all (4) turnbuckles to the guy wire
attachment ring located on the downtube using
(4) supplied quick links. Pull the loose end of each
guy wire through the No. 4 Gripple connector until
each guy wire is taut.
DOWNTUBE & MOUNT ASSEMBLY
GUY WIRE
45º to 60º
No. 4 GRIPPLE CONNECTOR
GUY WIRE ATTACHMENT RING
TURNBUCKLE
QUICK LINK
4. Place a level against the downtube and tighten all
(4) turnbuckles by hand in a crisscross pattern until
the guy wires are tight and the fan is level.
NOTE: When leveling the fan, place the level against
the downtube in-between two neighboring guy wires
to simplify the leveling process. The level should also
be moved around the circumference of the downtube
periodically to ensure that the fan is level in all
directions.
5. Cut or organize excess guy wires to ensure that
they do not interfere with fan rotation.
NOTE: If necessary, the guy wires can be loosened by
inserting the long end of a 1/16 in. allen wrench into
either of the pin holes on the No. 4 Gripple connector
and pulling the cable in the opposite direction of the
arrow marked on the Gripple connector.
IMPORTANT: Do not operate fans without the airfoil
blades. Failure to comply with this warning will result
in voiding of the product warranty and may result in
permanent damage to the VFD and motor.
WARNING
To reduce the risk of personal injury, do not bend
motor struts, airfoil blades, or airfoil retaining links
when installing the airfoil blades, balancing the blades,
or cleaning the fan. Damage to these components may
result in unsafe operation of the fan, which can lead
to property damage, personal injury or death. Contact
your local representative or the factory if replacement
parts are needed.
WARNING
To reduce the risk of personal injury, do not insert
foreign objects in between rotating fan blades.
AVERTISSEMENT
Pour réduire le risque de blessure, ne pliez pas les
entretoises moteurs, ailerons ou aile en conservant
des liens lors de l’installation des aubes, équilibrez,
ou nettoyer le ventilateur. Ces composants peuvent
endommager en utilisation dangereuse du ventilateur,
qui peut conduire à des dommages matériels, des
blessures ou la mort. Ces composants peuvent
endommager en utilisation dangereuse du ventilateur,
qui peut conduire à des dommages matériels, des
blessures ou la mort.
AVERTISSEMENT
Ces composants peuvent endommager en utilisation
dangereuse du ventilateur, qui peut conduire à des
dommages matériels, des blessures ou la mort.
Airfoil Blade & Winglet Installation