High Volume, Low Speed Ceiling Fans 17
®
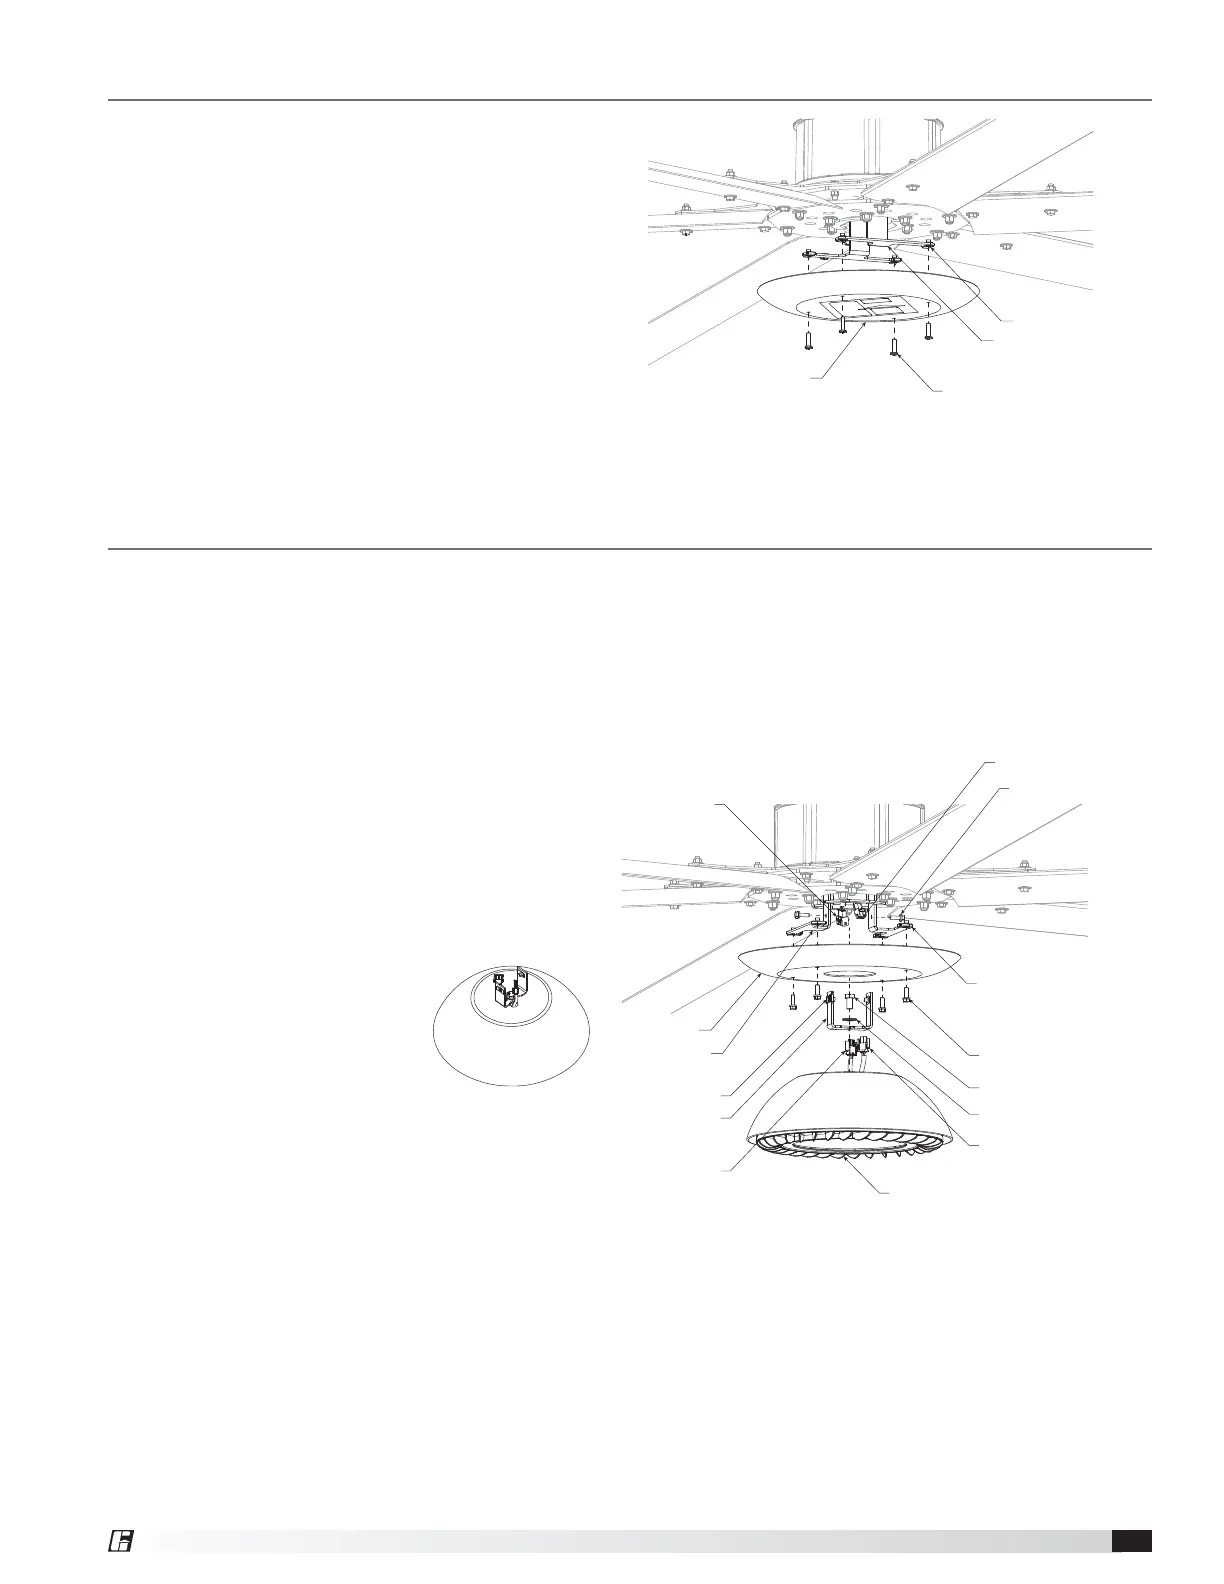
Components required from Bag # 915066 OR 854832:
• Hub Plate (1)
• 1/4 in. – 20 x 1 in. Stainless Steel Machine Screw (4)
Hardware/Tools Needed (Not Included):
• Torque Wrench
1. Align (4) holes in the faceplate with the (4) U-nuts
on the hub retention bracket.
2. Insert (1) 1/4-20 x 1 stainless steel machine screw
per hole and hand tighten to ensure all fasteners
will engage the U-nuts.
3. Torque fasteners to 96 in∙lbf (10.8 N∙m).
HUB PLATE
U-NUT
HUB RETENTION BRACKET
1/4 - 20 x 1 in. STAINLESS STEEL MACHINE SCRE
Hub Plate Installation
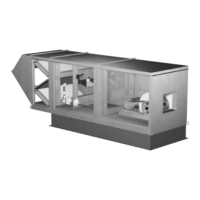
Components required from Bag # 915436:
• Hub Covering Plate (1)
• LED Light Assembly (1)
• LED Light Mounting Bracket (1)
• 1/4 in. – 20 x 3/4 in. Grade 5 Hex Bolt (6)
• M10 – 1.5 x 20 in. Grade 8.8 Hex Bolt (1)
• 3/8 in. Washer (1)
Hardware/Tools Needed (Not Included):
• Torque Wrench
• 17mm Socket
• 3/8 in. Magnetic Nut Driver
• Magnetic Nut Driver Extension
• Impact Driver
1. Use the supplied M10 – 1.5 x
20 in. grade 8.8 hex bolt and
3/8 in. washer to attach the
LED light mounting bracket
and light shroud to the light.
2. Insert the LED light mounting bracket into the
cut-out of the hub covering plate. Allow the hub
covering plate to sit on the top of the LED light
assembly.
3. Lift the LED light assembly and hub covering plate
until the u-nuts on the LED light mounting bracket
are aligned with the mounting holes in the hub
retention bracket. Install (2) 1/4 in. – 20 x 3/4 in.
grade 5 hex bolts into the u-nuts using a magnetic
nut driver extension and impact driver. Torque to
120 in∙lbf (13.6 N∙m).
4. Connect the male light power (3 pin) and light
communication (2 pin) plugs from the LED
light assembly to their corresponding female
connectors in the motor.
NOTE: The LED light assembly can be pivoted out of
the way to simplify connection of the light power and
light communication plugs.
5. Raise the hub covering plate until the holes in
the plate are aligned with the u-nuts on the hub
retention bracket. Install (4) 1/4 in. – 20 x 3/4 in.
grade 5 hex bolts into the u-nuts. Torque to
96 in∙lbf (10.8 N∙m).
LIGHT POWER PLUG
HUB COVERING
PLATE
HUB RETENTION
BRACKET
U-NUT
LIGHT BRACKET
LIGHT POWER PLUG
LED LIGHT ASSEMBLY
LIGHT COMMUNICATION PLUG
U-NUT
1/4 in. - 20 x 3/4 in. GRADE 5 HEX BOLT
(6 PER ASSEMBLY)
LIGHT COMMUNICATION PLUG
1/4 in. - 20 x 3/4 in. GRADE 5 HEX BOLT
M10 - 1-1/2 x 20 in. GRADE 8 HEX BOLT
3/8 in. WASHER
6. Using the attached 115v light power cable located
at the top of the downtube, wire the LED light
into the buildings light grid. Be sure to follow all
national and local codes for electrical installation.
LED Light Installation (Optional)