9
Chapter 2 - QUICK START
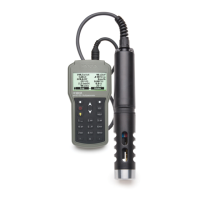
Before you begin using the HI 9829 multiparameter system, either charge the
included rechargeable C batteries for at least 6 hours or replace the rechargeable
batteries with non-rechargeable alkaline batteries.
2.1 SENSOR AND PROBE INSTALLATION
• Sensor o-rings must be lubricated with the supplied grease prior to
installation.
• HI 76x9829 probes have 3 sensor connectors identified with color-
coded triangles:
•
Connector 1 (red): For either pH/ORP, pH, ammonium, chloride or
nitrate sensor
• Connector 2 (white): For dissolved oxygen sensor
• Connector 3: (blue): For either EC or EC/turbidity sensor
• Position the connector key towards the center of the probe, make sure
the connector is seated correctly (the sensor will no longer move freely)
before tightening the locking threads.
• To protect the sensors, screw the protective shield onto the probe body.
• Unscrew the battery cover of the HI 7629829 logging probe and install
4 AA batteries for autonomous logging before connecting to the meter.
• With the meter off, connect the probe to the DIN socket on the bottom
of the meter. Align the pins and key then push the plug into the socket
and tighten the thread.
• Turn the meter on by pressing the ON/OFF key. The meter will
automatically recognize the probe and the installed sensors and identify
them on the probe status screen.
• Press <Measure> to view the measurement screen.
 Loading...