7 / 148
Fogantyú összeszerelése: VIGYÁZZ! A termék károsodásának a veszélye! Az összeszerelésnél szenteljen
figyelmet a bowdenek pályájának is. A bowdenek nem lehetnek túl kis sugárban vezetve és nem csípődhet
be sehová. Lazítsa meg a tartócsavarokról (B) a biztosító alátéttel és alátéttel ellátott önbiztosító anyákat (A). Telepítse
a fogantyút a tartócsavarokra és rögzítse önbiztosító anyák, biztosító alátét és alátét segítségével. Húzza be az anyákat.
Megjegyzés: Bizonyosodjon meg arról, hogy a fogantyú támaszték (E) és a fogantyú (C) között rezgéscsillapító van
telepítve (D).
Mounting the steering
CAUTION
Product damage!
Pay attention to the routing of the Bowden cables.
The Bowden cables may neither be routed in too small a radius not may they be
crushed.
– Loosen the self-locking nut (20) with the circlip
and the washer from the round-head screw with
square neck (21).
– Push the steering (3) onto the round-head screw
with square neck (21).
– Screw the self-locking nut (20) with the circlip
and the washer onto the round-head screw with
square neck (21) and tighten it.
Note:
Make sure that the vibration damper (22) between the arm housing (4) and the
steering (3) is installed.
Mounting the Bowden cable guide
CAUTION
Product damage!
Pay attention to the routing of the Bowden cables.
The Bowden cables may neither be routed in too small a radius not may they be
crushed.
– Loosen the self-locking nut (28) with the circlip
and the washer from the screw (29).
– Push the screw (29) with the washer through
the hole in the bracket (30) and the arm housing
(4).
– Screw the self-locking nut (28) with the circlip
and the washer onto the screw (29) and tighten it.
5
a
c
d
b
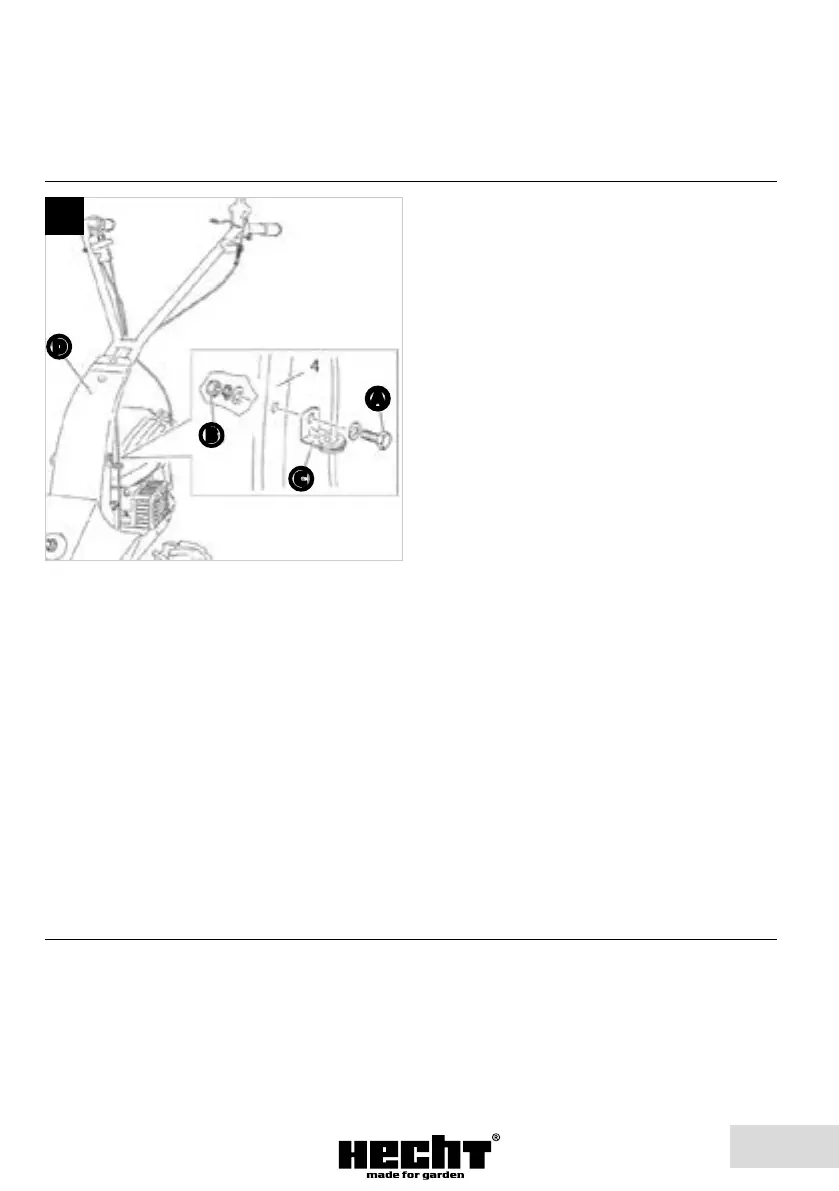
Bowden cable guide: CAUTION! Product damage!
Pay attention to the routing of the Bowden cables.
The Bowden cables may neither be routed in too
small a radius not may they be crushed. Loosen
the self-locking nut (B) with the circlip and the washer
from the screw (A). Push the screw with the washer
through the hole in the bracket (C) and the handlebars
support (D). Screw the self-locking nut with the circlip and
the washer onto the screw and tighten it.
Držák bowdenu: POZOR! Nebezpečí poškození
výrobku! Při montáži věnujte pozornost dráze
bowdenů. Bowdeny nesmějí být vedeny příliš
malým poloměrem a nesmějí být nikde skřípnuté.
Uvolněte ze šroubu (A) samosvorné matice (B) s pojistnou
podložkou a podložkou. Provlékněte šroub s podložkou
skrz otvor v držáku (C) a podpěře rukojeti (D). Pomocí
samosvorných matic, pojistných podložek a podložek
držák připevněte. Dotáhněte matice.
Držiak bowdenu: POZOR! Nebezpečenstvo poškodenia výrobku! Pri montáži venujte pozornosť dráhe
bowdenu. Bowdeny nesmú byť vedené príliš malým polomerom a nesmú byť nikde priškripnuté, resp.
zlomené. Uvoľnite zo skrutky (A) samosvorné matice (B) s poistnou podložkou a podložkou. Prevlečte skrutku s podložkou
skrz otvor v držiaku (C) a podpere rukoväte (D). pomocou samosvorných matíc, poistných podložiek a podložiek pripevnite
držiak. Pritiahnite matice.
Uchwyt bowdena: UWAGA! Niebezpieczeństwo uszkodzenia produktu! Podczas montażu zwróć uwagę
na bowden. Bowdeny nie mogą być prowadzone zbyt małym promieniem i nie mogą być nigdzie
przygniecione. Poluzuj nakrętki samozabezpieczające (B) z podkładką zabezpieczającą i podkładką od śrub (A). Przejdź
śrubą z podkładką przez otwór w rękojeści (C) i wspornik rękojeści (D). Używając nakrętek samozabezpieczających,
podkładek zabezpieczających i podkładek, zamocuj rękojeść. Dokręć nakrętki.
Bowden tartó: VIGYÁZZ! A termék károsodásának a veszélye! Az összeszerelés során szenteljen figyelmet
a bowden pályájának. A bowden nem lehet túl kis sugárban vezetve és nem csípődhet be sehová. Lazítsa
meg az önbiztosító anya (B), biztosító alátéttel és alátéttel ellátott csavarját (A). Húzza át az alátéttel ellátott csavart
a tartóban (C) található nyíláson és a fogantyú támasztékon (D). Az önbiztosító anyák, biztosító alátétek és alátétek
segítségével, rögzítse a tartót. Húzza be az anyákat.