45
(1) Speedometer cable (2) Tab (3) Brake cable
(4) Brake arm (5) Brake panel
(6) Front brake adjusting nut (7) Axel nut
(8) Axle (9) Side collar
5
6
1
(10) Lug (11) Slot
10
11
•
Reverse the removal procedure.
•
Remove the axle nut (7).
Front wheel installation (Drum type)
•
Remove the axle (8) and side collar (9).
•
Remove the wheel.
(b) Front wheel removal (Drum type)
•
Support the vehicle securely on the main
stand and raise the front wheel off the
ground.
•
Remove the speedometer cable (1) by
pressing the tab (2) & pulling cable out
from the speedometer gearbox.
•
Disconnect the brake cable (3) from brake
arm (4) and brake panel (5) by removing
the front brake adjusting nut (6).
•
Install the front wheel by ensuring that the
lug (10) on the left fork is located in the slot
(11) in the brake panel.
•
Tighten the axle nut.
Axle nut torque: 5.2 Kgf-m
•
After installing wheel, apply the brake
several times and check for free wheel
rotation when released.
•
Adjust the brake (page 41).
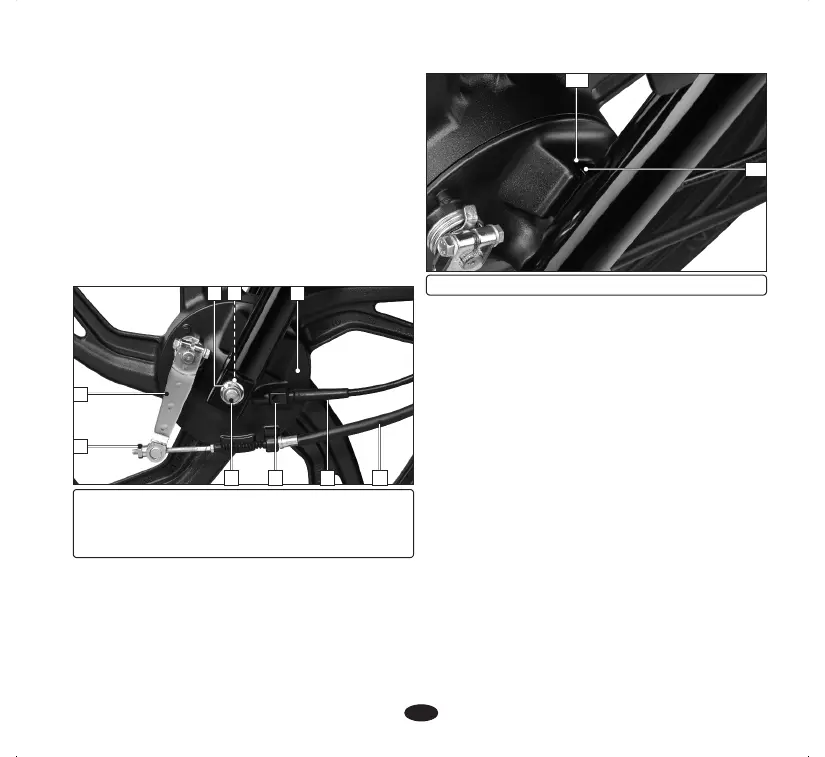
(c) Rear wheel removal
•
Support the vehicle securely on the main
stand and raise the front wheel off the
ground.
•
Remove the rear brake adjusting nut (1)
and disconnect the brake rod (2) from the
brake arm (3) by pushing down the brake
pedal. Disconnect the brake stopper arm
(4) from the brake panel (5) by removing
split pin (6) and lock nut (7).
2 3
4
8
97