USER MANUAL | NOVA OCUs
15
5.
Getting Your OCU to work
Get ready to embark on your control adventure!
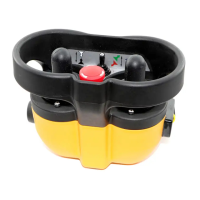
5.1 Holding the OCU
Hold the OCU upright, with the control console facing you. Take a moment to ensure that you can easily read and understand
any operation text or symbols - it's your roadmap to safely controlling your equipment remotely.
Now, let's dive into the daily routine. Complete the following procedures once a day, before kicking off your operation, and during
all shift changes. With these steps, you'll navigate through your control tasks efficiently but most above all safely.
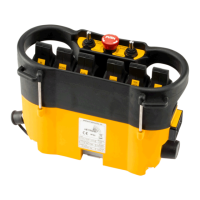
5.2 Visually checking the OCU
Before diving into action, it's time for a quick gear check! Take a moment to inspect your OCU, batteries, and accessories for any
signs of wear and tear. Look out for physical damage like scratches, cracks, or any other mishaps. Next up, give your equipment
a once-over, making sure there's no wear or damage that could compromise your safety. And don't forget to double-check the
safety warning labels - they're your trusty guides to a smooth control operation.
Remember, safety comes first! Never fire up an OCU with worn-out or damaged parts. Keep your gear in tip-top
shape for smooth control ahead!
5.3 Powering ON and starting the OCU
Quick reminder: when the OCU isn't in action, keep it in a safe place. Now, let's prep for action with these easy steps:
1. Double-check that you've got all the safety measures covered as described previously.
2. Load up your OCU with fresh batteries.
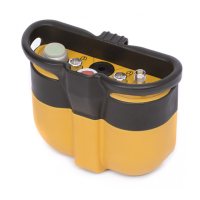
3. Ensure the STOP switch (#6) is OFF and no other switches are in action mode.
4. Time to power up! Pop the black key cap into the key switch and turn it to the ON (I) position.
5. Power ON the equipment if required for the machine control unit to initialise itself.
6. Finally, hit that START button (#7) and watch your OCU do its startup self-test initialisation sequence.
Note: The Start button is typically a green quadratic push button located on the right-hand side of the OCU, as indicated above.
However, it may also appear as a momentary toggle switch or round push button with the symbol , often paired with the horn
function .
Ensuring proper familiarity with the OCU's functions is crucial for safe operation. Let's proceed with caution and adhere to
recommended procedures.
5.4 Initialization of OCUs equipped with a status LED indicators
When the OCU is turned ON, all LEDs illuminate as solid colors, accompanied by two beeps from the buzzer on the OCU,
approximately two seconds apart. Subsequently, the LEDs turn off as the OCU proceeds with routine initialization.
During initialization, if the OCU logic controller detects an error in the radio frequency module, address, configuration, or feedback,
the OCU will still boot up. An error will be indicated by a blinking RED status LED. In such cases, all variants of the Nova C, Nova
L, Nova XL, and Nova XXL OCUs may be connected to Hetronic PC-Link (please refer to the Programming and Servicing Manual
for instructions) to diagnose and address the error.
Please note: If the buzzer output remains continuously ON, it indicates an issue with the address module, which itself may not be
present, plugged in correctly, or is defective.
Upon successful initialization, the OCU enters Normal Operation Mode. The Green LED blinks periodically, toggling on with every
transmitted telegram frame, while all other LEDs remaining in OFF state. It's recommended to thoroughly test all machine
functions and refer to the respective documentation for your machine, OCU, and radio remote MCU as needed.
5.5 Initialization of OCUs equipped with a display and status LED indicators
The initialization sequence is similar to the one described in section 5.4. After a successful initialization, the NOVA OCU enters
Normal Operation Mode. The display will show the software version and the splash screen if the latter has been configured. After
initialization, the basic home screen will appear, accompanied by the blinking of the green LED. The LED toggles ON with every
transmitted telegram frame, while all other LEDs switch off. Proceed to test all machine functions. Refer to the documentation
provided for your machine, OCU, and remote control MCU as necessary.