29
Measuring Earth Resistance Precisely
(Precise Measurement, 3-Pole Measurement Method)
Insert the auxiliary earthing rods into a moist layer in the ground. Because
this instrument can accept a large resistance of auxiliary earthing electrode,
the auxiliary earthing rods do not need to be inserted unnecessarily deep
into the ground.
For accurate measurement, the distances between earthing electrodes E,
S(P), and H(C) need to be approximately 5 m. The measurement cables
(yellow) and (red) should be positioned approximately 100 mm away from
each other not to tangle or overlap together.
Settings for 3-pole measurement
Set the Poles selector to 3.
Setting the measurement frequency
Select the measurement frequency between 575 Hz and 600 Hz by
switching the Hz selector. Usually, set the frequency to 575. If the needle of
the galvanometer uctuates during measurement, set the frequency to 600.
Switching the measurement frequency enables the instrument to be less
affected by a harmonic earth voltage.
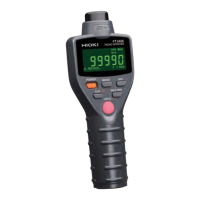
Battery check
Set the range selector to the mark
, press the MEASURE
button, and check if the needle of the
galvanometer rests within the range of
the mark
. Perform this check
in the actual measurement condition
with the measurement leads already
connected.
If the needle of the galvanometer does not reach the range of
the mark
, replace the batteries with fresh ones. See “4.2
Inserting/Replacing Batteries” (p. 52).
1
2
3
4
5
6
7
Appx. Ind.