Do you have a question about the Hioki BT3554 and is the answer not in the manual?
Guide on how to measure a new battery for baseline comparison.
Illustrates how battery wear affects resistance and voltage measurements.
Instructions for connecting test leads to the battery tester.
Steps to power on the battery tester and check clock settings.
Procedure for adjusting the measurement range settings.
Enabling automatic data holding and storage features.
Procedure for connecting the instrument's test leads to a battery.
How to retrieve stored measurement data using the READ key.
Using the comparator to set threshold values for battery wear judgment.
Examples of PASS, WARNING, and FAIL limits for battery wear.
How to transfer measurement data from the instrument to a PC via USB.
Using Bluetooth to view measurement data on smartphones or tablets.
Understanding how to measure battery wear based on internal resistance.
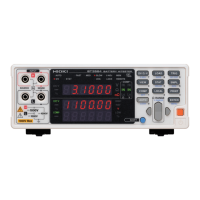
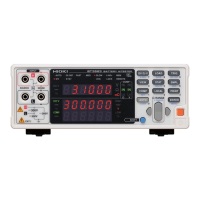
General overview of the instrument's capabilities and purpose.
Key features and functionalities of the battery tester.
Identification and explanation of the instrument's parts and controls.
Physical dimensions and specifications of the battery tester.
Instructions for attaching the neck strap to the instrument for carrying.
Checks to perform before using the instrument for measurement.
How to configure resistance and voltage measurement ranges.
Procedure for zero adjustment to ensure measurement accuracy.
Using the function to measure resistance with reduced noise.
Automatically holding and retaining stable measurement values.
Automatically storing measurement values in memory.
Function to reduce power consumption by automatically turning off the instrument.
Turning the instrument's backlight on and off.
Restoring the instrument to its default factory settings.
Display of battery level and status indicators on the instrument.
Guidelines for instrument maintenance, inspection, and cleaning procedures.
Common issues and solutions for instrument operation problems.
Understanding and troubleshooting instrument error messages.
Answers to common questions regarding the instrument's use.
Procedure for replacing a burned-out fuse in the instrument.
Instructions for replacing the conductive-tip contact pin of the test lead.
Instructions for removing and disposing of the instrument's lithium battery.
List of trademarks and their owners related to the product.
Description and illustration of the Model 9772 Pin Type Lead.
Description and illustration of the Model L2020 Pin Type Lead.
Description and illustration of the Model 9465-10 Pin Type Lead.
Details of the replacement tip pin for the Model 9772 Pin Type Lead.
Details of the replacement tip pin for Models 9465-10 and L2020.
Functionality of the remote control switch for holding values.
Description of the Z5038 0 ADJ Board for measurement.
Lead with temperature sensor for simultaneous measurement of resistance, voltage, and temperature.
Clip type lead for measurement on thick bars.
Critical safety warnings regarding potential injury or death from mishandling.
Warnings about risks of electric shock, heat generation, and arc flash.
Safety precautions for using the instrument on live lines and protective gear.
Explanation of hazard symbols (DANGER, WARNING, CAUTION) and other notations.
Icons found on the instrument and their meanings.
Explanation of symbols related to various product standards and certifications.
Description of alphanumeric characters and special displays on the instrument's screen.
Definitions of f.s., rdg., and dgt. used in accuracy specifications.
Explanation of IEC 61010 measurement categories (CAT II to CAT IV).
Precautions for installing the instrument in suitable locations to avoid malfunction.
Checks to perform on test leads and instrument before use for safety.
Handling precautions during instrument shipment to prevent damage.
Safety warnings regarding electric shock and high internal voltages.
Safety guidelines for measurement to avoid electric shock and overvoltage.
Covers warnings, cautions, and important notes for instrument use and handling.
Precautions for handling test leads, probes, and zero adjustment board.
Safety precautions for replacing batteries and fuses to avoid shock or injury.
Precautions regarding battery leakage, polarity, storage, and CD disc handling.
Understanding how to measure battery wear based on internal resistance.
Using the comparator to set threshold values for battery wear judgment.
General overview of the instrument's capabilities and purpose.
Enables UPS-free measurement, reliable values, and simultaneous display.
Includes comparator function and large memory capacity for enhanced usability.
Covers auto-memory, PC interface, Bluetooth, and optional accessories.
Identification of the front panel controls, display, and terminals.
Description and connection of SOURCE and SENSE measurement terminals.
Identification and function of the instrument's control keys.
Detailed explanation of control key operations (pressing and holding).
Detailed explanation of control key operations for setup and range selection.
Explanation of display indicators for measurement values and functions.
Identification of terminals on the top and rear views of the instrument.
Instructions for attaching the neck strap to the instrument for carrying.
Warning to ensure correct test lead connection to avoid electric shock.
Combining pin type leads with the remote control switch.
How to enable or disable the date and time display.
Steps to set the instrument's current date and time.
Methods for shorting test leads for zero adjustment using the zero adjustment board.
Specific zero adjustment procedures for pin type leads.
Procedures for performing zero adjustment with clip type leads.
Step-by-step guide to performing the zero adjustment procedure.
Troubleshooting common issues encountered during zero adjustment.
How to cancel the zero adjustment operation.
Using the remote control switch to retain displayed measurement values.
Configuring the resistance and voltage ranges for threshold setting.
Steps to set resistance warning and failure limits.
Setting the voltage warning limit and confirming threshold values.
Explanation of PASS determination based on resistance and voltage.
Explanation of WARNING determination based on resistance and voltage.
Explanation of FAIL determination based on resistance and voltage.
Table summarizing results based on resistance and voltage thresholds.
Examples illustrating how to interpret the comparator output table.
Overview of the instrument's memory capabilities for storing data.
Description of the internal memory structure and capacity.
Steps to enable the memory function.
Choosing a memory number for storing data.
Confirming settings and holding measurement values for storage.
Saving measurement values to the selected memory location.
Accessing the screen to read stored measurement data.
Choosing a specific memory number to view its data.
Returning to the normal measurement screen after reading data.
Procedure for deleting a single set of stored measurement data.
Procedure for clearing all data stored within a specific unit.
Procedure for clearing all stored data from the instrument.
Using the function to measure resistance with reduced noise.
How the noise frequency avoidance function is canceled.
List of the instrument's default settings after a system reset.
Transferring data and controlling the instrument via USB connection.
Steps to download and install the GENNECT Cross application.
How to enable or disable the Bluetooth function on the instrument.
Steps to pair the GENNECT Cross app with the battery tester.
Performing measurements using the Bluetooth function on the app.
General operating, storage, and physical specifications of the instrument.
Specifications for fuse, accessories, options, and display.
Items that can be measured and their respective ranges.
Input voltage, rated voltage, measurement method, and error display.
Warning indications, terminal specifications, and measurement timing.
Accuracy guarantee period, temperature, and humidity conditions.
Temperature effects on measurement accuracy.
Accuracy specifications for resistance measurements across different ranges.
Accuracy specifications for voltage and temperature measurements.
Impact of RF fields on measurement accuracy.
Functionality, setup, and correction for noise avoidance and zero adjustment.
Covers retaining, auto-hold, comparator, and memory functions.
Detailed specifications for memory storage, retrieval, and clearing.
Functionality and setup for the auto-memory feature.
Functionality and settings for auto power save and buzzer features.
Functionality and details for battery level indicator and clock.
Functionality for turning the instrument's backlight on and off.
Functionality for system reset, USB, and Bluetooth communication.
Specifications for USB data rate, class, and connector.
Specifications for Bluetooth interface, antenna, distance, and profiles.
Guidelines for instrument maintenance, inspection, and cleaning procedures.
Information on replacement parts, their operating life, and remarks.
Checks to perform before contacting support for repair.
Table listing errors, their causes, and solutions.
Troubleshooting table for instrument error messages.
Frequently asked questions about battery types, measurement limits, and threshold values.
Detailed steps for replacing the tip pin on model 9465-10 test leads.
Detailed steps for replacing the tip pin on model L2020 test leads.
Impact of extending test leads on induced voltage and measurement accuracy.
How eddy currents affect measurement accuracy and how to mitigate them.
Explanation of the AC 4-terminal method for resistance measurement.
Diagram and explanation of the AC 4-terminal measurement principle.
How current density affects measurements on wide or thick targets.
Measurement considerations for wide or thick targets.
Explanation of the synchronous detection system for obtaining effective resistance.
Methods to reduce induced voltage and its impact on measurements.
How eddy currents affect measurement accuracy and how to mitigate them.
Explanation of the AC 4-terminal method for resistance measurement.
Diagram and explanation of the AC 4-terminal measurement principle.
How current density affects measurements on wide or thick targets.
Measurement considerations for wide or thick targets.
Explanation of the synchronous detection system for obtaining effective resistance.
Guidelines and precautions for instrument calibration.
Procedure for calibrating the resistance measurement component.
Procedure for calibrating the voltage measurement unit.
How to cancel the disconnection detection function after calibration.
| Measurement Functions | Resistance, Voltage |
|---|---|
| Display | LCD with backlight |
| Storage Temperature | -20°C to 60°C |
| Relative Humidity | 80% RH or less (no condensation) |
| Communication Interface | USB |
| Power Supply | AA batteries or AC adapter |
| Weight | Approx. 500 g (including batteries) |
| Test Current | 100 mA |
| Operating Temperature | 0°C to 40°C |
| Resistance Measurement Range | 3 mΩ to 3 Ω |