15
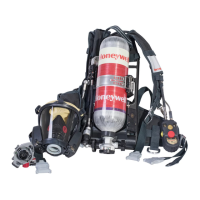
Honeywell Titan SCBA, 20132
7. Take a sharp, deep breath to activate the regulator,
or press the manual override button on the front of
the regulator.
8. Take several breaths to check the ow of air.
9. Quickly open and close the bypass valve to ensure
that it is operating properly.
WARNING
The SCBA has a rated service duration of 30,
45, or 60 minutes based on the requirements
of the Code of Federal Regulations, Title 42,
Part 84, Subpart H. Actual service duration
may be less than the rated time, depending
on the physical condition and exertion
level of the user, initial cylinder pressure,
and ambient temperature. When either
low air alarm begins sounding or fl ashing,
PROCEED IMMEDIATELY TO A SAFE AREA.
Failure to comply with this warning may lead
to personal injury, illness, or death.
G. Rapid Intervention Crew/Company Universal Air
Connection (RIC UAC) Operation
WARNING
The RIC UAC is NOT NIOSH CBRN-approved
for active engaged use in a potential or
known CBRN contaminated environment.
The SCBA has an RIC UAC installed, but
the RIC UAC MUST NOT be used if it is
suspected that the environment may or
does contain actual CBRN agents. Use of
the RIC UAC in a CBRN environment voids
the NIOSH CBRN approval, which is based
on non-engagement of the RIC UAC under
contaminated conditions and not active
engagement of the RIC UAC to mated non-
CBRN approved air line components. Failure
to comply with this warning may lead to
personal injury, illness, or death.
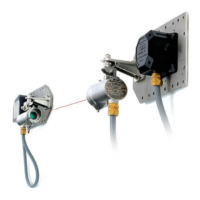
The Honeywell RIC UAC is intended to be used with
the RIT Kit, P/N 968970, purchased separately.
The UAC RIT Kit is equipped with a high pressure ll
hose that is compatible with the RIC UAC coupling on
the CGA handwheel, and is capable of accommodat-
ing a 60-minute high pressure cylinder. Although it is
possible to add air to a Honeywell SCBA via the RIC
UAC system while the SCBA is being worn, Honey-
well recommends that the cylinder be placed in a
container or in a location which is designed to restrain
fragments in the event of a component failure dur-
ing lling. Filling an SCBA cylinder while the SCBA
is being worn should only be done when the circum-
stances justify exposing the SCBA user to the added
risk associated with the ll procedure.
First stage pressure reducers equipped with the RIC
UAC have a pressure relief valve (PRV) incorporated
into the rst stage pressure reducer housing. The
WARNING
The audible alarm must sound and the
HUD LEDs must fl ash in sequence as the
system is pressurized. If either alarm fails
to activate, DO NOT USE the SCBA. Failure
of either alarm could result in a failure to
realize that the SCBA is near the end of its
service life, resulting in death or injury.
5. If the cylinder valve handle is equipped with a lock-
ing sleeve, ensure it is engaged when fully opening
the cylinder valve, to prevent accidental valve clo-
sure.
WARNING
• In the next step, when inserting the
regulator into the AIR KLIC, both release
buttons must be properly engaged. Rotate
and tug the regulator to ensure that both
release buttons are properly engaged in the
AIR KLIC. Do not push the release buttons
while verifying the engagement of the
regulator. Do not press the release buttons
unless you intend to remove the regulator
from the facepiece. Pressing either release
button during or after installation onto
the facepiece could result in inadvertent
regulator disengagement, causing death or
serious injury.
• When using the SCBA in temperatures
below 0°F, press the manual activation button
on the front of the regulator to activate fl ow
immediately after inserting the regulator.
• Failure to comply with this warning may
lead to personal injury, illness, or death.
NOTE
A click will be heard when each AIR KLIC button
is properly engaged. Two clicks should be heard
when the second stage regulator is properly
inserted in the AIR KLIC.
6. Insert the regulator into the AIR KLIC (Figure 21)
with the HUD display positioned on top, and press
rmly until you hear both release buttons snap into
place. If the regulator does not snap into place, wig-
gle the regulator while pressing rmly until the HUD
guides itself into the proper position and the regulator
snaps into place. Firmly bump the front of the regula-
tor with the palm of your hand to ensure that the AIR
KLIC buttons are both fully engaged.
Figure 21. Insert the Regulator
into the AIR KLIC
 Loading...