EasyManua.ls Logo

Hunter TCX550 - Page 14

Hunter TCX550
52 pages
To Next Page IconTo Next Page
To Previous Page IconTo Previous Page
Loading...
2
3)
Posiziona
r
e
il
serbatoio
sulla
car
cassa
e
ssarlo
mediante
le
4 viti TE M 8x16 (
5, Fig. B/3
).
4)
Fissar
e
il
tubo
(
1,
Fig.
B/3
)
all'attacco
(
3,
Fig.
B/3
)
serrando,
con l'ausilio di un cacciavite, la fascetta (
6, Fig. B/3
).
four M 8x16 hex sc
r
ews (
5, Fig. B/3
).
4)
Fix
the
tube
(
1,
Fig.
B/3
)
to
the
connection
(
3,
Fig.
B/3
)
and
tighten the clamp (
6, Fig. B/3
) with the aid of a screwdriver
.
FISSAGGIO UNIT
A' DI LETTUR
A
6.5
6.5
INFLA
TING DEVICE INST
ALLING
(solo
TCX525
GP)
(
TCX525 only
)
1)
Fissar
e
il
palo
di
supporto
(
1,
Fig.
B/4
)
tramite
le
viti
(
2,
Fig.
B/4
)
negli
appositi
fori
posti
sul
r
etr
o
dello
smontagomme
(
3,
Fi
g
. B/4
)
.
1)
Fix
the
mounting
post
(
1,
Fig.
B/4
)
using
sc
r
ews
(
2,
g.
B/4
)
in
the
pr
e-drilled
holes
on
the
back
panel
of
the
tyr
e
changer
(
3, Fi
g
. B/4
)
.
2)
Fissar
e
l'unità
di
lettura
(
4,
Fig.
B/4
)
tramite
le
apposite
viti
(
5,
Fi
g
. B/4
)
al
p
alo di su
pp
orto
(
1
,
Fi
g
. B/4
)
.
2)
Fix
the
inating
unit
(
4,
Fig.
B/4
)
to
the
mounting
post
(
1,
Fig.
B/4
)
usin
g
the r
elative sc
r
ew
(
5
,
Fi
g
. B/4
)
.
5
3
)
C
o
ll
e
g
a
r
e
il
t
u
b
o
(
7,
F
i
g
.
B
/
4
)
c
o
n
t
r
a
ss
e
g
n
at
o
da
l
b
o
lli
n
o
ad
e
s
i
v
o
"
A
"
,
a
l
r
a
cc
o
r
d
o
p
r
e
s
e
n
t
e
n
e
ll
a
pa
r
t
e
i
n
f
e
ri
o
r
e
d
e
ll
'
un
i
di
lettura
(
8,
Fig.
B/4
),
ugualmente
contrassegnato
dal
bollino
adesivo.
Collegar
e
poi
il
tubo
(
6,
Fig.
B/4
)
al
raccor
do
(
9,
Fig.
B/4
).
3)
Connect
hose
(
7,
Fig.
B/4
)
identied
as
A
with
an
adhesive
marker
to
the
tting
at
the
base
of
the
pr
essur
e
r
eading
gauge
(
8,
Fig.
B/4
)
identied
as
A
with
an
adhesive
marker
.
next
connect the hose
(
6, Fi
g
. B/4
)
to
ttin
g
(
9, Fi
g
. B/4
)
.
4
61
6.6
FISSAGGIO AL
P
A
VIMENTO
6.6
FIXING TO THE GROUND
2
3
7
1
4
6
3
5
B/3
4
1-
Posiziona
r
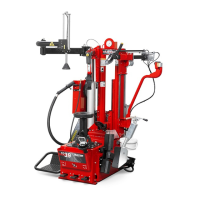
e lo smontagomme nell’esatta posizione.
2-
Munirsi del seguente materiale:
N. 1 – chiave a esagonale da 13 mm
N. 1 – trapano elettrico
N. 1 – punta da mur
o del diametr
o 13 mm tipo lungo
N. 4 – tasselli a espansione metallici 13x50
N. 4 – viti per tasselli M8 x 50.
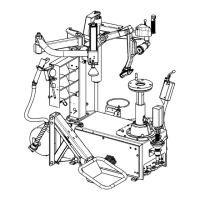
3-
Forar
e
in
corrispondenza
dei
4
fori
di
basamento
della
mac
-
china
per
una
pr
ofondità
di
80
mm,
utilizzando
la
punta
a
mur
o
da mm 13 lungo.
4-
Inserir
e
i
tasselli
metallici
nei
fori
pr
eposti
e
serrar
e
con
l'ap
-
posita chiave esagonale di CH 13.
1-
Set the tir
e changer in the exact work position.
2-
Pr
epar
e the following tools:
N. 1 - Hex spanner 13
N. 1 - Electric drill
N. 1 - Concr
ete drill bit diam. 13 long
N. 4 - Metal expansion screw anchors 13x50
N. 4 - M 8 x 50 anchor scr
ews.
3-
Drill
four
holes
in
the
oor
corr
esponding
to
the
holes
pre-
drilled
in
the
base.
Holes
should
be
80
mm
deep.
Use
the
long,
13 mm concr
ete drill bit.
4
-
I
n
s
e
r
t
t
h
e
e
x
pa
n
s
i
o
n
p
l
u
g
s
a
n
d
t
i
g
h
t
e
n
w
i
t
h
t
h
e
13
mm
spanner
.
9
8
B/4
14

Related product manuals