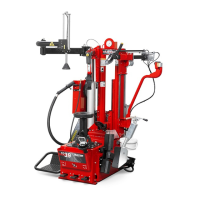
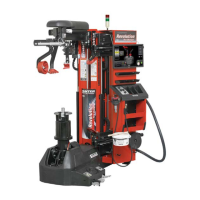
POS.B
C
Fig.
A
):
si
ottiene
il
bloccaggio
contemporaneo
dell'asta
esa
-
g
o
n
a
l
e
(
10,
F
i
g
.
A)
e
d
e
l
b
r
a
cc
i
o
o
ri
zz
o
n
ta
l
e
(
11,
F
i
g
.
A)
,
n
o
n
c
h
è
l'automatico
distanziamento
della
torr
etta
di
2
mm.
dal
bor
do
del cer
chio (vedi il capitolo relativo allo smontaggio).
Pr
emer
e
il
pulsante
giallo
dall'inter
no
della
maniglia
(
9,
Fig.
A
),
in
modo
da
farlo
ritor
nar
e
nella
posizione
iniziale
(
pos.
B,
fig.
C
):
si ottiene lo sblocco dei bracci operanti.
6)
Contr
ollar
e
che
ogni
due
o
tr
e
pr
essioni
sui
pedali
(
3
o
5,
Fig.
A)
cada
una
goccia
d'olio
nella
cupoletta
traspar
ente
del
lubrificator
e (
12, Fig. A
).
In
caso
contrario
agir
e
con
un
cacciavite
sulla
vite
di
r
egola
-
zione del lubrifi
cator
e (
vedi Fig. C/1
).
locked
in
position
and,
at
the
same
time,
the
mount/demount
head
will
be
lifted
2
mm
of
f
the
rim
edge
(See
Section
on
tyr
e
r
emoving).
Pr
ess
the
yellow
button
inside
the
handle
(
9,
Fig.
A)
to
r
etur
n
to
the
original
position
(
Pos.
B,
Fig.
C
)
by
r
eleasing
the
swing
ar
m
and vertical slide.
6)
Check
that
a
dr
op
of
oil
dr
ops
into
the
lubricator
glass cup
(
12,
Fig.
A)
after
every
two
or
thr
ee
movements
of
the
footped
-
als (3 or 5, Fig. A
).
O
il
f
ee
d
m
a
y
b
e
r
e
g
u
l
at
e
d
b
y
m
e
a
n
s
o
f
t
h
e
L
u
b
ri
c
at
o
r
ad
j
u
s
t
i
n
g
scr
ew (
see Fig. C/1).
Per versione
TCX525
GP:
Azionar
e
il
pedale
di
gonfi
aggio
(
1,
Fig.
C/2
)
in
posizione
1
(
Fig.
C/2
). Dalla testina di gonfiaggio
deve uscire aria.
Azionar
e
il
pedale
di
gonfi
aggio
(
1,
Fig.
C/2
)
in
posizione
2
(
Fig.
C
/
2
)
.
D
a
i
f
o
ri
p
r
e
s
e
n
t
i
n
e
i
4
s
c
o
rr
e
v
o
li
d
i
b
l
o
cc
a
gg
i
o
d
e
v
e
u
s
c
ir
e
un forte getto d'aria.
For
TCX525
GP version:
Activate
the
inflation
pedal
(1,
Fig.
C/2)
in
position
1
(Fig.
C/2)
.
Air must flow out of the infl
ation
head.
ctivate
the
inflation
pedal
(1,
Fig.
C/2)
in
position
2
(Fig.
C/2)
.
C/1
TTENZIONE
!
Nell'effettuar
e
questa
pr
ova
non
tener
e
il viso sopra l'autocentrante.
E
vent
uale
s
por
ciz
ia
pr
es
ent
e
s
ull'aut
ocent
r
ant
e
s
t
es
s
o
potr
ebbe colpir
e
gli occhi di chi opera.
Per
lo
stesso
motivo
far
e
attenzione
a
non
p
r
e
m
e
r
e
a
cc
i
d
e
nt
a
l
m
e
nt
e
il
p
e
da
l
e
d
i
g
o
n
fi
agg
i
o
d
u
r
a
nt
e
l
e
v
a
r
i
e
f
a
s
i
d
i
lavor
o.
W
ARNING!
While
per
for
ming
this
test,
avoid
holding
your head above the table top.
Dirt
that
may
be
pr
esent
on
the
table
top
could
strike
the eyes of the person working on it.
T
ake
care
you
do
not
accidentally
pr
ess
the
inflation
pedal
during
the
various
operat
-
in
TURA
10.1
BEAD BREAKING
C/2
L
'
o
p
e
r
a
z
i
o
n
e
d
i
s
t
a
ll
o
n
a
tu
r
a
d
e
v
e
e
ss
e
r
e
e
s
e
g
uit
a
con la massima attenzione.
L'azionamento del pedale stallonator
e
causa una veloce e potente chiusura
del braccio e rappr
esenta pertanto
un potenziale pericolo di
schiacciamento per tutto
ciò che si trova nel suo
ra
io di azione.
Bead
br
eaking
must
be
done
with
the
utmost
care
and attention.
When the bead br
eaker pedal is
operated the bead br
eaker ar
m
moves quickly and power
fully.
nything within its range o
action can be in danger of
being crushed.
24