e completamente le griffe dell'autocentrante.
Ef
fettuar
e l'operazione di stallonatura
con le grif
fe dell'autocentrante
aperte potr
ebbe causar
e lo
schiacciamento delle mani.
Durante l'operazione di stallona-
tura NON tener
e MAI le mani
sui fianchi del
neumatico.
2)
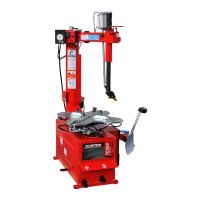
Close the table top gripper slides completely.
Bead br
eaking with the table top slide
grippers open can crush the
operator’s hands.
During bead br
eaking NEVER
touch the walls of the tyre with
your hands.
3
)
A
p
rir
e
il
b
r
a
cc
i
o
s
ta
ll
o
n
at
o
r
e
s
p
i
n
g
e
n
d
o
m
a
nu
a
lm
e
n
t
e
v
e
r
s
o
l
'
e
s
t
e
r
n
o
,
a
cc
o
s
ta
r
e
l
a
r
u
o
ta
a
ll
'
app
o
gg
i
o
i
n
g
o
mm
a
(
13,
F
i
g
.
A)
e
avvicinar
e
la
paletta
(
14,
Fig.
A)
al
tallone
del
pneumatico
alla distanza di 1 cm. dal bor
do del cer
chio (
vedi Fig. D).
A
TT
E
N
Z
I
O
N
E
:
P
o
s
i
z
i
o
n
a
r
e
c
o
rr
e
tta
m
e
n
t
e
l
a
pa
l
e
tta
i
n
m
o
d
o
c
h
e
operi sul fianco del pneumatico e non sul cer
chio.
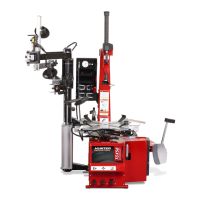
3)
Open
the
bead
loosener
by
hand
by
pushing
it
towar
ds
the
outside.
Place
the
wheel
up
against
the
rubber
bumper
(
13,
Fig.
A
).
Bring
the
blade
(
14,
Fig.
A)
against
the
bead
about
1
cm from the edge of the rim (
See Fig. D
).
W
ARNING!
Position
the
blade
as
to
operate
the
side
of
the
tir
e
and not of the rim.
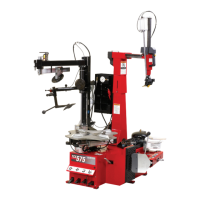
4)
Pr
emer
e
la
paletta
(
14,
Fig.
A)
sul
pneumatico
agendo
sul
pedale
(
3,
Fig.
A
).
Ripeter
e
l'operazione
su
tutta
la
cir
confer
en
-
za
della
ruota
e
su
ambo
i
lati,
fino
al
completo
distacco
dei
talloni dal cer
chio.
4)
Push
the
blade
(
14,
Fig.
 Loading...