Durante
il
bloccaggio
non
tener
e
MAI
le
mani
sotto
il pneumatico.
Per un corr
etto bloccaggio
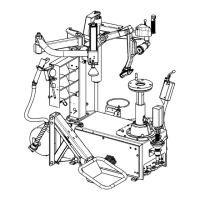
posizionar
e la ruota esattamente al
centro del piatto autocentrante
(2, Fig. A).
Contr
ollar
e che la ruota venga
corr
ettamente bloccata
dalle 4 grif
fe.
BLOCCAGGIO ESTERNO (ruote da 11" a 22")
P
r
e
m
e
n
d
o
il
p
e
da
l
e
(
5,
F
i
g
.
A)
i
n
p
o
s
i
z
i
o
n
e
i
n
t
e
r
m
e
d
i
a
,
p
o
s
i
z
i
o
n
a
-
r
e
le
4
grif
fe
di
bloccaggio
(
6,
Fig.
A
),
in
modo
che
il
riferimento
s
u
ll
'
a
u
t
o
c
e
n
t
r
a
n
t
e
,
s
i
a
c
ir
c
a
i
n
c
o
rri
s
p
o
n
d
e
n
z
a
d
e
l
d
i
a
m
e
t
r
o
d
e
l
pneumatico stampigliato sullo scorr
evole.
ppoggiar
e
la
ruota
sull'autocentrante
e
tenendo
pr
emuto
il
cerchione
verso
il
basso,
pr
emer
e
a
fondo
il
pedale
(
5,
Fig.A
)
per bloccar
e la ruota.
When clamping a tir
e, never have your hands
under the tir
e.
T
o clamp the tir
e corr
ectly, position
the wheel exactly at the centr
e
of the table top (2, Fig. A).
Check to be certain that the
wheel is corr
ectly clamped
by all four grippers.
RIM CLAMPED FROM THE OUTSIDE
(wheels fr
om 11-22")
Pr
ess
the
pedal
(
5,
Fig.
A)
to
the
middle
position
to
position
the
4
sliding
clamps
(
6,
Fig.
A)
so
that
the
r
efer
ence
on
the
table
top
is
mor
e
or
less
in
line
with
the
tyr
e
diameter
stamped
on
the sliding clamp.
Place
the
wheel
on
the
table
top
and
push
down
on
the
wheel
while
depr
essing
the
pedal
(
5,
Fig.
A)
all
the
way
to
clamp
the
wheel.
BLOCCAGGIO INTERNO (ruote da 13" a 24")
Chiuder
e
pr
eventivamente
le
4
grif
fe
di
bloccaggio
(
6,
Fig.
A)
pr
emendo a fondo il pedale (
5, Fig. A
).
A
pp
o
gg
i
a
r
e
l
a
r
u
o
ta
s
u
ll
'
a
u
t
o
c
e
n
t
r
a
n
t
e
e
p
r
e
m
e
r
e
a
f
o
n
d
o
il
pedale
(
5,
Fig.
A
).
Le
4
grif
fe
si
allar
gheranno
bloccando
il
cer
chione sugli appositi dentelli.
RIM CLAMPED FROM THE INSIDE (wheels fr
om 13-24")
P
r
e
ss
t
h
e
p
e
da
l
(
5,
F
i
g
.
A)
a
ll
t
h
e
w
a
y
d
o
w
n
t
o
c
l
o
s
e
t
h
e
4
s
li
d
i
n
g
clamps
completely.
Put
the
wheel
on
the
table
top
and
depr
ess
pedal
(
5,
Fig.
A)
all
the
way
down.
The
4
sliding
clamps
will
open
and
clamp
the wheel.
10.3
SMONT
TT
E
N
Z
I
O
N
E
:
P
e
r
l
e
o
p
e
r
a
z
i
o
ni
d
i
s
m
o
nt
agg
i
o
e
m
o
nt
agg
i
o
d
e
l
p
n
e
u
m
a
ti
c
o
d
i
s
m
o
nt
ag
o
mm
e
d
o
t
a
ti
d
e
g
li
a
cc
e
ss
o
r
i
PTX
o
PT
100,
per
un
corr
etto
utilizzo,
far
e
riferimento
al
manuale dell'accessorio stesso.
TT
E
N
T
I
O
N
:
F
o
r
m
o
untin
g
a
n
d
d
e
m
o
untin
g
o
p
e
r
a
ti
o
n
s
with
the
tir
e
changers
equipped
with
PTX
or
PT
100
see
the "istruction manual" for
er use.
1)
Pr
emer
e
il
pedale
(7,
Fig.
A)
per
riportar
e
il
palo
(
8,
Fig.
A)
in
osizione di " lavor
o ".
1
)
D
e
p
r
e
ss
t
h
e
p
e
da
l
(
7,
F
i
g
.
A)
t
o
b
ri
n
g
t
h
e
p
o
s
t
(
8,
F
i
g
.
A)
a
g
a
i
n
to its workin
e le mani sulla ruota:
il ritor
no in posizione di " lavoro "
del palo potrebbe causar
ne lo
schiacciamento fra cer
chio
e tor
etta.
Do not place your hands on the wheel:
when moving the post to its working
position your hands could be
crushed between the rim
and the mountin