6. Masonry Chimney Venting with Optional Kit Upflow/Horizontal
(USA ONLY) Not recommended for Downflow Furnaces
Chimney Inspection
All masonry chimney construction must conform to Standard
ANSl/NFPA211 and to any state or local codes applicable. The
chimney must be in good condition and a complete investigation
must be conducted prior to installation. If the inspection reveals
damage or abnormal conditions, make necessary repairs or seek
expert help. See "The Chimney Inspection Chart". Measure area
of tile-liner and exact height of chimney.
Connector Type 6.
To reduce flue gas heat loss and the chance of condensate prob- 7.
lems, the vent connector must be double wall Type B vent.
Venting Restrictionsfor ChimneyTypes 8.
Interior Chimney - has no sides exposed to the outside below
the roofline. All installations can be single furnace or common 9.
vented with another draft hood equipped Category I appliance.
Exterior Chimney - has one or more sides exposed to the out-
side below the roof line. All installations must be common vented
only with another draft hood equipped Category I appliance.
I I
lines may cause severe property dama_le.
Optional Masonry Vent Kit 3.
DraftHoodAssy.Installation(SeeFigure8)
NOTE: These instructions apply to the NTG3, NTN3, FBF & NBF
series furnaces only.
1. Disconnect power and gas supply to furnace.
2. Remove Iouvered door.
NTG3, NTN3, FBF & NBF Series furnaces - Discard Iou-
vered door.
NTN3, FBF & NBF furnaces in a horizontal left hand applica-
tion you will need to mount the pressure switch to the side of
the cabinet.
4. NTG3, NTN3, FBF & NBF series furnaces - Detach pressure
switch from top panel by removing two screws. Set aside
screws.
5. Detach field connect box from top panel by removing two
screws. Set aside screws.
Remove four screws holding top panel to casing. Remove
top panel. Discard top panel. Set screws aside.
Install draft hood assy. to casing using four screws previously
set aside.
Attach field connect box to draft hood assy. using two screws
previously set aside.
NTG3, NTN3, FBF & NBF Series furnaces - Attach pressure
switch to draft hood assy. using two screws previously set
aside.
VentLimit SwitchWiring(SeeFigure8)
1. Locate wire harness assy. which is supplied with kit. Attach
terminals on one end of wire harness assy. to vent limit switch
located on draft hood assy.
2. Locate furnace's main limit. Detach wire with insulated termi-
nal from one side of main limit.
Route wire harness assy. from vent limit switch to main limit.
Attach female terminal of wire harness assy. to vacated main
limit terminal. Attach male terminal of wire harness assy. to
insulated terminal of wire previously detached from main lim-
it.
Completionof Installation
1. NTG3, NTN3, FBF & NBF Series furnaces - Locate Iouvered
door supplied with kit. Install on furnace.
3. NTG3, NTN3, FBF & NBF may be installed upflow or horizon-
tal position per furnace application. When installing NTG3,
2. Refer to installation instructions provided with furnace to put
the furnace into operation.
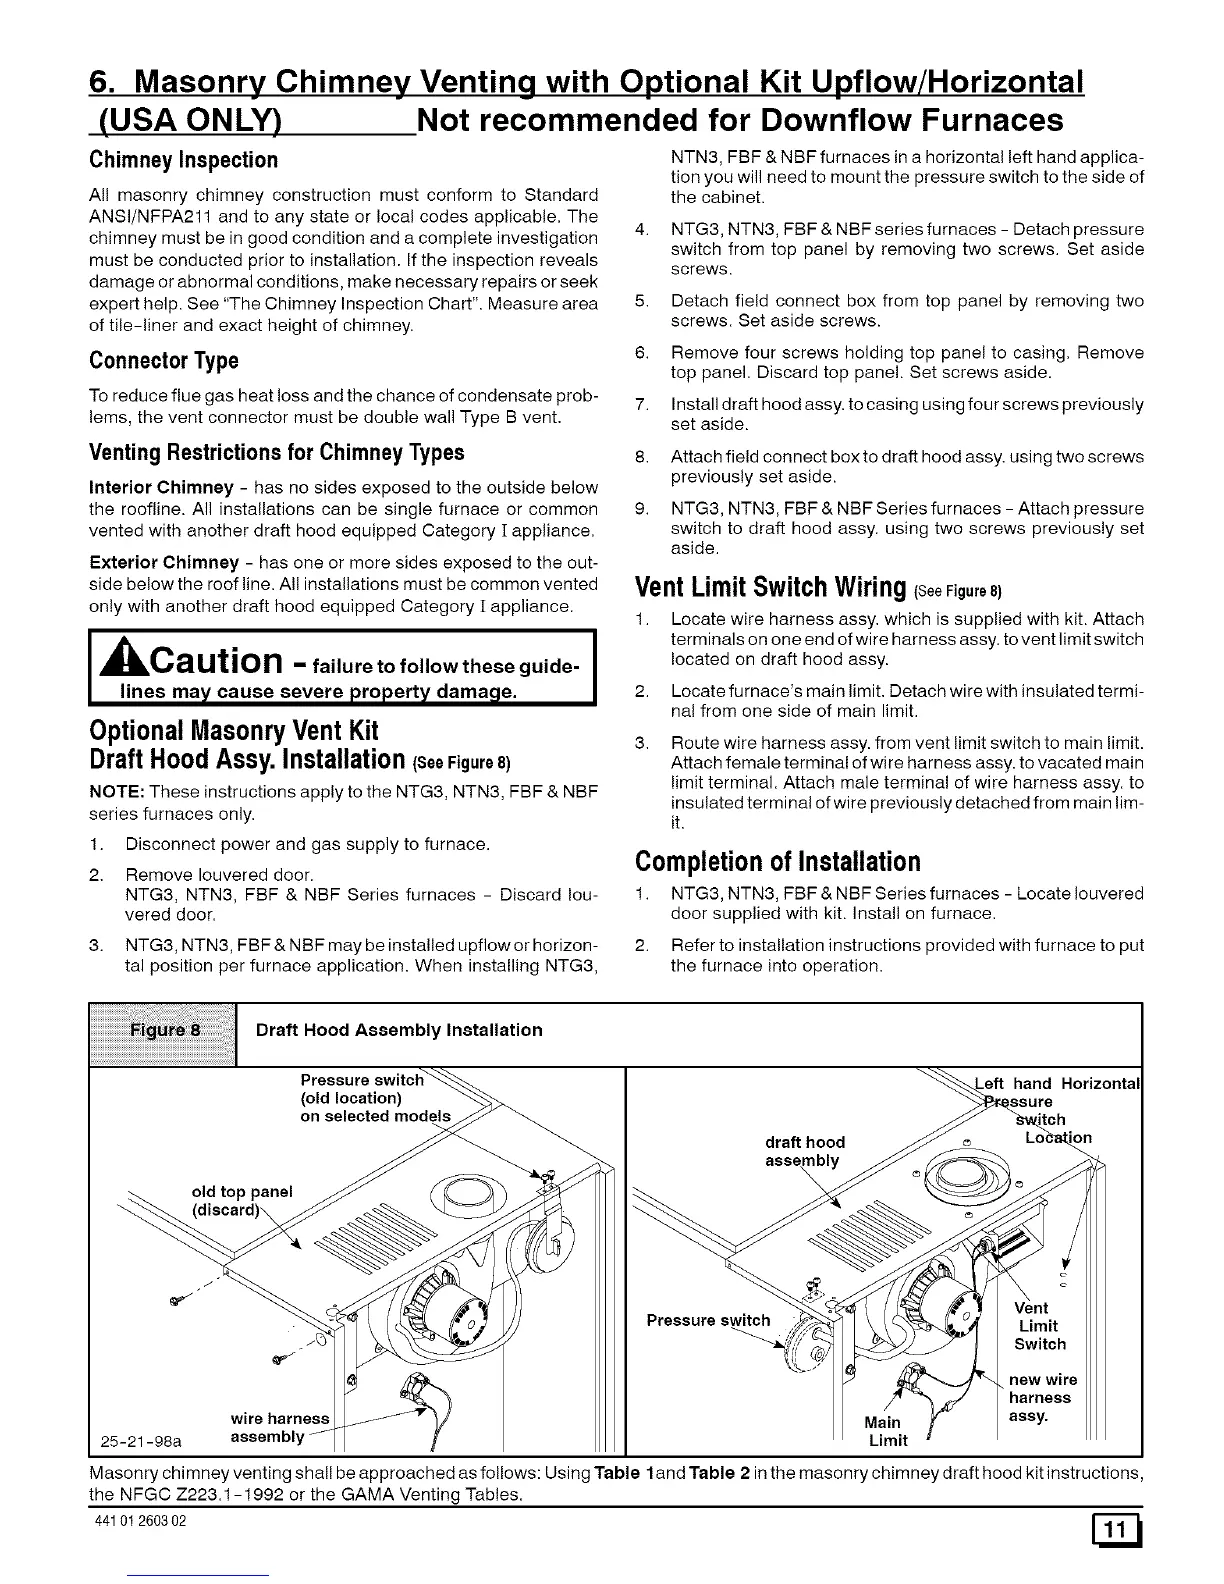
Draft Hood Assembly Installation
Pressure switch_
(oO/dle_cation) "--.._>_
old top panel _ ( _C )) _ >
wire harness _J_%'_
25-21-98a assembly//-
ft hand Horizontal
_ch..
draft hood __ e__._ LOcain
""-_'_ _ _ _ f I_q/ /f_ ! Vent
Pressure s_ _ __...(l__ u_ Limit
/2 ,_"
/ . new wire
. ..;:ro:,:e
Main _" assy.
Limit
Masonry chimney venting shall be approached as follows: Using Table land Table 2 in the masonry chimney draft hood kit instructions,
the NFGC Z223.1-1992 or the GAMA Venting Tables.
44101260302
 Loading...