ES
11
Notas:
- Hay una demora de 5 segundos al programar, después de 5 segundos, la unidad
automáticamente regresará a modalidad normal de radio.
- Se puede sobrescribir una estación pre-configurada y guardar una nueva frecuencia en su lugar.
Para activar una estación pre-configurada
1. Dé un ligero golpecito al botón para encender la unidad.
2. Dé un ligero golpecito al botón FUNCIÓN (FUNC) para seleccionar la modalidad de recepción de radio FM.
3. Para seleccionar el canal pre-configurado que desea, dé un ligero golpecito al botón
PRE-CONFIGURAR y luego al botón
/ en la unidad principal u oprima el botón
PRE-CONFIGURAR +/- en el control remoto.
Selección del sistema de radio difusión
Si está unidad se usa en otro país con sistemas ligeramente distintos, usted puede ajustarla a los
sistemas de radiodifusión de los EE. UU, UNIÓN EUROPEA, Japón y Australia.
1. Encienda la unidad en modalidad de espera, dé ligeros golpecitos repetidamente al botón de
MODALIDAD hasta que la pantalla muestre parpadeando el indicador “USA”, “EUr”, “JAP” o “AUS”.
2. Dé un ligero golpecito al botón de VOLUMEN + / - para seleccionar uno de los siguientes
sistemas de radiodifusión.
Sistema de Radiodifusión de los Estados Unidos Paso de sintonización FM 87.5 – 108 MHz, 0.1MHz
Sistema de Radiodifusión de la Unión Europea (EUr) Paso de sintonización FM 87.5 – 108 MHz, 0.05MHz
Sistema de Radiodifusión de Japón Paso de sintonización FM 76.0 – 90 MHz, 0.1MHz
Sistema de Radiodifusión de Australia Paso de sintonización FM 87.5 – 108 MHz, 0.05MHz
3. Para guardar esta configuración y salir de esta modalidad, dé un ligero golpecito en el botón
MODALIDAD.
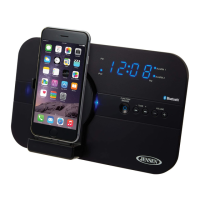
ENTRADA AUXILIAR
Esta unidad tiene una entrada auxiliar de audio para conectarla con dispositivos externos como
reproductores MP3, reproductores de CD y para escuchar sus fuentes externas de audio a través de
los altavoces de este sistema.
1. Use un cable de audio (no incluido) con enchufe de 3.5 mm en cada extremo.
2. Conecte uno de los extremos al conector de ENTRADA AUXILIAR en el respaldo de la unidad.
3. Enchufe el otro extremo del cable al conector de la línea de salida o conector de audífonos de su
dispositivo externo de audio.
4. Encienda su dispositivo externo.
5. Para seleccionar la línea auxiliar de audio, dé un ligero golpecito al botón de FUNCIÓN (FUNC) hasta que
el indicador despliegue “AUX”.
6. Ahora podrá controlar el nivel de volumen a través de su unidad principal. Opere todas las demás
funciones en el dispositivo auxiliar como siempre.
Nota:
- Si ya conectó la línea de salida de su dispositivo externo, entonces solo necesita ajustar el control
de volumen de esta unidad. Si usted conectó la salida de audífonos de su dispositivo externo,
entonces necesitará ajustar el control de volumen de su dispositivo externo y también el control de
volumen de esta unidad para encontrar el volumen de su preferencia.
- Si acopla su iPod o iPhone para que adquiera carga mientras está en modalidad AUX, la unidad
cambiará automáticamente a modalidad de iPod para autenticación. Espere algunos segundos,
luego dé un golpecito al botón de FUNCIÓN para regresar a la modalidad AUX.
- Oprima y sostenga el botón
en la unidad principal o dé un ligero golpecito al botón en el
control remoto para que el sistema entre a modalidad de espera cuando usted haya terminado de
escuchar. No olvide también apagar la corriente de su dispositivo externo.
GB
11
Radio Broadcast System Selection
If this unit is used in a different country with slightly different radio broadcast systems, you can adjust
the system to select USA, EU, Japan and Australia broadcasts.
1. Turn the unit to standby mode, tap the MODE button repeatedly until the display shows the blinking
“USA”, “EUr”, “JAP” or “AUS” indicator.
2. Tap the VOLUME + / - button to select one of the following broadcasting systems.
USA’s Radio Broadcast System FM 87.5 – 108 MHz, 0.1MHz tuning step
EU’s Radio Broadcast System FM 87.5 – 108 MHz, 0.05MHz tuning step
Japan’s Radio Broadcast System FM 76.0 – 90 MHz, 0.1MHz tuning step
Australia’s Radio Broadcast System FM 87.5 – 108 MHz, 0.05MHz tuning step
3. To save the setting and exit the setting mode, tap the MODE button.
AUXILIARY INPUT
This unit provides an auxiliary audio signal input for connecting external audio devices MP3 players,
CD players and listen to your external source through the speakers of this system.
1. Use an audio cable (not included) with one 3.5 mm stereo plug on each end of the cable
2. Plug one end into the AUX-IN Jack located at the back of the unit.
3. Plug the other end of the cable to a Line Out Jack or Headphone Jack of your external audio
device.
4. Turn on the external audio device.
5. To select auxiliary audio input, tap the FUNCTION (FUNC) button until the “AUX” indicator
displays.
6. The volume level can now be controlled through the main unit. Operate all other functions on the
auxiliary device as usual.
Note:
- If you connected the Line-Out Jack of your external device then you only need to adjust the volume
control of this unit. If you're connected the Headphone Jack of your external device, then you may
need to adjust both the volume control of your external device and the volume control of this unit to
find the most desirable volume setting.
- If you dock iPod or iPhone for charging during listening to AUX mode, the unit will automatically
switch to iPod mode for authentication. Wait for few seconds, then tap the FUNCTION button once
to switch unit back to AUX mode.
- Press and hold the
button on the main unit or tap button on the remote control to place the
system into standby mode when you finish listening. Don't forget to switch off the power of your
external device as well.
W166-R(JiMS-252i)_GB_ES IB.indd11 18 - 2611 2012-2-28 8:36
size:148x210mm,80gms book paper,BK+BK.
 Loading...