ASSEMBLING SPINDLE
PULLEY
GUARD
\
Attach spindle pulley guard to inside of
table assembly
with
two hex head bolts.
ASSEMBLING
AND
INSTALLING
FENCE
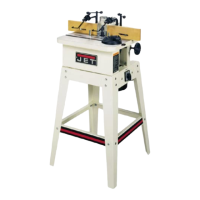
1.
Install
fence body to table by aligning two
holes in table to two holes in fence body
and
attaching
with
two T-handles (A) and
two
large washers. See figure 11.
2.
Install
fence
boards
(A) to fence body using
two
5/16"xl"
flat
head machine screws,
washers
and nuts. See figure 12,
3.
Insert hold down clamps (A) into fence
body and secure
with
screw handles.
See
figure 13.
4.
Install
dust hood (B) to fence body by
sliding
holes in dust hood over screws in
fence body. Tighten screws.
See
figure 13.
5.
Attach spindle guard (C) to spindle
mounting plate (D) using hex bolt and
wing
nut. See Figure 13.
CONNECTING
TO
POWER SUPPLY
Certain
electrical guidelines must be followed:
1.
Use a
separate
electrical
circuit
with
No. 12
wire
or
greater
protected
with
a 20 amp
breaker.
2.
Use No. 12
wire
for extension cord runs up
to 50 feet.
3.
Use No. 10
wire
for extension cord runs up
to 150 feet.
Before
connecting to power supply:
*
Set
switch
to
stop
position.
*
Place machine on a dry, non-conductive
surface.
*
Make sure
that
power supply is the same as
information
stamped on the motor
nameplale.
Fig.
13
—4—
 Loading...