18
Before You Start to Play
NOTE
• To avoid the risk of malfunction and/or damage to external
speakers, always turn the volume all the way down and switch o
the power on all devices before you make any connections.
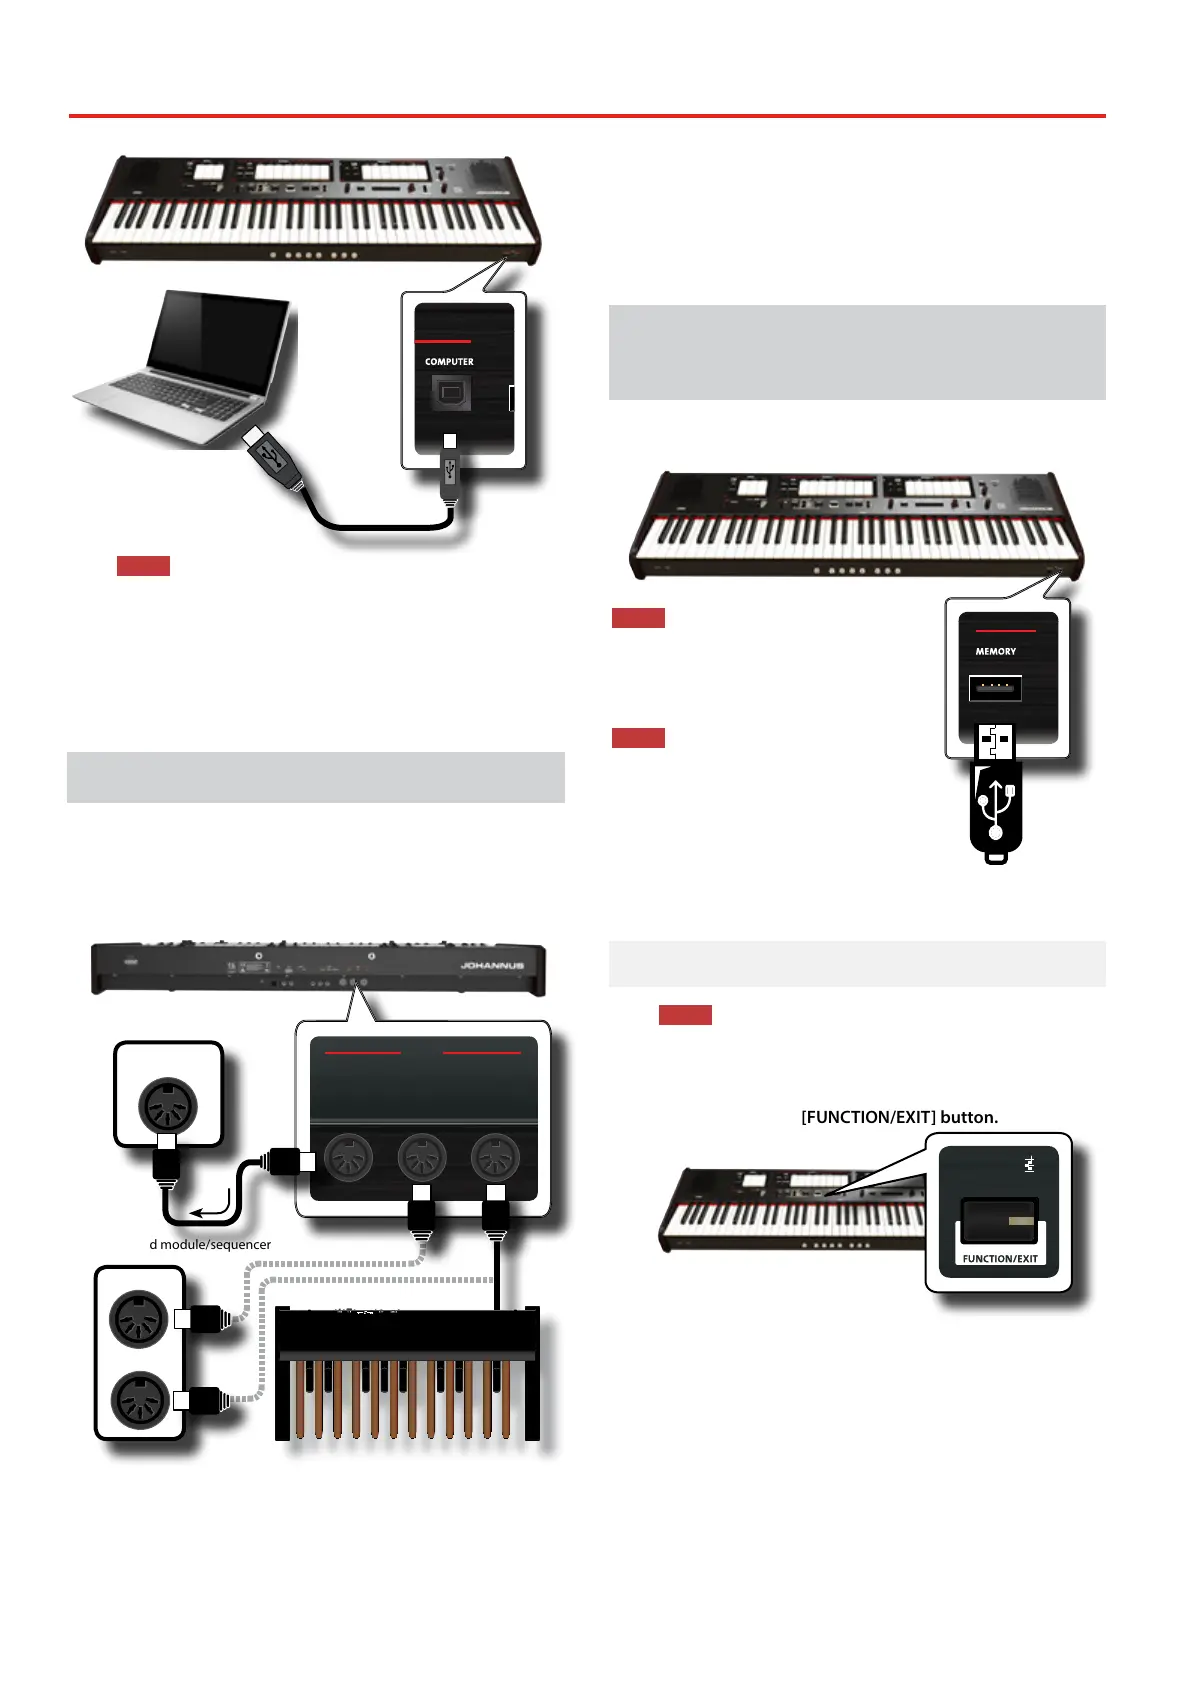
• Only MIDI data can be transmitted and received via USB. Audio data
cannot be transmitted or received.
• Switch on the power to the ONE before you start up the MIDI
application on your computer. Never turn the ONE’s power on/o
while your MIDI application is running.
Connecting the ONE to MIDI devices
MIDI is an universal standard, which means that musical data can
be sent to and received by instruments of dierent types and
manufacturers. MIDI allows you to connect your instrument to
another devices as an MIDI sound module.
Here below an example of MIDI connection:
THE ONE REAR SIDE
OUTPUTDC IN PEDAL MIDI
L/MONOUSE DEXIBELL
ADAPTOR ONLY
R CRESCENDO DAMPER EXPRESSION THRU OUT IN
DYS602-240250W
24 Vdc
IN
MIDI sound module/sequencer
To control other MIDI devices
IN
OUT
Pedal Board
MIDI PedalBoard
1. Use a optional standart MIDI cable (code: CHL400LU15) to
connect the ONE MIDI OUT socket to the MIDI IN socket of
the external MIDI device.
2. If necessary, use an optional standard MIDI cable (code:
CHL400LU15) to connect the MIDI OUT socket of the
external MIDI device to the ONE MIDI IN socket.
3. If you need to re-send the MIDI messages received by the
ONE OUT socket to another device, connect the THRU
socket using an additional MIDI cable (code: CHL400LU15)
to the relative MIDI IN socket.
For details on MIDI settings of the external device, refer to its user
manual.
Connecting an USB Memory
(commercially available)
1. As shown in the illustration, connect an USB Memory to
the MEMORY port.
NOTE
Carefully insert the USB Memory making
sure that the connector on the device is
appropriate and that it is connected in the
proper direction.
NOTE
The ONE supports all USB memory (FAT 32
formatted).
Anyway, because there are so many USB
memory on the market and it is almost
impossible to check all types of memories, it
could happen that a memory is not compatible
with your instrument.
Safely Remove the USB Memory
NOTE
You should always safely eject the USB Memory before
physically unplugging it from USB socket. Before to unplug the
USB Memory use the "USB REMOVE" function.
1. Press and hold the [FUNCTION/EXIT] button.
PRESETFINE
466
444
442
440
432
415
392
EQUAL
PYTHAGOREAN
MEANTONE
YOUNG II
KIRNBERGER III
VALLOTTI
WERCKMEISTER III
SCALE
TRANSPOSE
6
4
2
0
-2
-4
-6
5
3
1
-1
-3
-5
ENHANCER
CHORD
STRINGS
PIANO HARPSICHORD
CHOIR
BOURDON 8
GEDACT 8
BOURDON 8
HOHLFLÖTE 8
VIOLA DI GAMBA 8
SALICIONAL 8
SALICIONAL 8
QUINTATÖN 8
VOX CELESTE 8
VOIX CELESTES II
VOIX CELESTES II
BLOCKFLÖTE 4
ROHRFLUTE 4
CHIMNEY FLUTE 4
FLÛTE OCTAVIANTE 4
QUINTE 2 2/3
NASARD 2 2/3
VIOLA 4
NAZARD 2 2/3
WALDFLÖTE 2
WALDFLUTE 2
BLOCK FLUTE 2
OCTAVIN 2
QUINTE 1 1/3
AMERICAN
ENGLISH
FRENCH
GERMAN
MANUAL I
TUNING TEMPERAMENT
SPLIT POINT
The [FUNCTION/EXIT] button ashes to indicate that we are in
function mode. All other indicators go dark.
2. Press the lower part of the "30" tilt tab to safely remove
the USB Memory.


 To Next Page