EasyManua.ls Logo

JVC GY-HM750CHU - User Manual

JVC GY-HM750CHU
138 pages
To Next Page IconTo Next Page
Loading...
HD MEMORY CARD CAMERA RECORDER
GY-HM750U
GY-HM750CHU
GY-HM750E
GY-HM750CHE
INSTRUCTIONS
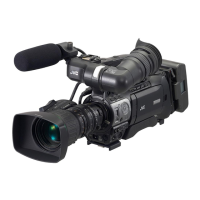
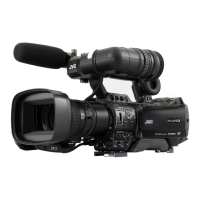
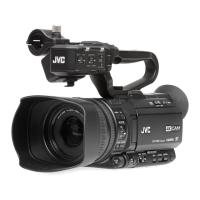
* The illustration shows the GY-HM750E with the supplied viewfinder, microphone and lens attached.
* GY-HM750CHU/GY-HM750CHE does not come with a lens.
For Customer Use:
Enter below the Serial No. which is located on the body.
Retain this information for future reference.
Model No. GY-HM750U/GY-HM750CHU
Serial No.
Please read the following before getting started:
Thank you for purchasing this JVC product.
Before operating this unit, please read the instructions
carefully to ensure the best possible performance.
In this manual, each model number is described without the last letter
(U/E) which means the shipping destination. (U: for USA and Canada,
E: for Europe)
Only “U”models (GY-HM750CHU/GY-HM750U) have been evaluated by
UL.
LST1190-001A

Table of Contents

Questions and Answers:

JVC GY-HM750CHU Specifications

General IconGeneral
Effective Pixels1920 x 1080
Video Resolution1920 x 1080, 1280 x 720
TypeShoulder Mount Camcorder
Sensor3x 1/3-inch CMOS
FocusAuto/Manual
Recording FormatAVCHD
Recording MediaSD/SDHC/SDXC
Frame Rates60i, 30p, 24p
Audio FormatDolby Digital
Audio Channels2
Viewfinder0.45-inch LCD
Input/OutputHDMI, USB, XLR, SDI
Weight5.5 lbs
IrisAuto/Manual (lens dependent)

Summary

Introduction

Important Safeguards

Essential safety instructions to prevent hazards and ensure proper use of the appliance.

Safety Precautions

Menu Display and Detailed Settings

Basic Operations in Menu Screen

Explains how to navigate and use the camera's menu system for settings.

Status Screen

Displays current camera settings, media info, and operational status.

Camera Features

Details various advanced functionalities and features of the camera.

Connecting External Devices

Instructions for connecting and using external monitors, PCs, and devices.

Main Features

Precautions for Proper Use

Operation Mode

Displays on the LCD Monitor and Viewfinder

Status Screen

Status Screen in Camera Mode

Displays status information when the camera is in shooting mode.

Enlarged Status Display on LCD Monitor

Provides an enlarged view of status screen characters on the LCD.

Preparations

Attaching Accessories

Instructions for connecting and mounting various accessories.

Power Supply

Using AC Power (DC IN Power)

How to operate the camera using an AC adapter.

Using a Battery Pack

Information on attaching and using battery packs for power.

Precautions for the Battery Operation

Power Status Display

Turning On;Off the Power

Turning On the Power

Steps to power on the camera recorder and enter Camera mode.

Turning Off the Power

Procedures for safely powering down the camera recorder.

Setting the Clock (Initial Setting)

Adjusting Back Focus

Adjusting the LCD Monitor and Viewfinder

SDHC Cards

Formatting (Initializing) SDHC Cards

Restoring the SDHC Card

Clips Recorded to SDHC Cards

Shooting

Basic Shooting Procedures

General steps and initial settings required to start shooting.

Focus Assist Function

Selecting System Definition, File Format and Video Format

Setting the Record Format Menu

Adjusting the Iris

Setting Gain

Setting the Electronic Shutter

Adjusting the White Balance

Adjusting the White Shading

Adjusting Audio Input Settings and Recording Level

Time Code and User’s Bit

Time Code Operation Mode

Presetting the Time Code

Setting Time Code Without Opening the Menu

Setting User’s Bit Without Opening the Menu

Recording Time Code in Continuation of the Recorded Time Code on SDHC Card

Setting Zebra Pattern

Setting Spot Meter

Protecting Important Scenes (OK Mark Function)

Viewing Recorded Videos Immediately (Clip Review)

Dual Rec

Setting to Dual Rec mode

How to enable simultaneous recording to two SDHC cards.

Special Recording

Clip Continuous Rec

Variable Frame Rec

Playback

Playing Back Recorded Clips

How to play back recorded clips from the SDHC card.

Deleting Clips

Appending and Deleting OK Marks

Deleting OK Marks

Basic Operations in Menu Screen

Main Menu Screen

Record Set Menu

Rec Mode Menu

Audio Set Menu

Camera Function Menu

Switch Set Item

FULL AUTO Item

Camera Process Menu

Detail;Adjust... Item

White Balance Item

Shading Mode;Adjust Item

Color Matrix;Adjust Item

TC;UB Menu

LCD;VF Menu

Shooting Assist Item

A;V Out Menu

Others Menu

Media Menu

Setup File Manage Menu

Adding Menu Items to Favorites Menu

Editing Favorites Menu

Status Screen in Camera Mode

Status Screen in SD Card Mode

Status Screen in IEEE1394 Input Mode

Camera Features

Marker and Safety Zone Displays (Camera Mode Only)

Visual guides for framing and composition during shooting.

Smoothening the Skin Color (Skin Detail Function)

Using the Skin Detail Function

How to apply skin detail adjustment for smoother skin tones.

Color Matrix Adjustment

Reproduction of Dark Areas (Black Stretch; Compress Function)

Configuring Setup Files

Saving Setup Files

Loading a Setup File

Resetting Setup Files

Connecting External Devices

Connecting an External Monitor

Instructions for connecting external monitors for output.

IEEE1394 Connection

Backup Recording

Managing;Editing Clips on a PC

Remote Control Unit Connection

List of Remote Control Unit Functions

Error Displays and Actions

Troubleshooting

Specifications

Related product manuals