EasyManua.ls Logo

Kaadas K20 Pro - User Manual

Kaadas K20 Pro
20 pages
Print Icon
To Next Page IconTo Next Page
Loading...
User Manual
Unified Hotline: 400-800-5919
Model: K20 Pro Smart Lock with Camera and Display Screen
www.kaadas.com
Question and Answer IconNeed help?

Do you have a question about the Kaadas K20 Pro and is the answer not in the manual?

Summary

Important Information

Safety Guidelines

Read and understand all instructions before using this smart lock. Damages caused by failure to follow instructions is not covered by the warranty.

Operational Warnings

Important warnings regarding product usage, such as avoiding fire, short-circuiting, and unauthorized maintenance.

Disposal of Used Components

Guidelines for the proper disposal of used batteries and electronic products according to local regulations.

Install the Smart Lock

Package Contents

List of all components included in the smart lock package for reference.

Exploded View of Components

Detailed diagram showing the exploded view of the smart lock components for better understanding.

Pre-Installation Checks

Pre-installation checks and considerations, including door opening direction.

Latch Bolt Reversing

Instructions for reversing the direction of the latch bolt to match door swing.

Installation Procedure

Step-by-step guide for the complete installation of the smart lock on the door.

Overview of Smart Lock

Front Panel Features

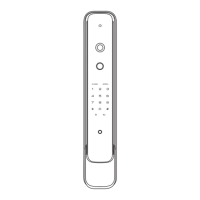
Description of the front panel, its components like doorbell, camera, and keypad.

Back Panel Features

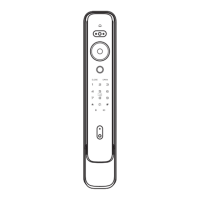
Description of the back panel, its components like buttons and sensors.

Configure Your Smart Lock

Setup Preparation

Explanation of dual-verification modes and credential types for unlocking.

Accessing Master Mode

Procedure to access and enter the master mode for system configuration.

User Management

Managing user accounts, adding/deleting PINs, fingerprints, and master credentials.

Dual-Verification Settings

How to enable or disable the dual-verification feature for enhanced security.

Automatic Mode Control

Instructions for enabling or disabling the automatic mode of the lock.

Power Saving Mode

Guide to activate or deactivate the power saving mode to conserve battery.

Language Selection

Procedure to change the display language of the smart lock interface.

Network Connectivity

Steps to connect the smart lock to a WiFi network for app connectivity.

Camera and Video Features

Configuration of camera features, remote wake-up, and video intercom via the app.

Wandering Alarm Setup

Setting up and utilizing the PIR motion detection and alarm feature.

Using Your Smart Lock

Exterior Unlocking Methods

Methods for unlocking the smart lock from the exterior in normal operation.

Unlock by PIN Code

Instructions on how to unlock the door using a registered PIN code.

Unlock by Fingerprint

Steps for unlocking the door using fingerprint recognition.

Mechanical Key Usage

Using the physical mechanical key for unlocking the door.

Sensing Handle Unlock

Unlocking the door using the sensing handle on the back panel.

Interior Lock;Unlock

Procedures for locking and unlocking the door from the inside.

Volume Adjustment

Adjusting the audio volume levels for voice prompts and alerts.

Defense Mode Activation

Enabling and disabling the defense mode for increased security against unauthorized entry.

Emergency Thumb Turn

Utilizing the emergency thumb turn for manual unlocking from the inside.

Doorbell and Intercom

Operating the doorbell and video intercom features for visitor interaction.

Inside Display Screen

Features and usage of the internal display screen for viewing outside.

Additional Functions

Factory Reset Procedure

Procedure to reset the smart lock to its original factory settings.

Emergency Power Supply

Using an external power bank to open the lock when the battery is critically low.

System Reboot

Instructions on how to restart the smart lock system for troubleshooting.

Battery Replacement

Guide on how to replace the battery when the low battery warning is active.

Overview

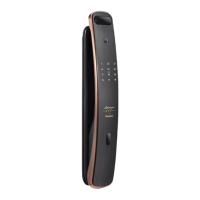
The Kaadas K20 Pro Smart Lock with Camera and Display Screen is a sophisticated security device designed for modern homes, offering a blend of advanced access control, monitoring, and convenience features. This smart lock is equipped with multiple unlocking methods, integrated camera functionality, and a display screen for enhanced user interaction and security.

Function Description

The primary function of the Kaadas K20 Pro is to provide secure access control to a property. It supports various credential types for unlocking, including PIN codes, fingerprints, and mechanical keys. The integrated camera and display screen allow for real-time video intercom and monitoring of the area outside the door. The lock can operate in both single credential verification and dual-verification modes, offering flexible security levels. Dual-verification requires two types of credentials (e.g., fingerprint + PIN code) for unlocking, providing an extra layer of security. The lock also features a "Master Mode" for managing user settings and system configurations.

Usage Features

Unlocking from Outside:

  • PIN Code: Users can unlock the door by touching the keypad to wake it up, then entering a registered PIN code followed by the '#' key. A voice prompt confirms successful verification.
  • Fingerprint: Placing a registered finger properly on the fingerprint sensor area will unlock the door, with a voice prompt confirming successful verification.
  • Mechanical Key: In cases of forgotten PIN codes, low battery, or system errors, a mechanical key can be used to unlock the door by inserting it and rotating 180 degrees. The direction of rotation (clockwise or counter-clockwise) depends on the door's opening direction.

Unlocking/Locking from Inside:

  • CLOSE Button: Pressing the CLOSE button once locks the door. A long press (3 seconds) enables privacy mode, where the lock can only be opened from inside or by master credentials from outside.
  • OPEN Button: Pressing the OPEN button twice unlocks the door.
  • Sensing Handle: When enabled, holding both the front and back sides of the sensing handle and covering the unlocking sensor allows for unlocking from the inside. If disabled, the OPEN button must be used.
  • Emergency Thumb Turn: In abnormal system functions, the emergency thumb turn can be rotated to the unlocking position to open the door from inside.

Setting Up Your Smart Lock:

  • Entering Master Mode: To access system settings, users need to touch the keypad, double-press the '*' key, enter the master PIN code, and then press '#'. If it's the initial password, the master PIN code must be changed first.
  • User Settings:
    • Adding Normal User: In Master Mode, users can add PIN codes and fingerprints. The lock automatically recognizes the credential type.
    • Adding One-time PIN Code: A temporary PIN code can be set for single use.
    • Adding Master Fingerprint: A master fingerprint can be added for convenient access to Master Mode.
    • Changing Master PIN Code: The master PIN code can be updated for security.
    • Deleting a User: Individual PIN codes or fingerprints can be deleted.
    • Deleting All User PIN Codes/Fingerprints: All user PIN codes or fingerprints can be cleared.
  • Dual-Verification: This feature can be turned on or off. When enabled, two credentials (e.g., fingerprint + PIN code) are required to unlock.
  • Automatic Mode: The lock can be set to automatic or manual mode.
  • Power Saving Mode: This mode can be enabled or disabled. In power saving mode, the video intercom function is stopped to conserve battery. It automatically activates when battery power is low.
  • Language Settings: The system language can be set to Chinese or English.
  • Network Configuration: The lock supports 2.4GHz WiFi for network configuration via a mobile APP. Users need to download the Kaadas APP, register, and then scan a QR code on the battery cover to add the device. This enables remote video intercom and other smart features.
  • Camera Settings: After WiFi configuration, the APP allows users to check the situation outside the door (remote video intercom). The remote wake-up function for video viewing can be disabled in the APP to save battery.
  • Wandering Alarm: The PIR (human infrared detection) function triggers an alarm if a suspicious person lingers outside the door for a specified time (default 10 seconds, configurable up to 60 seconds). The smart lock captures video and sends an alarm message with a snapshot to the mobile APP. This feature is off by default and needs to be enabled in APP settings.

Integrated Display Screen:

  • Wake-up: Pressing the awaken button once wakes up the display screen to view the outside situation. Pressing it again closes the screen.
  • Light-up Time & Brightness: Display light-up time (5/10/15 seconds, default 10) and brightness (high, medium, low, default medium) can be set via the mobile app.
  • Doorbell Activation: The display turns on by default when the doorbell is pressed, allowing real-time viewing of the outside. This can be toggled in the mobile app.
  • Dynamic Viewing: When the display is on, users can watch the dynamic outside the door in real time. Touching the awaken button again turns off the display.

Other Functions:

  • Volume Adjustment: In voice mode, long-pressing the '*' button enables mute mode. In mute mode, long-pressing the '#' button enables voice mode.
  • Defense Mode: After closing the door, pressing the defense mode button enables this mode. If someone unlocks from inside while defense mode is active, an alarm will be triggered. It is disabled once unlocked from outside.
  • Doorbell Function: When the doorbell button is pressed, the doorbell sounds, and the video intercom camera records a video, sending it to the paired APP along with a notification. Users can view the real-time situation outside the door through the APP. The APP also allows for generating one-time PIN codes, taking screenshots, and recording screens during video intercom.

Maintenance Features

Battery Management:

  • Low Battery Alarm: The lock triggers a low battery alarm, prompting users to replace the fully charged lithium battery in time.
  • Emergency Power Supply: If the battery voltage is too low to open the lock from outside, a 5V power bank can be used to charge the door lock via the Type-C port. The battery should be replaced immediately after unlocking.
  • Replacing Battery: The manual provides instructions on how to replace the battery when prompted by the "low battery" voice alert.

System Management:

  • Factory Reset: If the master PIN code is forgotten, a factory reset can be performed. While the battery is working, double-press the reset button on the back panel with an eject pin, then press '#' on the keypad within 15 seconds to confirm the reset. A voice prompt confirms successful restoration.
  • System Reboot: If a system reboot is needed, a 5V power bank can be used as an emergency power supply through the Type-C port.

General Maintenance:

  • Cleaning: The product should be wiped with a soft cloth for cleaning.
  • Installation: It is recommended to have a professional engineer install the door lock according to the company's standard instructions. After installation, the default master PIN code should be changed immediately, and the mechanical key should be kept in a safe place.
  • Safety Precautions: Avoid placing the battery near fire, using non-compliant emergency power supplies, or short-circuiting battery poles. Do not forcibly disassemble the product, scratch the fingerprint sensor, or expose the product to corrosive substances. Do not hang objects on the handle.
  • Warranty: The warranty may be invalidated if accessories from other manufacturers or those not recommended by Kaadas are used.
  • Disposal: Users are advised to follow local regulations for disposing of used batteries and electronic products, as they cannot be discarded with ordinary household garbage.

Kaadas K20 Pro Specifications

General IconGeneral
MaterialZinc Alloy
ConnectivityBluetooth
Fingerprint Capacity100
User Capacity100
Door Thickness35-60mm
Battery LifeUp to 12 months
Emergency KeyYes
Power SupplyBattery
Access MethodsFingerprint, PIN, Mechanical Key
Fingerprint Sensor TypeSemiconductor
Mortise TypeStandard

Related product manuals