1-62 (No.RA018<Rev.002>)
4.11 E, E2 TYPE Controls
4.11.1 Preparations for checking/tuning the transceiver
Before attempting to check/tune the transceiver, connect the unit
to a suitable power supply.
Whenever the transmitter is turned on, the unit must be connect-
ed to a suitable dummy load (i.e. power meter).
The speaker output connector must be terminated with an 8Ω
dummy load and connected to an AC voltmeter and an audio dis-
tortion meter or a SINAD measurement meter at all times during
checking/tuning.
4.12 Panel Test Mode
4.12.1 Test mode operation features
This transceiver has a test mode. To enter test mode, press and
hold the [ ] key while turning the transceiver power ON or
press the [ ] key and select the “Panel Test”. Before the trans-
ceiver enters test mode, the frequency version information ap-
pears on the LCD momentarily. Test mode can be inhibited by
programming. To exit test mode, turn the transceiver power OFF.
The following functions are available in test mode.
• When the panel test mode is activated, the channel selected
with the [Selector] knob and the last used signaling number are
displayed. When it is activated for the first time, the signaling
number is 1.
• If test signaling 10 (P25 Phase1), 7 (P25 Phase2) and 7
(NXDN Mode) is selected, the result of Bit Error Rate (BER)
calculation is displayed on the LCD.
4.12.2 Key operation
*1: When the mode is selected as Analog, this function is en-
abled.
*2: When the Mode is selected as P25, bandwidth is fixed to Nar-
row.
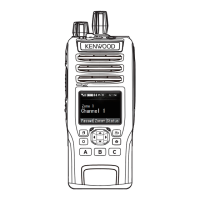
Power switch/Volume control Selector knob
Transmit/ Receive/ Battery low indicator
Lever switch
Side 1 key
Universal connecto
PTT (Push To Talk) switch
Side 2 key
Side 3 key
Auxiliary (orange) key
Key "FNC" not appears on the sub LCD display
Function Display
[Selector] - -
[] Push: Test channel up
Hold: Test channel up
continuously
Channel No.
[] Push: Test channel down
Hold: Test channel down
continuously
Channel No.
[] Push: Squelch level up *1
Hold: Squelch off
Squelch level
Squelch off: icon
appears
[]
Push: Squelch level up *1
Hold: Squelch off
Squelch level
Squelch off: icon
appears
[]
Wide 5k/Wide 4k
/Narrow/Very Narrow *2
Wide 5k: "w"
Wide 4k: "s"
Narrow: "n"
Very Narrow: "v"
[Side1] - -
[Side2] - -
[Side3] Push: Microphone (Front
MIC/Rear MIC) select
Rear MIC: icon
appears
[ ] Shift to panel tuning
mode
-
[ ] Function on "FNC" appears on the
sub LCD display
[ ] MSK 1200bps and
2400bps *1
2400bps: icon
appears
[ ] Push: Test signaling up
Hold: Test signaling up
continuously
Signaling No.
[AUX
(Orange)]
--
[PTT] Transmit -
[0] to [9]
and
[#], [ ]
--
Key "FNC" not appears on the sub LCD display
Function Display
 Loading...