9
Assemble units as described herein only. To do otherwise
may result in instability. All screws, nuts and bolts must be
tightened securely and must be checked periodically after
assembly. Failure to assemble properly, or to secure parts
may result in assembly failure and personal injury.
Concerto
®
Seating with Power & Data
Assembly Instructions
thread the
3
/
8
-24 hex washer head
bolt into the tablet arm side cover and
pivot mount bracket on the upright.
Tighten the
3
/
8
-24 hex washer head
bolt to 10 inch pounds of torque.
Thread a
3
/
8
" jam nut onto the cap hex
washer bolt behind the pivot mount
bracket. Holding the hex washer bolt
in place with a
9
/
16
" wrench on the bolt
and a wrench on the nut, tighten the
3
/
8
" jam nut behind the pivot mount
bracket to 450 inch pounds. Hold the
nut tight and tighten the
3
/
8
-24 hex
washer head bolt to 500 inch pounds
of torque. The large tablet arm must
rotate down smoothly under its own
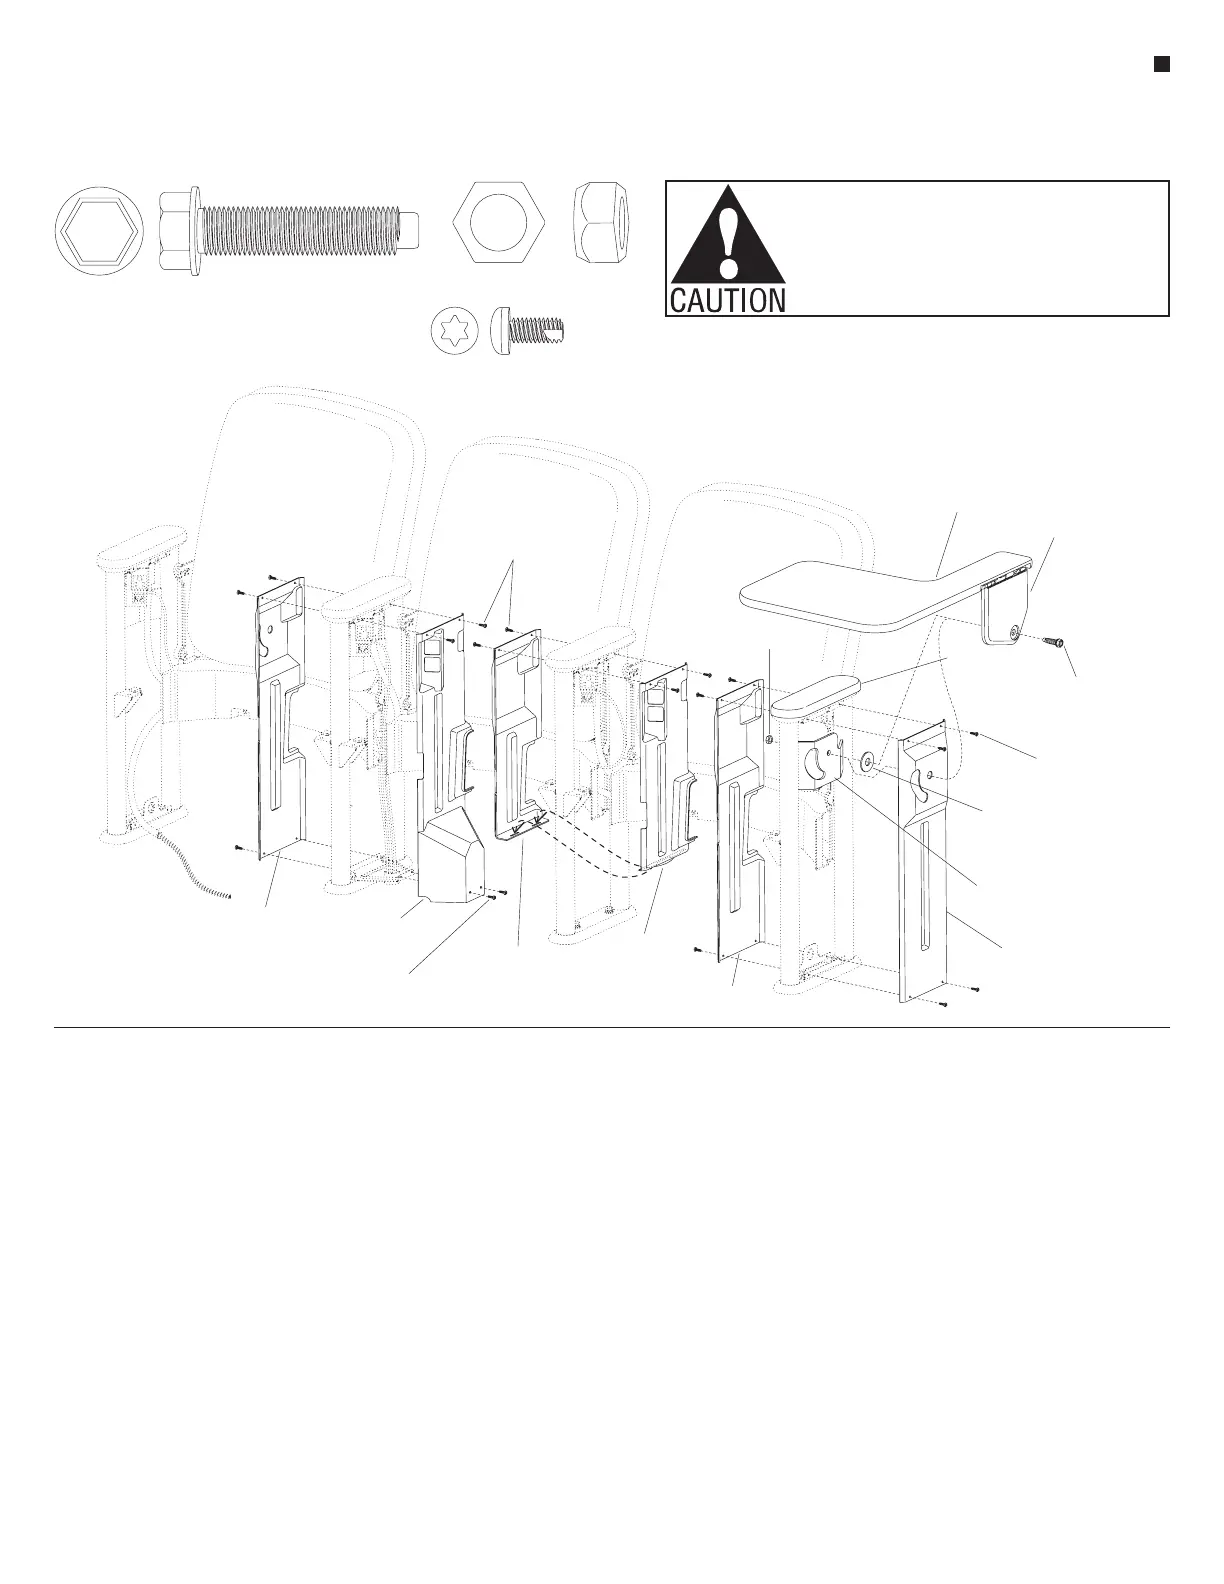
weight (Figure 6).
4. The full-height side cover can now be
installed opposite the tablet arm full-
height side cover. Carefully maneuver
the side cover against the upright to
align the mounting holes. Secure the
cover to the upright with four #8 x
3
/
8
"
Torx self-tapping screws (Figure 6).
5. Continue with the installation of all
large tablet arm and side covers
(Figure 6).
Half-Height Side Cover
Installation
Note: The following section depicts
a half-height, no-tablet side cover,
installed opposite a half-height
power & data side cover. When a
large tablet arm is to be installed to
a tablet arm half-height side cover,
refer to the “Large Tablet Arm and
Side Cover Installation” section as
instructed.
1. Begin installation with the
half-height side cover that is
opposite the power & data outlets.
In most instances, this will require a
right-hand large tablet arm. Carefully
maneuver the half-height side cover
(no-tablet, right-hand option shown)
against the upright to align the upper
mounting holes on the cover with the
upper holes in the upright. Secure
the top of the cover to the upright
with two #8 x
3
/
8
" Torx self-tapping
screws (Figure 6).
2. If a large tablet arm is to be installed
to the upright and the half-height
tablet arm side cover described
above in step 1, follow steps 2 and 3
in the section “Large Tablet Arm and
Side Cover Installation”, then return
to this section and continue with
step 3 below. If no large tablet arm is
to be installed, continue on now with
step 3 below.
3. Next install the half-height
power & data side cover by inserting
the tabs at the bottom of the cover
into the slots on the bottom flange of
the opposite half-height side cover.
Carefully maneuver the half-height
power & data side cover into place
so the mounting holes align with
Data Infeed Side Cover
Installation
Note: The data infeed full-height
side cover requires a full-height
side cover to be mounted opposite
it on the same upright. If a large
tablet arm is specified, but not yet
installed, refer now to the section
“Large Tablet Arm and Side Cover
Installation”, steps 2 and 3. For
a no-tablet full-height side cover,
refer to step 4 in the same section.
1. Carefully maneuver the data infeed
side cover against the upright to
align the upper and lower mounting
holes with the holes in the top of the
upright and the data bracket. Secure
the cover to the upright and bracket
with four #8 x
3
/
8
" Torx self-tapping
screws (Figure 6).
3
/ -24 x 1.618”
Matpoint bolt
8
tablet mechanism
large tablet arm assembly
(left-hand)
armcap
#8 x /”
T-20 Torx screw
3
8
nylon washer
(used only if no side
cover is installed
pivot mount
bracket
tablet arm
full-height side cover
(left-hand end)
full-height
half-height
power & data
side cover
half-height
no-tablet side cover
#8 x /”
T-20 Torx screw
3
8
tablet arm
full-height side cover
data infeed
side cover
#8 x /”
T-20 Torx screws
3
8
3
/”jam nut
8
6
#8 x
/”Pan Head Self-Tap T-20 Torx Screw
3
3
3
/ hex washer head Matpoint bolt
8
-24 x 1.618”
the holes at the top of the upright.
Secure with two #8 x
3
/
8
" Torx
self-tapping screws (Figure 6).
 Loading...


