›
Using a screwdriver, Unlock the fuse
C
in the direction of arrow
3
.
›
Remove the headlight in the direction of arrow
4
.
Replacing the light bulb
›
Press the latch on the connector in the direction of arrow
5
» fig. 114.
›
Remove the key in the direction of the arrow
6
.
›
Turn the socket with the bulb to the stop in the direction of the arrow
7
.
›
Remove the socket with the bulb in the direction of arrow
8
.
›
Insert the new bulb into the headlight and turn counter to the direction of
arrow
7
as far as the stop.
›
Fit the connector.
Refit the headlight and grille
›
Replace the fog light by inserting it in the opposite direction of the arrow
4
and tighten. » fig. 114.
›
Insert the guard and push it gently until it locks into place.
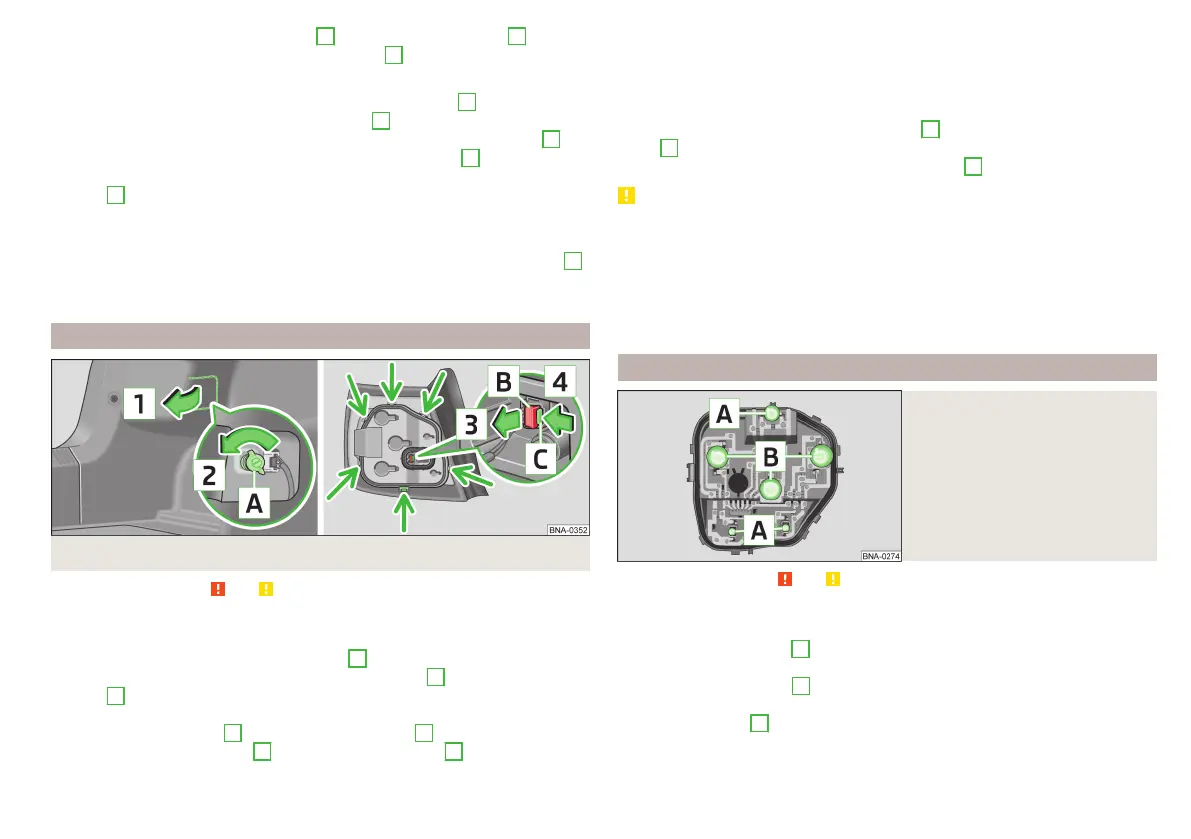
Removing/installing taillights
Fig. 115 Removing the light/pulling out the connector
Read and observe and on page 97 first.
Removing
›
Open the boot lid.
›
Lift up the cover in the direction of arrow
1
» fig. 115.
›
Hold the light in one hand and remove the plastic nut
A
in the direction of
arrow
2
with the other.
›
Hold the light and carefully remove it by moving it side to side.
›
Pull the connector lock
B
in the direction of arrow
3
.
›
Press the catch mechanism
C
in the direction of arrow
4
.
›
Remove the connector.
Install
›
Insert the connector into the lamp and lock it securely.
›
Insert the light into the opening in the body.
›
Push in the light so that the light holder locks into the bolt on the outside of
the opening in the body.
›
Tightly screw the light with the plastic nut
A
in the opposite direction to ar-
row
2
» fig. 115.
›
Fold the cover in the opposite direction to arrow
1
.
CAUTION
■
Ensure that the cable bundle does not become stuck between the body and
the lamp when it is being refitted – or there is a risk of damage to the electrical
installation and risk of water ingress.
■
If you are not sure whether the cable bundle has been pinched, we recom-
mend that you have the connection of the light checked by a specialist garage.
■
Ensure that the vehicle paintwork and the tail lamp are not damaged when
removing and installing the tail lamp.
Replacing the bulbs in the tail lamp assembly
Fig. 116
Inner part of the light
Read and observe and on page 97 first.
›
Unlock the bulb holder using the locking latches in the areas » fig. 115 on
page 101 marked with arrows and remove the bulb holder from the light.
›
Remove the faulty bulb
A
» fig. 116 from the holder.
›
Insert a new bulb into the socket.
›
Turn the defective bulb
B
anticlockwise as far as it will go and remove from
the holder.
›
Insert a new bulb
B
into the holder and turn in a clockwise direction to the
stop.
›
Insert the bulb holder in the light.
101
Fuses and light bulbs