2-10 2G0733 January 14, 2008
Using and Maintaining the Imager
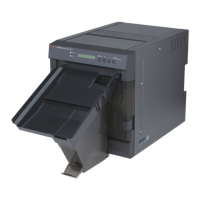
Inserting the Film
Saver and Removing
the Film Tray
A film saver must be inserted into a film tray when:
• the hood is opened.
• any panel on the Imager is removed.
• a film tray with film in it is removed.
1. Insert the film saver as shown below.
2. If the film tray has not been unlocked, press the "unlock" button on
the local panel.
NOTE: The film tray must be removed within 30 seconds after pressing
the "unlock" button. Otherwise, the film tray will re-lock
automatically.
3. Remove the film tray as shown below.
Inserting the Film Saver
Note: The film saver can be stored under the film tray until required.
Calibration Prints Imager calibration is performed by printing a calibration print. A calibration
print has a step wedge pattern with a series of 26 stripes of increasing
optical density. The only purpose of a calibration print is to calibrate the
Imager. The Imager prints a calibration print when:
• A manual film calibration is requested.
• A film cartridge containing film with new sensitometric
characteristics (speed, contrast) is loaded.
• A film tray for which a current calibration is not stored is inserted into
the Imager.
You can discard all calibration prints.

 Loading...