2-2 2G0733 2011-09-09
Using and Maintaining the Imager
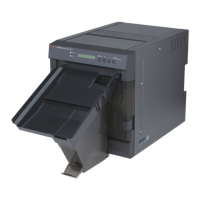
Local Panel and Display Screen
Local Panel /
Display Screen
{
1 Ready LED. When steady on, the LED indicates that the imager is ready for printing.
When flashing, the imager is processing and printing films. When unlit, the imager is not
ready to print.
2 Error LED. When lit, this LED indicates that the imager has an error. An error code
appears on the display screen.
3 Attention LED. When lit, this LED indicates a condition that requires attention, such as
out of film. The imager can still process and print films from unaffected film trays.
4 Warming LED. When lit, this LED indicates that the imager is warming up. A timer is
also shown on the display screen indicating the amount of time, in minutes, before the
imager reaches operating temperature.
5 Display screen. Displays codes and icons that indicate the status and operating condition
of the imager.
6 Menu Selection button. In Menu Selection Mode, you can work with menus on the
display screen, and the functionality of buttons on the right side of the local panel
change. To enter Menu Selection Mode, press and hold the Menu Selection button (6 on
the graphic above) for five seconds. The following screens are available:
• Test Print screen: Select a test print (only SMPTE is available for 5800 Laser
Imager)(Prints are available for mammography quality control for the 5850 Laser
Imager).
• Maintenance Reset screen: Reset maintenance items such as reset print counts,
jobs to delete
7 Unlock buttons. Used to unlock the film trays. Note that the trays will not unlock unless
a film saver is installed in trays that have film.
NOTE: These buttons are used to select or cancel when in Menu Selection Mode. See
the Icons table on page 2-4.
8 Calibration buttons. Initiate a manual film calibration for upper and lower film trays.
NOTE: These buttons are used to move up or down in a menu when in Menu
Selection Mode. See the Icons table on page 2-4.
 Loading...