Do you have a question about the Korg D1600 and is the answer not in the manual?
Basic precautions to follow when using electric products.
Proper grounding procedures to reduce the risk of electric shock.
Warning about FCC regulations and interference for digital devices.
Explanation of CE mark conformity directives.
Earthed connection instructions for UK mains plugs.
Warning about copyright law and unauthorized use of Korg products.
Cautionary notes regarding laser product safety and radiation exposure.
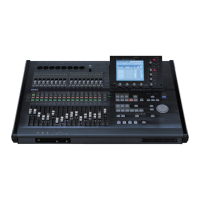
Overview of the D1600's capabilities including tracks, mixer, and effects.
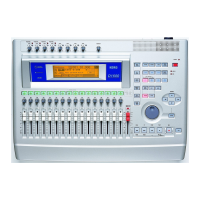
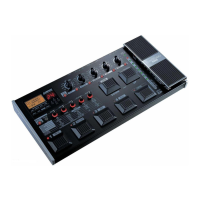
Identification and explanation of the D1600's top panel controls.
Explains that LCD screen examples in the manual are illustrative.
Identification and explanation of the D1600's top panel controls.
Identification and explanation of the D1600's top panel controls.
Identification and explanation of the D1600's top panel controls.
Identification and explanation of the D1600's front panel connectors.
Identification and explanation of the D1600's rear panel connectors.
Identification and explanation of the D1600's rear panel connectors.
Explanation of LCD screen components like parameter display, edit cells, and popup buttons.
How to select a mode to access functions on the D1600.
How to navigate between pages within a selected mode using tabs.
Methods for selecting and editing parameter values in the LCD screen.
Initial steps to prepare and start using the D1600.
Examples of connecting the D1600 to various audio equipment.
Step-by-step instructions for powering on the D1600 and connected devices.
Step-by-step instructions for safely powering off the D1600 and connected devices.
How to play demo songs from the included CD using a CD-R/RW drive.
Steps to create a new song, set its type, and save it.
How to rename songs using the LCD screen and on-screen keyboard.
Explains three methods for selecting existing songs.
Connecting and assigning analog sources like guitars and keyboards to mixer channels.
Detailed steps for connecting a mic and assigning its input signal to mixer channel 2.
Steps to connect a keyboard and assign its stereo input to mixer channels.
How to connect and assign digital audio sources via the S/P DIF jack.
How to use the built-in tuner to tune instruments or check track pitch.
How to set recording levels and perform basic recording.
Utilizing virtual tracks for multiple takes and bounce recording.
Recording additional tracks while listening to previously recorded ones.
How to re-record specific sections of a performance using manual punch-in/out.
Automating punch-in/out recording using pre-set times.
Techniques for combining multiple tracks into two for more recording space.
Starting recording automatically when input signal exceeds a threshold.
Repeating recordings over a specific region for practice or loop creation.
Basic steps for selecting tracks and initiating playback.
Creating and playing back songs in a specified order using a program list.
Repeating playback of a specific IN-OUT region of a song.
How to adjust channel and master volumes using faders.
Using PAN knobs to control the stereo placement of each channel.
Applying three-band EQ to shape the tone of input and playback signals.
How to apply EQ to input signals during recording.
Linking adjacent mixer channels for simultaneous control of settings.
Configuring audio monitoring levels and sources for headphones and speakers.
Adjusting monitoring volume and pan independently for recording.
Isolating specific channels or signals for monitoring.
Saving and recalling mixer settings as scenes for automatic or manual recall.
Moving a previously registered scene to a different time location.
Modifying existing scene settings and saving the changes.
Removing unwanted scenes from the song.
Changing the time location where a registered scene is recalled.
Disabling specific parameter changes when registering or recalling scenes.
Controlling scene changes using MIDI messages from external devices.
Summary of available effect types, algorithms, and preset/user programs.
Applying effects to analog inputs or playback tracks.
Explanation of the four types of insert effects and their configurations.
Practical examples of applying insert effects during recording for different instruments.
How to apply insert effects to analog inputs or rhythm sounds during recording.
How to select, use, and adjust master effects for spatial depth and balance.
Applying a stereo effect to the master LR output for mixdown.
Modifying and saving effect parameters for insert, master, and final effects.
Using expression pedals or MIDI controllers to manipulate effect parameters in real-time.
Connecting external effect processors via AUX OUT and INPUT jacks.
Step-by-step guide to creating an audio CD using a CD-R/RW drive.
List of available track editing functions like copy, erase, delete, and reverse.
Steps for specifying the edit region and executing track editing commands.
Examples of copying track data within the same song or to a different song.
How to insert blank space into a track's recorded data.
How to erase track data without shifting subsequent data.
How to delete track data, shifting subsequent data to fill the gap.
Copying track data in reverse for creative sound manipulation.
Optimizing track data to improve disk access efficiency and prevent errors.
Exchanging data between tracks or virtual tracks.
Adjusting the duration of track data by expanding or compressing it.
Copying an entire track's data to another track or virtual track.
Copying track data to a specific virtual track.
Swapping entire tracks or virtual tracks.
Applying fade-in or fade-out effects to track data regions.
Adjusting track data to the maximum allowable level without clipping.
Basic steps for selecting a song and initiating editing operations.
Examples of common song editing tasks like copying and moving.
Changing the order of songs by moving them to different numbers.
Removing unwanted songs from the drive.
Preventing accidental modification or deletion of songs.
Copying all songs from one drive to another.
Creating and playing back songs in a specified order using a program list.
Registering and using marks for song navigation.
Controlling scene playback and editing scene parameters.
Configuring tempo source, rhythm volume, and pattern selection.
Creating and editing tempo maps to change tempo, time signature, or rhythm during a song.
Explanation of the functions of IN/LOC1, OUT/LOC2, TO/LOC3, and END/LOC4 keys.
Configuring auto punch parameters like threshold, pre-roll, and post-roll times.
Turning loop playback on/off and setting IN/OUT points.
Using the Undo and Redo functions to reverse operations.
Configuring trigger recording parameters like threshold and pre-trig time.
Function of the ENTER key for parameter finalization.
Assigning analog and digital input sources to mixer channels 1-8.
Assigning analog input sources to mixer channels 9-16.
Adjusting EQ for analog inputs 1-4 during recording.
Using the built-in tuner to tune instruments or check track pitch.
Adjusting EQ for playback of tracks 1-4.
Adjusting EQ for playback of tracks 5-8.
Adjusting EQ for playback of tracks 9-12.
Adjusting EQ for playback of tracks 13-16.
Inverting the phase of mixer channels to correct stereo issues.
Selecting insert effect assignment, type, and insertion point.
Selecting and configuring insert effect 1, including its parameters.
Selecting and configuring insert effect 2.
Selecting and configuring insert effect 3.
Selecting and configuring insert effect 4.
Selecting and configuring insert effects 5 through 8.
Selecting and configuring master effect 1, including send and return levels.
Selecting and configuring master effect 2.
Setting the send level from mixer channels to master effect 1.
Setting the send level from mixer channels to master effect 2.
Setting the send level to the external AUX OUT jack.
Selecting and configuring the final effect applied to the master output.
Selecting channels or sources to solo for monitoring.
Selecting audio signals for monitoring and adjusting cue levels.
Setting AutoIn for monitoring input or track playback when tracks are in REC status.
Selecting channels or sources to solo for monitoring.
Parameters for Reverb-type effects (Hall, Room, Plate).
Parameters for Delay-type effects (L/C/R, Stereo, Multitap, Modulation, Dynamic, Auto Pan).
Parameters for Modulation effects (Chorus, Flanger, Phaser, Vibrato, Tremolo, Auto Pan, Ensemble).
Parameters for Dynamics effects (Compressor, Limiter, Multiband Limiter, Gate, Exciter/Enhancer, Decimator).
Parameters for Dynamics effects (Compressor, Limiter, Multiband Limiter, Gate, Exciter/Enhancer, Decimator).
Parameters for a stereo parametric 4-band EQ effect.
Parameters for Special Effects (Ring Modulator, Doppler, Analog Record, Talking Modulator).
Parameters for a stereo ring modulator effect.
Parameters for a stereo Doppler effect.
Parameters for a stereo analog record simulation effect.
Parameters for a stereo talking modulator effect.
Parameters for various large-size effects (Graphic EQ, Multiband Limiter, Vocoder, Pitch Shifter, Early Reflections, Rotary Speaker, Center Canceller).
Parameters for effects usable with 1in2outx2 configuration.
Parameters for a stereo 7-band graphic EQ.
Parameters for effects usable with 1in1outx4 configuration.
Parameters for Guitar Multi effects chains.
Parameters for effects usable with 1in1outx8 configuration.
Parameters for pre-amp simulator effects.
Parameters for the Distortion effect.
Parameters for the Noise Reduction effect.
Parameters for Compressor/Limiter effects.
Parameters for Compressor2 effect.
Parameters for the Limiter effect.
Parameters for Amp Simulator effects.
Parameters for Cabinet Resonator effects.
Parameters for the Gate effect.
Parameters for the Deesser effect.
Parameters for Chorus/Flanger effects.
Controlling effect parameters with expression pedals or MIDI.
Solutions for common problems like no sound, no playback, or recording issues.
Explanations of confirmation and error messages encountered during operation.
Information about the internal hard disk requirement and installation.
Step-by-step guide for installing the internal CD-R/RW drive.
Technical specifications covering recorder, MIDI, mixer, and effect sections.
General, power, and dimension specifications of the D1600.
Details on input and output connector specifications and levels.
Specifications for the AUX output connector.
Specifications for the headphone output connector.
Specifications for the S/P DIF digital input/output connectors.
Specifications for the SCSI connector.
Specifications for the MIDI IN/OUT connectors.
Specifications for the FOOT SW jack.
Specifications for the EXPRESSION PEDAL jack.
List of included accessories.
List of optional accessories.
Index entries starting with numbers.
Index entries starting with the letter A.
Index entries starting with the letter B.
Index entries starting with the letter C.
Index entries starting with the letter D.
Index entries starting with the letter E.
Index entries starting with the letter F.
Index entries starting with the letter G.
Index entries starting with the letter H.
Index entries starting with the letter I.
Index entries starting with the letter S.
Index entries starting with the letter T.
Index entries starting with the letter U.
Index entries starting with the letter V.
Index entries starting with the letter W.
Index entries starting with numbers.
Index entries starting with the letter A.
Index entries starting with the letter B.
Index entries starting with the letter C.
Index entries starting with the letter D.
Index entries starting with the letter S.
Index entries starting with the letter T.
Index entries starting with the letter U.
Index entries starting with the letter V.
Index entries starting with the letter W.
| Tracks | 16 |
|---|---|
| Simultaneous Recording Tracks | 8 |
| Simultaneous Playback Tracks | 16 |
| Internal Hard Drive | 20 GB |
| Sampling Frequency | 44.1 kHz |
| A/D Conversion | 24-bit |
| D/A Conversion | 24-bit |
| Built-in Effects | Yes |
| EQ | 3-band EQ per channel |
| MIDI | In/Out |
| CD-RW Drive | Yes |
| USB | No |
| Headphone Output | 1 |
| Display | 240 x 64 dot LCD |
| Phantom Power | Yes |