-
15 -
KingKORG Parameter Guide Parameters
Key Sync ............................................................................... [Off, On]
This specifies whether the arpeggiator will be synchronized to the keyboard.
If this is “On”, the arpeggiator will always start from the beginning of the
arpeggio pattern when you play the keyboard. If you are performing together
with other instruments, you can use this function to ensure that the arpeggio
pattern is aligned with the beginning of the measure.
Off:
Sync off. The arpeggio pattern will not be reset when you play the
keyboard.
On:
Sync on. The arpeggio pattern will be reset the moment you play the
keyboard.
Assign (Arp Timbre Assign) ........ [TimbreA, TimbreB, TimbreA+B]
This selects the timbre(s) that will be sounded by the arpeggiator.
TimbreA:
The arpeggiator will sound timbre A.
TimbreB:
The arpeggiator will sound timbre B.
TimbreA+B:
The arpeggiator will sound timbres A and B.
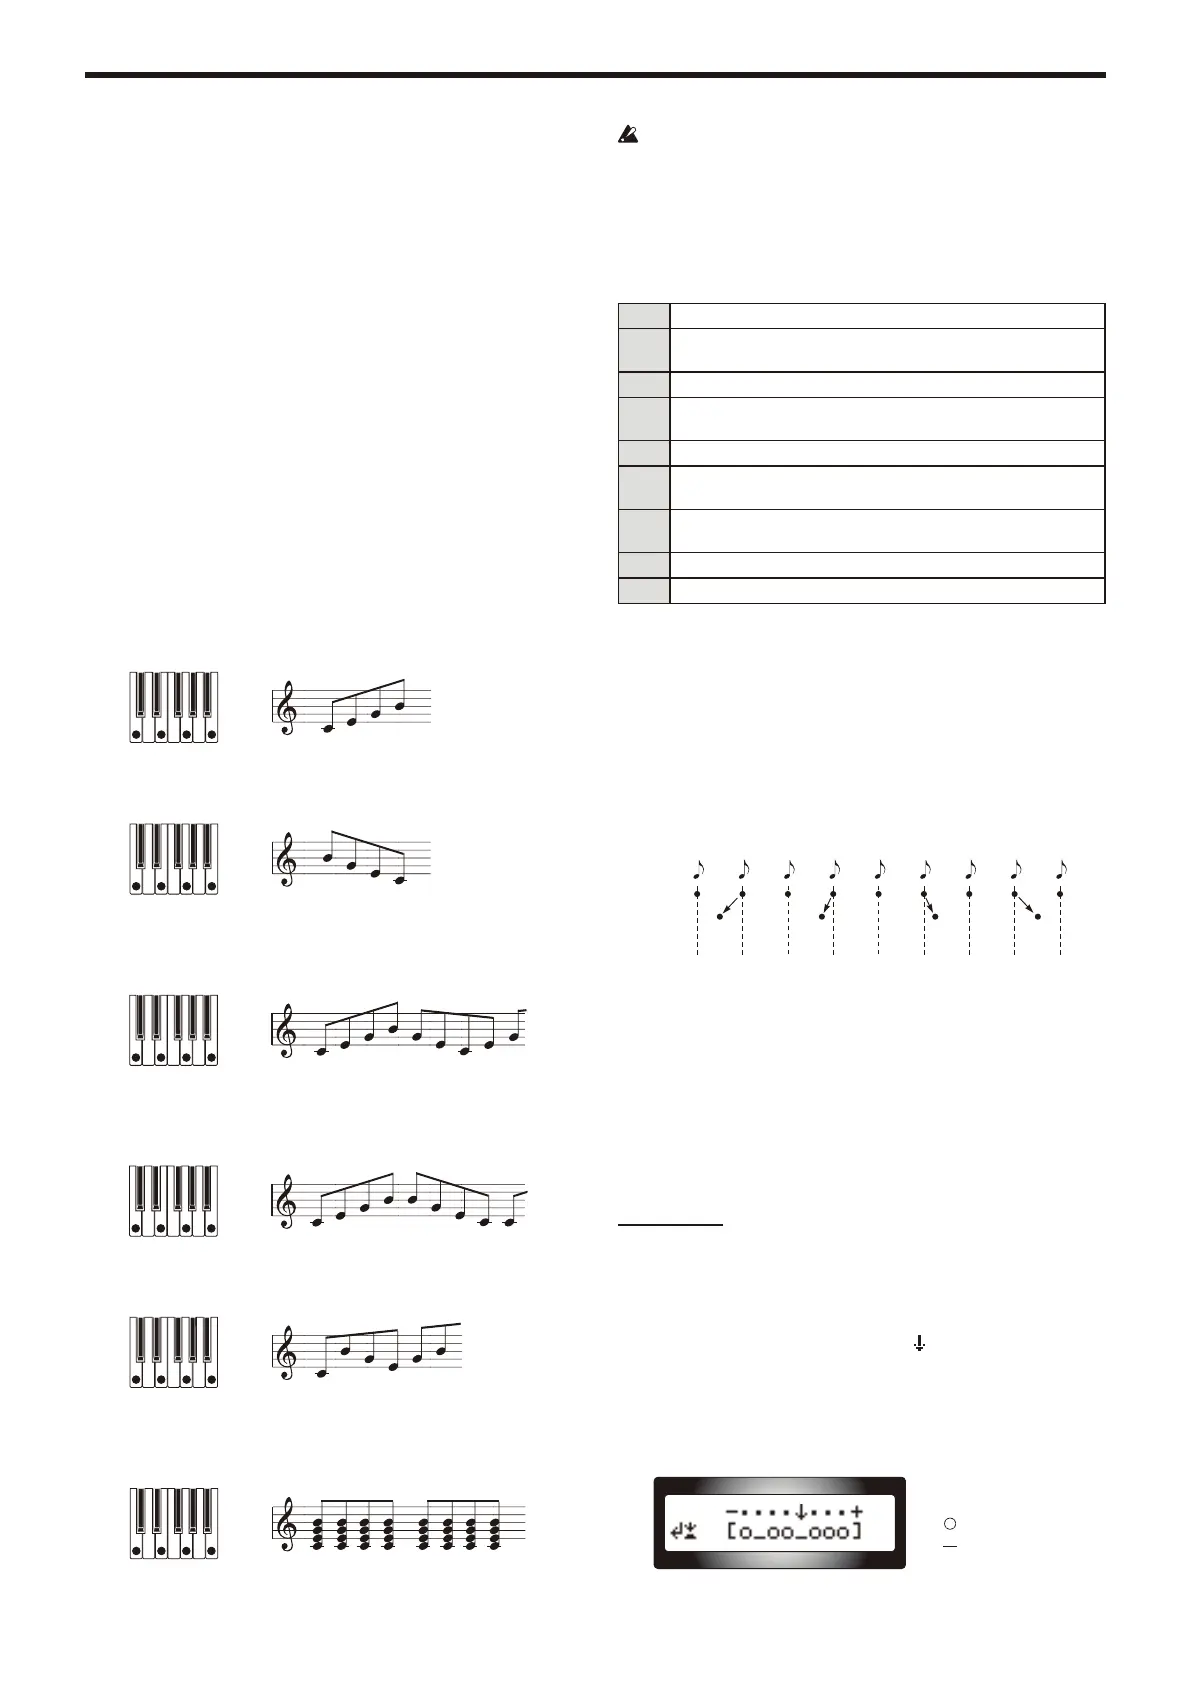
Type ................................. [Up, Down, Alt1, Alt2, Random, Trigger]
This selects the arpeggio type.
Up:
Notes will be played consecutively from low pitches to high.
Down:
Notes will be played consecutively from high pitches to low.
Alt1:
Up and Down will be alternated. (The highest and lowest notes will be
played once).
Alt2:
Up and Down will be alternated. (The highest and lowest notes will be
played twice, once on the way up, and once on the way down).
Random:
Notes will be played randomly.
Trigger:
The notes you are holding down will be played simultaneously at the
tempo and “Resolution” timing. The “Oct. Range” setting will be ignored.
If “Trigger” is selected, and a large number of keys are pressed
simultaneously, a maximum of six notes starting from the lowest pitch will
be detected and sounded. However if you’re using settings that cause a
single note to sound a large number of voices, limitations of the maximum
polyphony might mean that not all of the notes can be sounded.
Resolution ....................................................................... [1/32…1/1]
Specifies the resolution (spacing of the notes) relative to the tempo specified
by [TEMPO] knob.
1/32 The arpeggio will be played as 32nd notes at the specified tempo.
1/24 The arpeggio will be played as 16th note triplets at the specified
tempo.
1/16 The arpeggio will be played as 16th notes at the specified tempo.
1/12 The arpeggio will be played as 8th note triplets at the specified
tempo.
1/8 The arpeggio will be played as 8th notes at the specified tempo.
1/6 The arpeggio will be played as quarter note triplets at the specified
tempo.
1/4 The arpeggio will be played as quarter notes at the specified
tempo.
1/2 The arpeggio will be played as half notes at the specified tempo.
1/1 The arpeggio will be played as whole notes at the specified tempo.
Gate Time ...................................................................[000%...100%]
This specifies the duration (gate time) of the arpeggiated notes, as a
percentage (%). With a setting of “001%”, each note will be extremely short.
With set to “100%”, each note will continue playing until the next step.
Swing ......................................................................[–100%...+100%]
This specifies the percentage (%) by which even-numbered notes of the
arpeggio will be shifted in timing relative to the first note.
TIP:
A setting of “+33%” will produce a perfect shuffle timing.
When Resolution =1/8
123456789
Swing
–50 –25 +25 +50
Last Step ................................................................................... [1…8]
This specifies the number of valid steps (maximum number of steps) for the
arpeggiator.
Oct Range (Octave Range) ...................................................... [1…4]
This specifies the range of octaves over which the arpeggio will be played.
Step ..............................................................................................[_, o]
Here you can turn each step of the arpeggio pattern on/off. This is a way to
give more variety to arpeggios that might become boring.
This is available for the steps up to the Last Step.
Editing a step
1.
Press the PROGRAM (GLOBAL) button to enter Program mode.
2.
Use the PAGE +/– buttons to access the “a12:Arp” page.
3.
Press the VALUE dial.
4.
Use the PAGE+/– buttons to move the “ ” to the step that you want
to edit.
5.
Turn the VALUE dial to set the step on (o) or (_).
6.
Repeat steps 4–5.
7.
Press the VALUE dial to confirm the settings.
Step status
: The step will sound
: The step will not sound