EasyManua.ls Logo

Kreg Straight Edge Guide - User Manual

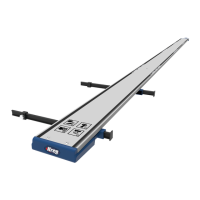
Kreg Straight Edge Guide
96 pages
Print Icon
To Next Page IconTo Next Page
Loading...
English
2
French (N. America)
17
Spanish (N. America)
33
French
49
Spanish
65
German
81
OWNER’S MANUAL
We’re here to help.
We want you to have an exceptional project building experience.
If you have questions or need support, please get in touch.
1-800-447-8638 | technicalsupport@kregtool.com
Tell us about your experience.
Your opinion counts. And we’re always looking for ways to improve.
Share your feedback so we can keep growing and innovating for you.
www.kregtool.com/feedback
WARNING Every user must read and follow instructions and safety precautions in this manual.
Failure to do so could result in serious injury. Save manual for future reference.
Straight Edge Guide
Manual applies to Item #
KMA4500 and KMA4500-E (Straight Edge Guide),
KMA4600 and KMA4600-E (Straight Edge Guide Extension),
KMA4700 and KMA4700-E (Straight Edge Guide XL)

Questions and Answers

  • C
    Courtney HughesSep 10, 2025
    How to clamp smaller material with Kreg Straight Edge Guide Power Tool Accessories?
    • H
      hilltammySep 12, 2025
      If the handle is too far away to clamp to smaller/narrow material when using Kreg Power Tool Accessories, remove a section of guide rail and use only one section. Reinstall the handle.
  • R
    Robert RhodesSep 12, 2025
    Why does my jigsaw vibrate the Kreg Straight Edge Guide Power Tool Accessories clamp loose?
    • D
      Daniel MorrisSep 12, 2025
      If the jigsaw vibrates the clamp loose when using Kreg Power Tool Accessories, check to ensure oscillating mode on your jigsaw is turned off.
  • V
    vphillipsSep 14, 2025
    How to fix indicator arm reach on Kreg Power Tool Accessories?
    • S
      Sierra YoungSep 14, 2025
      If the distance of the indicator arm does not reach to the blade for offset when using Kreg Power Tool Accessories, reinstall indicator arm facing the other way in clamp pads and recalibrate.
  • A
    Adam WatsonSep 16, 2025
    What if Kreg Straight Edge Guide guide rail is too short?
    • M
      Marcus StoneSep 16, 2025
      If the Kreg Power Tool Accessories guide rail is not long enough for larger pieces, purchase the Extension or XL version of this product.

Summary

Safety Precautions

Pre-Assembly

Recommended Tools;Materials (Not Included)

Lists tools and materials required but not provided with the product.

Hardware;Tools Included

Details the specific hardware and tools that are included in the product package.

Product Description

Assembly

Prepare the Upper Connector Bars

Instructions for preparing the upper connector bars by threading set screws into them.

Assemble the Connector Bars

Steps for assembling the upper and lower connector bars into the guide rail channels.

Attach the Guide Rails

Guidance on sliding and aligning guide rails onto the connector bars and tightening screws.

Install the Adjustable GripMaxx Clamp

Instructions for installing the adjustable GripMaxx clamp onto the underside of the guide rail assembly.

Install the Handle

Steps to slide the handle onto the guide rail and secure it with bolts and nuts.

Assemble the Cutline Indicator Stops

Process for installing thumb screws and nuts into the cutline indicator stops.

Install the Indicator Arms

Instructions for sliding indicator arms into the clamp and attaching indicator stops.

Calibration

Position the Saw and Make Reference Marks

Steps to position the saw on material and mark reference lines for calibration.

Align the Guide Rail to the Marks

Guidance on placing the guide rail on material and aligning it with reference marks.

Align the Cutline Indicator Arms

Instructions on sliding indicator arms and stops to align with material edges for calibration.

Operation

Measure and Mark Your Material

Steps to measure and mark the material edge for precise cutting.

Position the Guide Rail and Cutline Indicator Arms

How to position the guide rail and slide indicator arms to align with material marks.

Clamp the Straight Edge Guide in Place on Your Material

Method for securing the straight edge guide onto the material using the clamp.

Cut Your Material

Instructions on how to cut the material using the guide rail, ensuring the tool follows the rail.

Remove the Straight Edge Guide from the Material

Steps for safely detaching the straight edge guide from the material after cutting.

Tips and Tricks for Successful Operation

Trim Router Calibration

Trim Router Operation

Care and Maintenance

Troubleshooting

Assembly

Lists common problems and solutions related to the assembly of the guide rails.

Set Up and Operation

Addresses issues encountered during setup and operation, offering troubleshooting steps.

Kreg Straight Edge Guide Specifications

General IconGeneral
BrandKreg
ModelStraight Edge Guide
CategoryPower Tool Accessories
LanguageEnglish

Related product manuals