32
ENGLISH
MAKING COFFEE
a) Grinding
This product has a function of grinding coee beans. Before using this function, please make sure
that your grinder is well installed on the machine:
• Align the arrow marked on the bean hopper with the orange index on the machine (12).
• Then turn clockwise the bean hopper to x it on the machine (13).
1. Put coee beans in the bean hopper (14). It is best to grind only a quantity of beans sucient
for immediate use, so that the coee will always be fresh.
2. For your rst grind, start with the 10 (13). If this is too ne or too coarse, adjust the level
according to personal taste and the type of coee beans used. To do so, align the grinding
setting marked on the bean hopper with the orange index on the machine.
3. Adjust coee ground quantity by turning COFFEE QUANTITY selector (15). For your rst
grind, turn the dial to the middle setting. If you have too much quantity or too few, adjust the
quantity according to personal taste and the type of coee beans used. To do so, turn the dial
anticlockwise for less quantity of ground coee or turn it clockwise for more.
Note: In the beginning, it is normal to make a few attempts before nding the optimal settings.
We suggest you start with the recommended settings, then adjust them if necessary, following
the suggestions in section “Adjusting your espresso results”.
4. Choose your lter and insert it in the portalter (16).
• Single wall lters are dedicated for fresh whole coee beans, this is recommended.
• Dual wall lters are dedicated for pre-ground coee (for example decaeinated). It will
help to create a good crema.
5. It’s recommended to insert the funnel on the portalter to avoid coee powder spilling out.
You can also grind and tamp without funnel (16).
6. Insert the portalter (with or without the funnel) into the coee grinder outlet (20).
All machines have been tested; you may have some coee
residue and water drops on the appliance.
Before the rst use of the machine or when it has not been used for a long time, you should follow
below steps to rinse and warm up the internal pipes of the machine.
1. Check and ensure that all accessories are complete and not damaged.
2. Remove the orange plug under the water tank (58).
3. Insert a water lter in the water tank by using its lter insertion accessory (55).
4. Fill the water tank with clean water, and water level should not exceed the “MAX” position (2).
5. Plug into the main socket (4). Press POWER button (5).
6. Place a container with a minimum capacity of 500ml/17.5 oz under the hot water outlet (6).
7. Select HOT WATER (7) and press START/STOP BREW (8) button to clean hot water hydraulic
circuit. Delivery and stops automatically.
8. Insert one of the lters in the portalter (9) (no ground coee is placed at this moment) and
insert the portalter under the brewing head (anti-clockwise) to lock it tightly (25).
9. Place the container under the portalter (6).
10. Select LUNGO (10) and Press START/STOP BREW (8) button to clean coee hydraulic circuit.
Hot water will come out from the portalter. Delivery stops automatically.
11. Place the container under the steam wand (6).
12. Select STEAM (11) and wait for the machine to be pre-heated until the indicator becomes
xed white and press START/STOP BREW (8) button and deliver steam for a few seconds to
rinse the steam circuit. Press again the button to stop the delivery.
The appliance is ready for use.
Note: Do not extend any parts of your body closed to portalter and steam wand to avoid scalding
during operation.
7. Select 1 cup or 2 cup by pressing CUPS button, depending on the lter you chose (18).
Note: If the lights above the 1 or 2-cup selection button are turned o, it is because your RECIPES AND
CLEANING dial is on Hot Water, Steam or Calc. Please turn it to Espressos, Lungo or Americano (10).
8. Press START/STOP GRIND button (19) to start grinding. The grinder will automatically stop
after reaching the set grinding quantity. You can also press START/STOP GRIND button to
stop halfway.
Note: Do not leave the portalter under the grinder coee outlet when not used.
b) Tamping
1. After grinding, remove the portalter from the bracket.
2. Place the pad (under of the portalter) on the edge of your countertop to have better stability
(24).
3. Use the tamper and apply it rmly to compact the ground coee. It should be at and evenly
tamped to avoid bad coee extraction. To make it at, refer to the horizontal line of your
tamper base, it should be parallel to the top of your portalter (24).
c) Brewing
1. Insert the portalter with tamped ground coee into the brewing head and lock it tightly (25)
2. Select pre-infusion time from 2, 5, 8 seconds (26).
Note: The longer the pre-infusion time, the better the aromas will be from your coee.
3. Select coee preparation temperature from Low, Middle, High (27).
4. Select the desired beverage (52).
5. Place a cup (or 2 cups) on the drip tray according to your selection (28). For Americano, please
choose a suciently large cup to t for both coee outlets and hot water outlet.
6. Once light indicator of the START/STOP BREW button becomes xed white, press START/STOP
BREW button to start brewing (8). Delivery of the coee will stop automatically. You can also
press START/STOP BREW button to stop halfway.
7. Do not forget to eject the coee cake after the extraction (31).
Note: If you want to make a second coee just after, you must wait 30 sec for the pre-heating of
the machine.
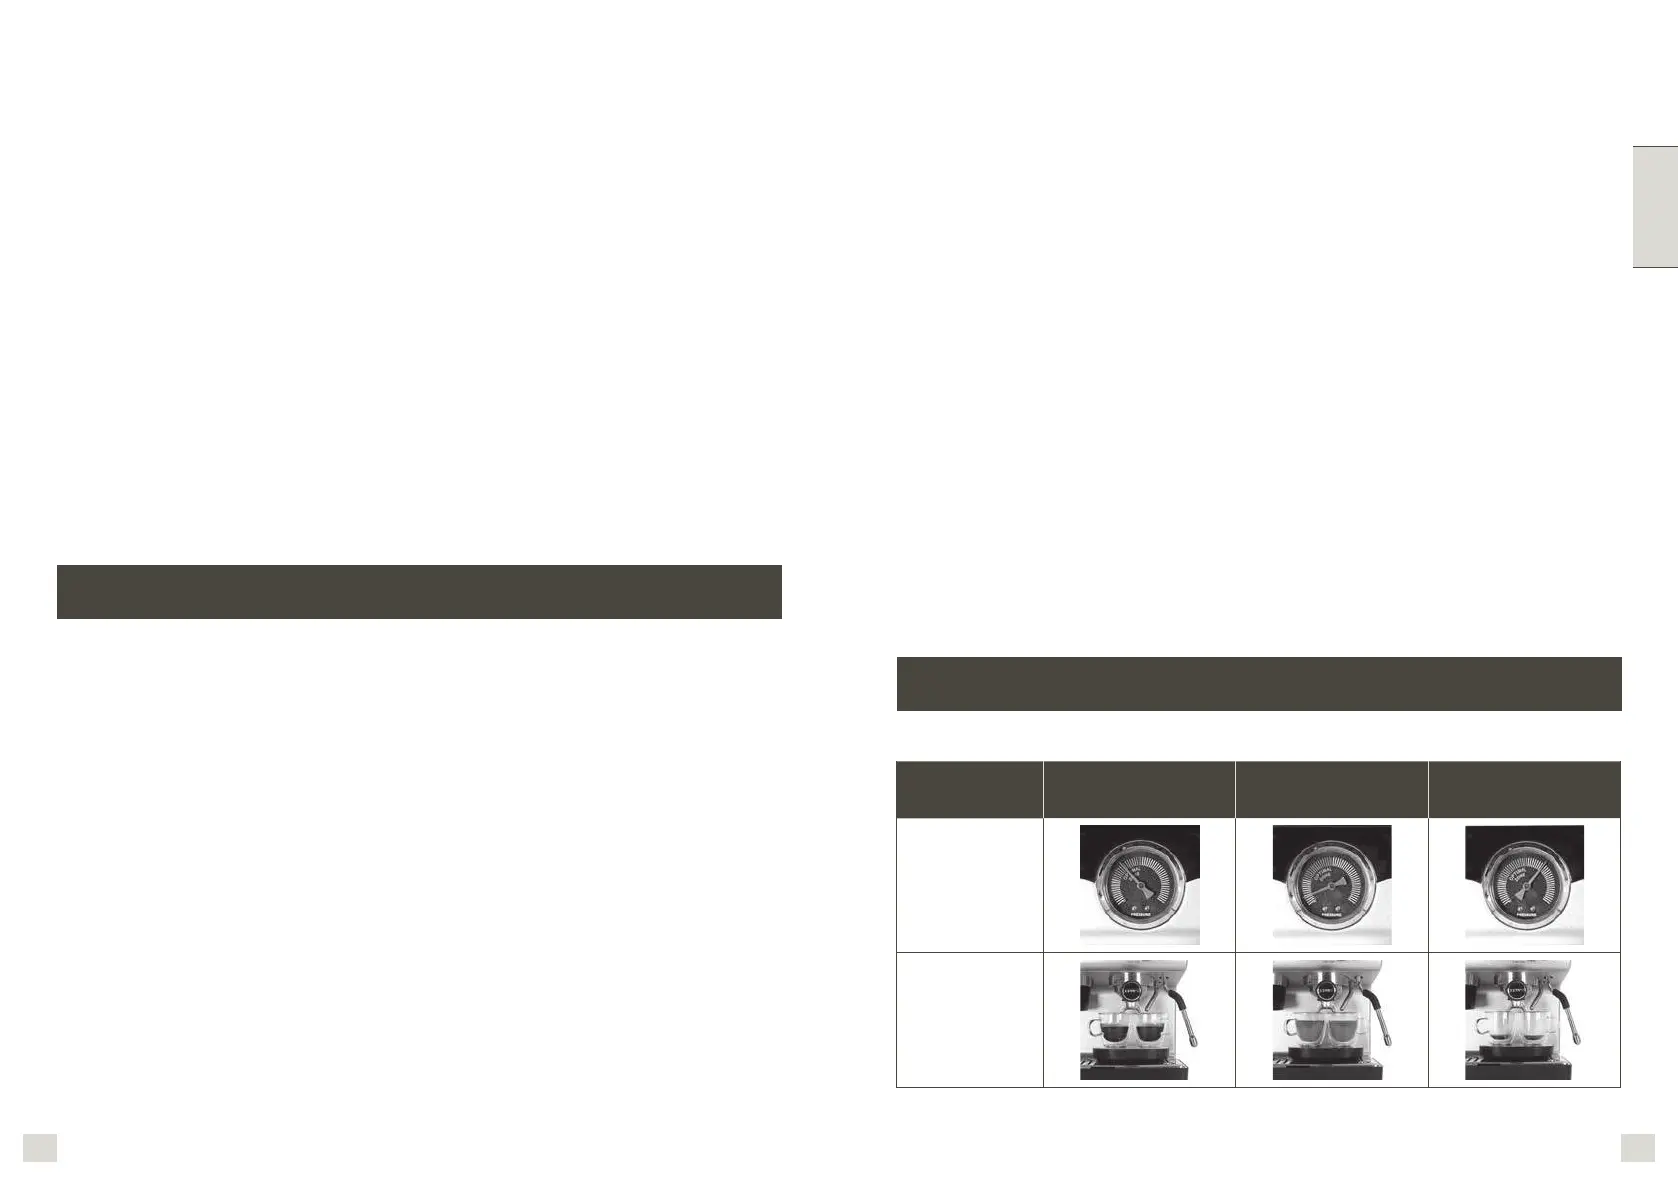
ADJUSTING YOUR ESPRESSO RESULTS
CORRECT
EXTRACTION
UNDER
EXTRACTION
OVER EXTRACTION
Manometer
Result
a) Extraction