X-431 ADAS PRO Calibration Tool User Manual
30
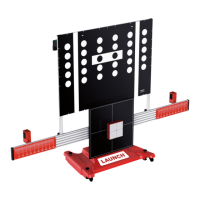
holes (Each side has two) reserved on the calibration frame. User can choose to
install the laser distance meter on either side of the calibration frame to your
preference.
Fig. 4-8
2). Install the level gauge on the top of the fixing bracket. Make sure that the mouting
holes on the fixing bracket are aligned with the ones on the calibration frame and
use the screws to secure it in place.
Fig. 4-9