EasyManua.ls Logo

Launch X-431 ADAS PRO User Manual

Launch X-431 ADAS PRO
64 pages
To Next Page IconTo Next Page
Page #1 background imageLoading...
Page #1 background image
X-431 ADAS PRO Calibration Tool User Manual
i
Copyright Information
Copyright © 2019 by LAUNCH TECH. CO., LTD. All rights reserved. No part of this
publication may be reproduced, stored in a retrieval system, or transmitted in any form
or by any means, electronic, mechanical, photocopying, recording or otherwise, without
the prior written permission of LAUNCH.
Neither LAUNCH nor its affiliates shall be liable to the purchaser of this unit or third
parties for damages, losses, costs, or expenses incurred by purchaser or third parties
as a result of: Accident, misuse, or abuse of this unit, or unauthorized modifications,
repairs, or alterations to this unit, or failure to strictly comply with LAUNCH operating
and maintenance instructions. LAUNCH shall not be liable for any damages or
problems arising from the use of any options or any consumable products other than
those designated as Original LAUNCH Products or LAUNCH Approved Products by
LAUNCH.
All information, specifications and illustrations in this manual are based on the latest
information available at the time of printing. LAUNCH reserves the right to make
changes at any time without prior written or oral notice.
Trademark Information
LAUNCH is a registered trademark of LAUNCH TECH CO., LTD. (LAUNCH) in China
and other countries. All other LAUNCH trademarks, service marks, domain names,
logos, and company names referred to in this manual are either trademarks, registered
trademarks, service marks, domain names, logos, company names of or are otherwise
the property of LAUNCH or its affiliates. In countries where any of the LAUNCH
trademarks, service marks, domain names, logos and company names are not
registered, LAUNCH claims other rights associated with unregistered trademarks,
service marks, domain names, logos, and company names. Other products or
company names referred to in this manual may be trademarks of their respective
owners. You may not use any trademark, service mark, domain name, logo, or
company name of LAUNCH or any third party without permission from the owner of the
applicable trademark, service mark, domain name, logo, or company name. You may
contact LAUNCH by visiting the website at www.cnlaunch.com, or writing to LAUNCH
TECH. CO., LTD., Launch Industrial Park, North of Wuhe Avenue, Banxuegang,
Bantian, Longgang, Shenzhen, Guangdong, P.R.China, to request written permission
to use Materials on this manual for purposes or for all other questions relating to this
manual.
Question and Answer IconNeed help?

Do you have a question about the Launch X-431 ADAS PRO and is the answer not in the manual?

Launch X-431 ADAS PRO Specifications

General IconGeneral
BrandLaunch
TypeADAS Calibration Tool
Operating SystemAndroid
Display Size10.1 inches
ConnectivityWi-Fi, Bluetooth
FunctionADAS Calibration
DisplayTouchscreen
SoftwareX-431 ADAS Software
CompatibilitySupports multiple vehicle makes and models
Power SupplyRechargeable Battery
DimensionsVaries with components
WeightVaries with components

Summary

1 Safety Precautions

Warning Symbols and Definitions

Explanation of warning symbols used in the manual to indicate potential hazards and precautions.

General Safety Precautions for Calibration Tool

General guidelines for safe operation and handling of the X-431 ADAS PRO calibration tool.

2 Product Description

2.1 ADAS Calibration Tool Profile

Overview of Advanced Driver Assistance Systems (ADAS) and the role of the calibration tool.

2.2 Packing List and Components

Details of the items included in the X-431 ADAS PRO calibration tool package.

3 Knowledge of X-431 ADAS PRO Calibration Tool

3.1 X-431 ADAS PRO Calibration Tool Components

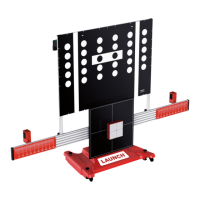
Description of the main components and features of the X-431 ADAS PRO calibration tool.

3.2 Base Support Assembly

Details on the base support assembly, its parts, and adjustment screws.

3.3 Beam Lifter (Upstand) Operation

Information on the beam lifter, its controls, and how to adjust height.

3.4 Calibration Frame and Cross Member Setup

Instructions for assembling the calibration frame and cross member.

3.5 Laser Module Installation and Battery

Details on the laser module, its output, mounting, and battery replacement.

3.6 3 Points Wheel Alignment Clamp

Information on the 3 points wheel alignment clamp and its attachment.

3.6.1 Installing Attachment Bracket on Wheel Clamp

Step-by-step guide for installing the attachment bracket onto the wheel clamp.

3.6.2 Installing Laser Module on Wheel Clamp

Procedure for mounting the laser module onto the wheel clamp.

3.6.3 Attaching Wheel Clamp to Vehicle Tyre

Instructions on how to properly attach the wheel clamp to the vehicle's tyre.

3.7 Radar Kit Components

Description of the components that make up the radar kit.

3.8 Laser Distance Meter

Details on the laser distance meter, including battery installation and operation.

3.8.1 Installing Laser Distance Meter Battery

Steps for installing or replacing the batteries in the laser distance meter.

3.8.2 Laser Distance Meter Operation Tips

Guidance on using the laser distance meter, including reference edge settings.

4 Initial Use

4.1 Installing the ADAS Calibration Tool

Step-by-step instructions for assembling the main components of the ADAS calibration tool.

4.1.1 Installing Beam Lifter on Base Support

Detailed steps for attaching the beam lifter to the base support.

4.1.2 Installing Cross Member and Calibration Frame

Procedure for mounting the cross member and calibration frame onto the beam lifter.

4.1.3 Installing the Radar Kit

Instructions for attaching the radar kit to the cross member for radar calibration.

4.1.4 Installing Calibration Reference Pattern

Guide on how to attach the vehicle-specific calibration pattern to the frame.

4.2 Activate Software Calibration Function

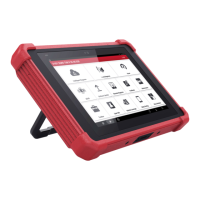
Steps to activate the ADAS calibration software on the diagnostic tool.

5 Working with the ADAS Calibration Tool

5.1 Preconditions for ADAS Calibration Tool Use

Requirements and conditions necessary before using the ADAS calibration tool.

5.1.1 Workstation Size Requirements

Specifications for the required workstation dimensions for calibration.

5.1.1.1 Workstation Size for Front Cameras

Detailed workstation size requirements for front camera calibration.

5.1.1.2 Workstation Size for Rear & AVM Cameras

Workstation size requirements for rear and AVM camera calibration.

5.1.2 Workstation Ground Requirements

Ensuring the vehicle is parked on an even floor surface for accurate calibration.

5.1.3 Workstation Lighting Requirements

Guidelines for proper lighting conditions in the calibration workstation.

5.2 Calibrating Camera-based ADAS

General steps and procedures for calibrating camera-based ADAS systems.

5.2.1 Calibrating the Front Camera

Detailed guide for calibrating the vehicle's front camera system.

5.2.1.1 Placing ADAS Panel in Front of Vehicle

Steps to connect the diagnostic tool and place the ADAS calibration panel correctly.

5.2.1.2 Placing ADAS Panel Centered

Ensuring the ADAS calibration panel is centered in front of the vehicle.

5.2.1.3 Placing ADAS Panel Parallel to Vehicle

Aligning the ADAS calibration panel parallel to the vehicle.

5.2.1.4 Setting Calibration Frame Height

Adjusting the height of the calibration frame using the beam lifter.

5.2.2 Calibrating Rear & AVM Camera

Instructions for calibrating the vehicle's rear and AVM camera systems.

5.3 Calibrating Radar-based ADAS

Guide for calibrating radar-based ADAS systems using the radar expansion kit.

5.3.1 Calibrating Radar Sensor with Magnetic Laser

Procedure for calibrating the radar sensor using the magnetic laser.

5.3.2 Calibrating Radar Sensor without Magnetic Laser

Steps for calibrating the radar sensor without the magnetic laser.

6 Care & Maintenance

Handling and Lubrication Guidelines

Guidelines for handling spare parts and lubricating moving components.

Cleaning the Calibration Tool

Instructions for cleaning the ADAS calibration tool using appropriate cleaning agents.

Using Original Spare Parts for Replacements

Importance of using original spare parts for replacing damaged accessories.

Appendix: Car ADAS Reference Pattern Kit

Front Camera Panels Kit Configuration

List and configurations of reference patterns for front camera calibration.

Rear Camera & AVM Panels Configuration (Asian)

Configurations of reference patterns for Asian vehicles' rear and AVM cameras.

Rear Camera & AVM Panels Configuration (American)

Configurations of reference patterns for American vehicles' rear and AVM cameras.

Rear Camera & AVM Panels Configuration (European)

Configurations of reference patterns for European vehicles' rear and AVM cameras.

Corner Radar Reflector Configuration

Details on the corner radar reflector configuration for ADAS calibration.

Related product manuals